Fire Incident Documentation Release Notes: November 2025
New Features
Implement Unit Actions Behavior for Aiding Apparatus in NERIS
What - NERIS now properly handles Actions Taken for Aiding Apparatus, ensuring that deleting apparatus with incomplete action data no longer triggers invalid validation errors in the Operations section. The system includes automatic data cleanup logic that removes residual references when apparatus are deleted, and refined validation checks that only display legitimate errors for missing data rather than phantom errors from deleted apparatus records. This improvement enhances data integrity and ensures incident reports can be completed and authorized without unnecessary validation blocks.
Why - This enhancement was implemented to resolve validation issues that prevented users from completing and authorizing incident reports, improving user experience and ensuring validation errors only appear for legitimate missing data rather than deleted apparatus references.
How - No manual configuration is required to utilize this improvement:
Add and document Actions Taken for Aiding Apparatus in Operations/Actions as you normally would
If you need to delete an apparatus that has incomplete Action Taken data, the system will automatically clean related references from the incident report
Validation errors will only display for genuine missing or incomplete data, not for deleted apparatus
You can now finalize and authorize incident reports without encountering false validation errors from incomplete or removed apparatus records
Note: This behavior applies to both NERIS and NFIRS client environments
Use Case - A fire captain is completing a NERIS report for a mutual aid incident where three engines from neighboring departments assisted. While documenting the Actions Taken in the Operations section, they realize that one of the aiding apparatus was incorrectly added to the incident and needs to be removed before completing the action documentation for that unit. The captain deletes the incorrect apparatus entry from the report. Previously, this deletion would have left residual data references that triggered validation errors in the Operations section, blocking report authorization even though the apparatus was no longer part of the incident. With this enhancement, the system automatically cleans up the related action references when the apparatus is deleted, and the captain can complete and authorize the incident report without encountering phantom validation errors, ensuring accurate documentation of only the apparatus that actually responded to the incident.
CAD Designation Restrictions with NERIS Update
What - Validation and synchronization for CAD Designations has been introduced for station and unit data integration with NERIS via API, ensuring consistent and compliant data exchange between systems. For NERIS-enabled clients, the Associate Dispatch Unit field is now mandatory in the Apparatus Catalog, and the CAD Designation field is required when creating or editing apparatus records. The NERIS readiness checklist validates that CAD Designation is not empty and meets NERIS regular expression requirements. Apparatus records with invalid or missing CAD Designations are rejected by NERIS and logged in the Export Log for correction and reprocessing, while the CAD Designation field remains optional for NFIRS-only clients.
Why - This enhancement was implemented to ensure data compliance with NERIS requirements, prevent apparatus registration failures, and maintain consistent data quality when exchanging station and unit information between First Due and NERIS systems.
How - To ensure apparatus records meet NERIS CAD Designation requirements:
Navigate to Apparatus Catalog
When creating or editing apparatus records, ensure both:
Run the NERIS readiness checklist to validate CAD Designation compliance before submitting data
If apparatus records are rejected, review the NERIS Export Log to identify failed records
Correct any invalid or missing CAD Designations in the flagged apparatus records
Resend the corrected apparatus information to NERIS
Note: CAD Designation validation only applies to NERIS-enabled clients; NFIRS-only clients are not required to complete this field
Note: A fallback value is used when a valid CAD Designation is not available to prevent data transmission failures
Use Case - A fire department is preparing to transition from NFIRS to NERIS reporting and needs to register all their apparatus with the state system. The fleet manager reviews their apparatus catalog and notices that Engine 3 has "Associate Dispatch Unit" populated as "E3" but the CAD Designation field is empty. When they run the NERIS readiness checklist, the system flags Engine 3 as having an invalid CAD Designation. The fleet manager opens the apparatus record, enters the proper CAD Designation "ENG03" that matches their dispatch system's format and meets NERIS regular expression requirements, and saves the record. After correction, they re-run the readiness checklist and Engine 3 now passes validation. When the apparatus data is transmitted to NERIS, all units are successfully registered. If they had proceeded without correcting the CAD Designation, Engine 3 would have been rejected by NERIS and appeared in the Export Log, requiring manual correction and resubmission before the unit could be used in NERIS incident reporting.
Multi-Client NERIS Entity ID Configuration
What - The system now supports Multi-Client NERIS Entity ID Configuration, enabling NERIS customers who manage multiple agencies or departments to submit incidents under different NERIS Entity IDs. This functionality mirrors the existing NFIRS multi-FDID capability but is specifically designed to align with NERIS validation rules and data integrity requirements. The feature allows customers to manage multiple NERIS Entity IDs within a single account, select the appropriate Entity ID during incident reporting, and automatically register all stations and apparatus under each configured Entity ID. The system includes validation controls to ensure proper Entity ID formatting (FD followed by 8 digits), prevents deletion of Entity IDs currently in use, and maintains read-only visibility of NERIS-returned station and apparatus identifiers for each department. All registration activities and export operations are logged for transparency and troubleshooting purposes.
Why - This enhancement was implemented due to customer request to accommodate public safety organizations that operate multiple departments or agencies under separate NERIS Entity IDs while using a single software platform. Previously, NERIS customers were limited to a single Entity ID per account, which created operational challenges for multi-department organizations that needed to maintain distinct reporting identities for state submission purposes. This capability ensures that each department's incidents are properly attributed to the correct NERIS Entity ID during state exports, maintains compliance with NERIS registration requirements that prohibit sharing stations and apparatus across entities without duplication, and provides the same multi-entity flexibility that NFIRS customers already enjoy.
How - To configure and use Multi-Client NERIS Entity IDs:
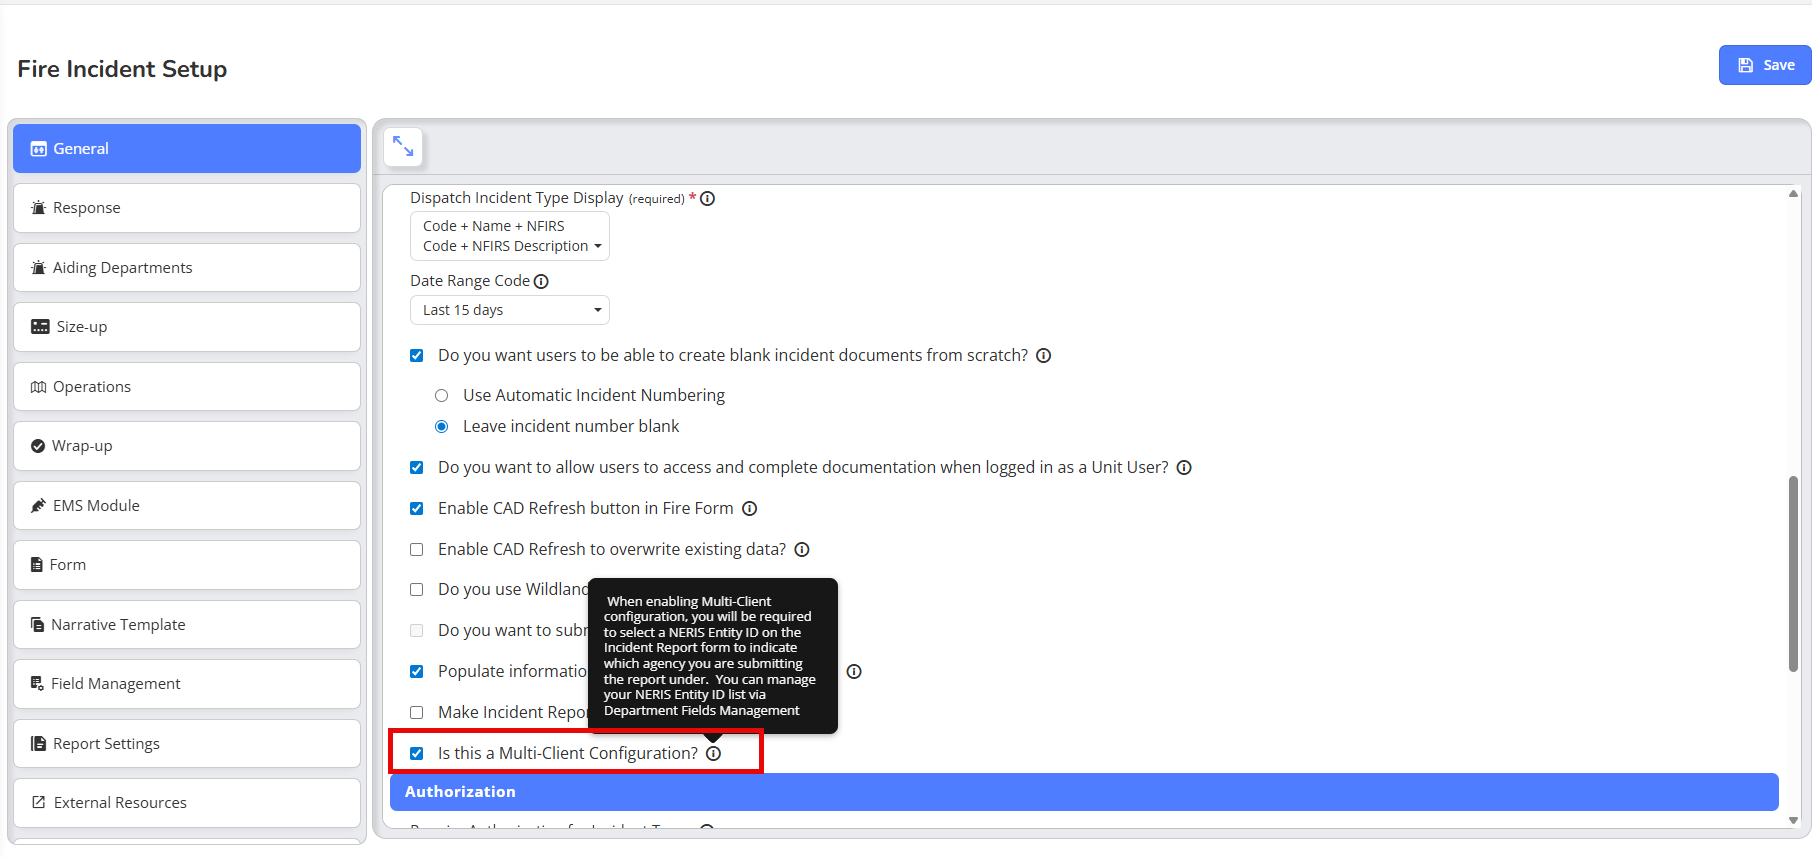
Navigate to Fire Incident Setup → General → General
Set
Is this a Multi-Client Configuration? to
Yes (this setting is only visible for NERIS clients with an existing NERIS Entity ID configured)
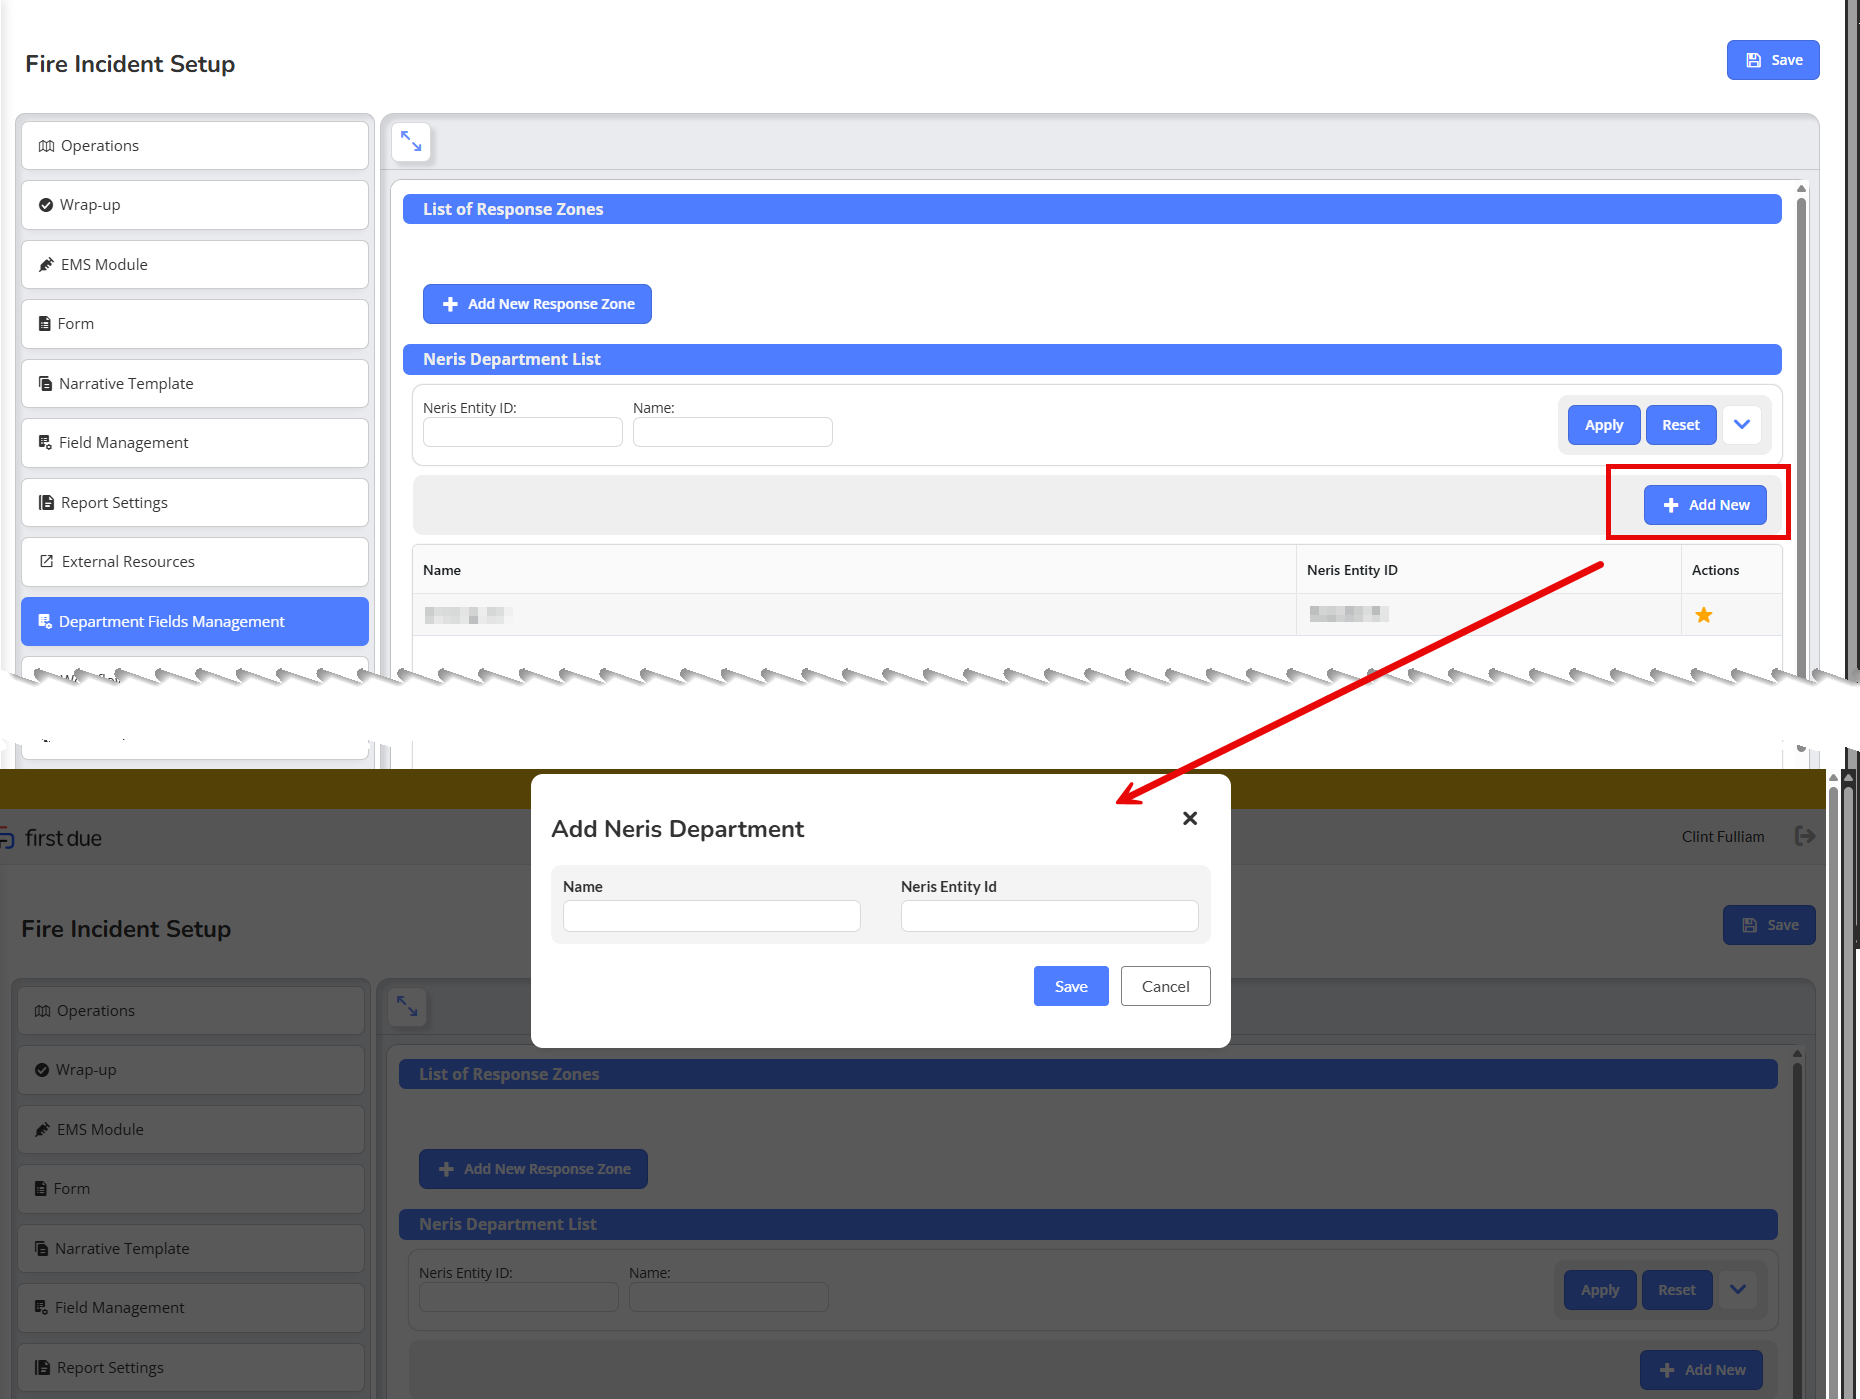
Access Fire Incident Setup → Department Fields Management → NERIS Entity IDs to add additional Entity IDs
Enter a Name and NERIS Entity ID for each department (Entity ID must follow the format FD######## - FD followed by 8 digits)
Upon saving each new Entity ID, the system automatically registers all stations and non-archived apparatus under that Entity ID and logs the results
When creating or editing incident reports, navigate to Response → Dispatch and select the appropriate NERIS Entity ID from the dropdown (this field appears after Special Incident Modifier)
The selected Entity ID will determine the export endpoint and payload used during state submission
Note: Once an Entity ID is associated with incidents, it cannot be edited or deleted; if Multi-Client Configuration is later disabled, all incidents will automatically revert to using the main Entity ID
Use Case - A county fire department manages three separate volunteer fire districts, each requiring independent NERIS reporting under distinct Entity IDs: FD12345678 for District 1, FD87654321 for District 2, and FD11223344 for District 3. The department administrator enables Multi-Client Configuration and adds all three Entity IDs to the system, which automatically registers each district's stations and apparatus under their respective Entity IDs. When District 2 responds to a structure fire, the incident report creator selects Entity ID FD87654321 from the NERIS Entity ID dropdown in the Dispatch section, ensuring that when the incident is exported to the state, it appears under District 2's identity with the correct station and apparatus associations. The department can view read-only NERIS-returned identifiers for each district's resources on the Department edit page, and all registration activities are tracked in the export logs for audit purposes. If a new station is added to District 1, the system automatically registers it under all three Entity IDs to maintain consistency across the multi-client configuration.
Enhancements
Improved Inactivity Timer Recognition in NERIS & NFIRS Reports
What - The inactivity timer functionality in NERIS and NFIRS reports has been enhanced to accurately recognize all active user interactions, including typing, scrolling, searching, and clicking within slide outs and narrative boxes. The system now continuously monitors these interaction types and properly resets the inactivity timer when any activity is detected, ensuring the inactivity pop-up only appears after genuine periods of inactivity rather than interrupting users who are actively working on reports. Autosave functionality now detects changes in narrative sections (Apparatus, People Involved/EMS, Department, and Impediments), preventing inappropriate inactivity warnings during active documentation.
Why - This enhancement was implemented to resolve issues where the inactivity pop-up was incorrectly appearing while users were actively completing incident narratives, causing frustrating interruptions and potential data loss concerns during critical documentation tasks.
How - No configuration changes are required to benefit from this improvement:
Continue working in NERIS or NFIRS reports as normal, including typing in narrative fields, scrolling through forms, searching within pop-ups, or clicking on elements
Any of these interactions will automatically reset your inactivity timer, keeping your session active
If the inactivity pop-up does appear after genuine inactivity (based on your configured timeout period), you have two options:
Note: Narrative changes in Apparatus, People Involved/EMS, Department, and Impediments sections are automatically detected by the autosave function, preventing inactivity warnings while you're actively documenting
Note: Filling in apparatus narratives from the pre-populated list also counts as detected activity
Use Case - A paramedic is completing a complex EMS narrative in a NERIS report, documenting patient care and transport details for a cardiac arrest call. They spend several minutes typing detailed observations, occasionally scrolling up to review earlier sections, and searching through medication lists in a slideout panel. Previously, the inactivity pop-up would interrupt them mid-documentation, forcing them to click "Stay" and potentially disrupting their documentation flow. With this enhancement, all their typing, scrolling, and searching activities are recognized as active interaction, the inactivity timer continuously resets, and they can complete their comprehensive narrative without interruption. The inactivity pop-up will only appear if they genuinely step away from their computer for the configured timeout period, at which point they can choose to stay and continue or save and exit.
NERIS ZIP Code Validation in Readiness Checklist
What - The Readiness Checklist now includes enhanced validation to ensure all fire station addresses contain a valid ZIP code before allowing NERIS data submission. When a station address is missing or has an invalid ZIP code, the system displays an "Incorrect Station Address" error message, preventing users from proceeding until the address is corrected to include all required components (street number and name, city, state, and ZIP code). This validation uses the same logic applied during NERIS submission, ensuring consistency between the readiness check and actual data transmission requirements.
Why - This enhancement was implemented to prevent submission errors and reduce workflow disruptions caused by incomplete station addresses that previously passed the readiness checklist but failed during NERIS data transmission, ensuring data quality and alignment between validation checkpoints.
How - To ensure your station addresses pass NERIS readiness validation:
Navigate to the Readiness Checklist page
Review any stations displaying the "Incorrect Station Address" error message
Update the flagged station address to include all required components in the format: # and address, City, State, ZIP Code (example: 54 Miramar Blvd, Miramar, FL 33025)
Verify that the ZIP code is present and valid
Re-run the readiness checklist to confirm the station now passes validation
Note: Addresses selected from autocomplete must include a ZIP code to pass validation
Note: The same validation logic applies to both the readiness checklist and NERIS submission, preventing discrepancies between the two processes
Use Case - A fire department administrator is preparing to submit their monthly NERIS report and runs the Readiness Checklist to ensure all stations are configured correctly. The checklist displays an "Incorrect Station Address" error for Station 3, which has the address "Pasadena Blvd, Pasadena, TX, USA" without a ZIP code—an incomplete address that was previously accepted by the checklist but would have caused a submission failure. The administrator updates the address to "1250 Pasadena Blvd, Pasadena, TX 77506" with the complete ZIP code, re-runs the checklist, and confirms that Station 3 now passes validation. When they proceed to submit the NERIS data, the submission completes successfully without any address-related errors, saving time and eliminating the need to troubleshoot failed submissions.
NERIS Add 'None' as Option to Water Supply List
What - A new "None" option has been added to the Water Supply dropdown in the Incident Information form, allowing fire department officers to accurately document incidents where no water supply was used. This option persists across all incident statuses (Incomplete, Pending Authorization, and Authorized), can be used as a condition for triggering workflows, and is recognized as a valid value for required field compliance. The addition aligns First Due with the water supply values available in NERIS Swagger, ensuring complete and accurate incident documentation.
Why - This enhancement was implemented to provide fire departments with the ability to accurately document incidents that did not require or utilize a water supply, filling a documentation gap and ensuring compliance with NERIS reporting standards.
How - To use the new "None" water supply option:
Navigate to Incident Information within your NERIS incident report
Locate the Water Supply dropdown field
Select "None" from the dropdown list when documenting incidents where no water supply was used
Save your incident—the selected value will persist across all status changes
Note: If you have workflows configured based on Water Supply conditions, "None" can be used as a trigger criterion
Note: Incidents created before this update will retain their original water supply values, but "None" will become available if you edit the Water Supply field
Note: "None" is recognized as a valid value for required field validation
Use Case - A fire engine responds to a vehicle fire on a highway where the crew uses only portable extinguishers and foam from their apparatus to suppress the fire. No hydrants, tankers, or other water supply sources were utilized during the incident. The officer completing the NERIS report can now select "None" from the Water Supply dropdown, accurately documenting that no external water supply was used for this incident. Additionally, if the department has configured a workflow to automatically flag incidents with no water supply for training review or statistical tracking, selecting "None" will trigger that workflow, ensuring proper documentation and follow-up for incidents handled without traditional water supply resources.
Add Command Established Time/Date to NFIRS Notification Table
What - A new "Command Established Time/Date" field has been added to the NFIRS Notification Table, capturing command establishment information from incident reports. This field is automatically populated with values entered in either Dispatch > Response > Command Established (Time) or Operations > Command and Safety > Initial Command Established > Date/Time sections. The field is accessible through the API for integration with external systems and is available in both NFIRS and NERIS notifications, ensuring consistent command timeline documentation across all reporting platforms.
Why - This enhancement was implemented to maintain data consistency between incident reports and NFIRS/NERIS notifications, ensuring that critical command establishment timeline information is preserved throughout the reporting workflow and accessible for state reporting and external system integration.
How - No manual configuration is required to utilize this field:
Record the command establishment time during incident documentation in either:
Dispatch > Response > Command Established (Time), or
Operations > Command and Safety > Initial Command Established > Date/Time
The Command Established Time/Date will automatically populate in the NFIRS Notification Table
The field is accessible through the API for external reporting and integration needs
Note: This field is available for both NFIRS and NERIS notifications
Use Case - A battalion chief arrives at a working structure fire and establishes command at 14:23. The dispatcher or incident commander enters this time in the Dispatch > Response > Command Established field during the incident documentation. When the incident data is transmitted to the state NFIRS system, the Command Established Time/Date of 14:23 is automatically included in the NFIRS notification, ensuring the state receives complete timeline information about when incident command was formally established. If the department uses integrated reporting software that pulls data via API, that external system can also access the command established time for analysis of response effectiveness and command timeline metrics without requiring manual data re-entry or reconciliation between different data sources.
Separate Read Permission from Update Permission
What - The permission structure for Incident Reporting has been refined to separate Read permissions from Update permissions, ensuring users with Read access can view complete report contents without the ability to edit, start, or modify them. Users granted only Read permission will see the 👁️ (view) icon for reports, while the ▶️ (start) and ✏️ (edit) icons are hidden. This permission structure applies to both NERIS and Canada/NFIRS environments, with the system automatically defaulting to read-only display when edit and start permissions are not granted.
Why - This enhancement was implemented to improve data integrity and user confidence by preventing unintended report modifications, ensuring that users assigned view-only access cannot accidentally alter critical incident documentation while still maintaining full visibility into report details.
How - To configure read-only access for Incident Reporting:
Navigate to Admin → Roles and Permissions
Select the target role you wish to configure (e.g., Fire Department Admin - Client X)
Under Incident Reporting, General>Incidents select only the Read checkbox
Ensure Create, Update, and Delete permissions remain unchecked
Save your changes
Users assigned to this role will now see the 👁️ (view) icon for reports and can view complete report contents
Users will not see ▶️ (start) or ✏️ (edit) icons and cannot modify reports
Note: This permission structure applies to both NERIS and Canada/NFIRS reporting systems
Note: The system automatically defaults to read-only display when edit and start permissions are not granted
Use Case - A fire department has training officers who need to review completed incident reports for training scenario development but should not be able to modify official documentation. The department administrator creates a "Training Officer - Read Only" role with only the Read permission enabled under Incident Reporting. When a training officer logs in and accesses the incident list, they see the 👁️ (view) icon next to each report and can open and review all report details including narratives, apparatus information, and timelines. However, they cannot see the edit or start icons, preventing them from accidentally modifying any incident data. This ensures the training officers have the information they need for training purposes while maintaining the integrity of official incident records that may be used for state reporting or legal documentation.
Validate Aiding Departments Have FDID or NERIS Entity ID
What - Enhanced validation has been introduced for Aiding Departments to ensure each department has a valid FDID (NFIRS) or NERIS Entity ID before saving. The system displays real-time error indicators including a red border, exclamation icon, and inline error message ("Department is missing an associated ID") when attempting to save a department without the required ID, blocking the save action until a valid ID is provided. An error counter in the Aiding Departments section displays the number of incomplete records, and the system prevents duplicate FDID/NERIS Entity IDs with a specific error message. When transitioning from NFIRS to NERIS, existing Aiding Departments are retained but flagged as incomplete if missing Entity IDs, prompting administrators to complete the required information.
Why - This enhancement was implemented to prevent incomplete data submissions to NFIRS/NERIS systems, ensuring accurate reporting, compliance with state requirements, and reliable funding metrics by enforcing that all aiding departments have proper identification before being used in incident reports.
How - To ensure Aiding Departments have valid identification:
Navigate to Setup → Aiding Departments
When adding or editing a department, ensure the FDID (NFIRS) or NERIS Entity ID field is completed
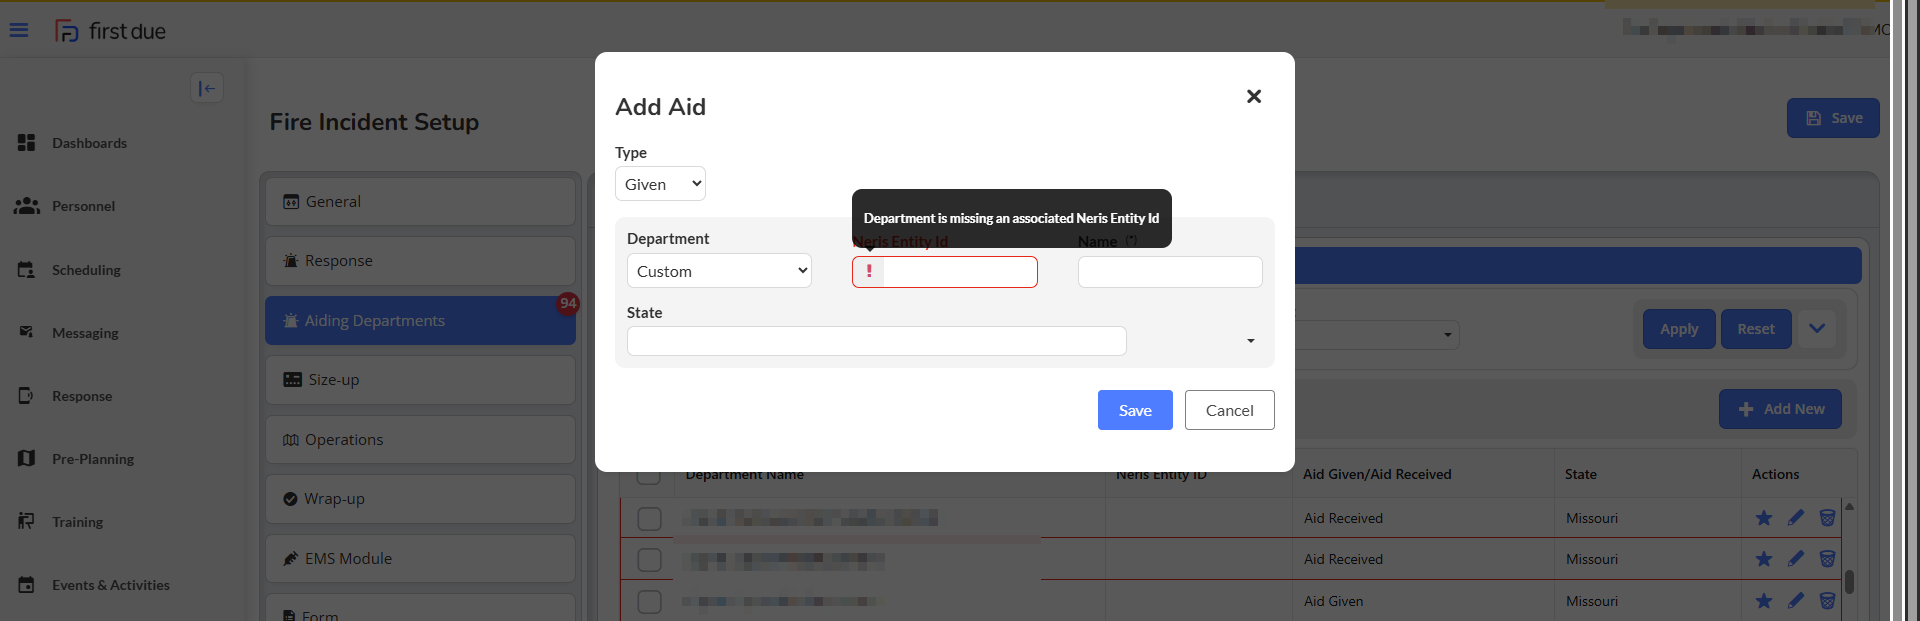
If you attempt to save without an ID, you'll see:
A red border and exclamation icon on the ID field
An inline error message: "Department is missing an associated ID"
The record cannot be saved until a valid ID is entered
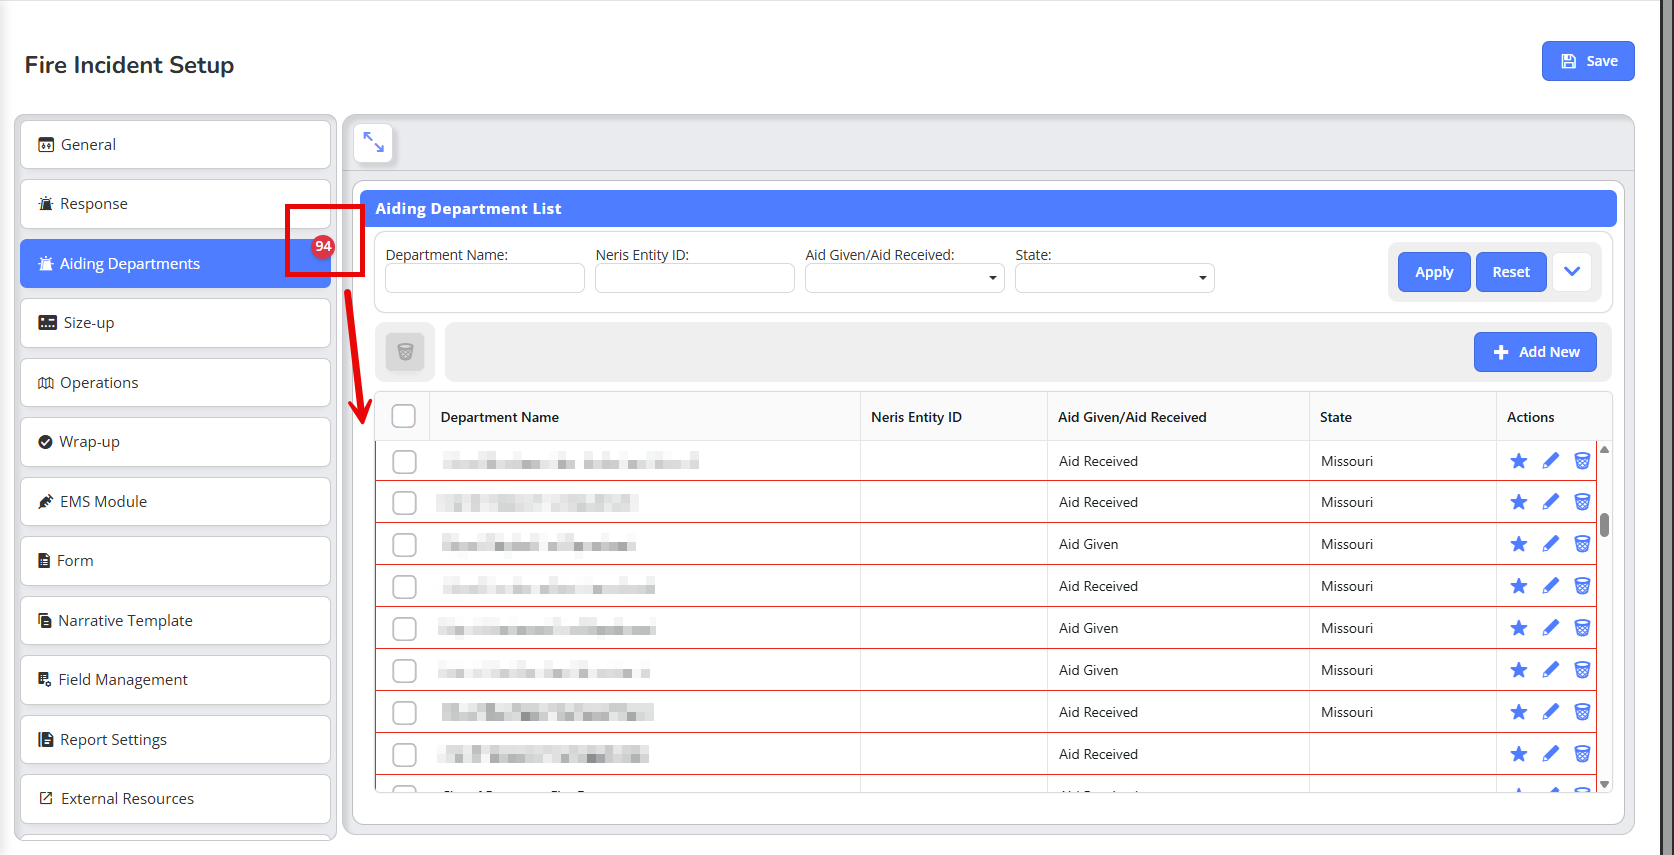
Review the Error counter in the Aiding Departments section to identify how many incomplete records require attention
For flagged incomplete records, add the missing FDID or NERIS Entity ID and save to clear the error flag
Note: The system prevents duplicate FDID/NERIS Entity IDs and will display an error message if you attempt to reuse an existing ID
Note: When transitioning from NFIRS to NERIS, existing Aiding Departments are retained but will be flagged if missing NERIS Entity IDs until corrected
Use Case - A fire department administrator is setting up their mutual aid partners in the Aiding Departments section before submitting their quarterly NERIS report. They add "County Fire District 5" as an aiding department but forget to enter the NERIS Entity ID. When they attempt to save, the system displays a red border around the Entity ID field with an exclamation icon and the message "Department is missing an associated ID," preventing the save. The administrator sees that the Error counter shows "1 incomplete record" in the Aiding Departments section. They obtain the correct NERIS Entity ID (12345) from their regional coordinator, enter it in the field, and successfully save the department. Later, when documenting a mutual aid incident where County Fire District 5 responded, the administrator can confidently select this department knowing it has the proper Entity ID for accurate state reporting and funding allocation tracking.
What - The duplicate incident validation process within the importing tool has been enhanced to accurately identify unique incidents by aligning time zones between the database and imported files, and by including the FDID field as part of the validation criteria. The system now converts both database-stored timestamps and imported file timestamps to the client's local time zone before comparison, and uses Incident Number, Exposure, Alarm Date/Time (in client time zone), and FDID as validation parameters. This prevents valid incidents from being incorrectly flagged as duplicates and significantly reduces false positive "Incident already exists" errors.
Why - This enhancement was implemented to resolve validation inconsistencies that caused legitimate incidents to be incorrectly flagged as duplicates due to time zone mismatches and missing FDID differentiation, improving import accuracy and reducing workflow disruptions during bulk incident imports.
How - No manual configuration is required to benefit from this improvement:
Import incident files using the standard importing tool process
The system will automatically:
Convert both imported file timestamps and database timestamps to your client's local time zone for comparison
Compare incidents using Incident Number, Exposure, Alarm Date/Time (in client time zone), and FDID
Flag an incident as duplicate only if all four parameters match
Identify incidents as unique if FDID or Alarm Date/Time differ, even if Incident Number and Exposure match
Note: Incidents with the same Incident Number but different FDIDs will now be correctly identified as unique records
Note: Time zone alignment ensures incidents are not incorrectly flagged due to UTC conversion discrepancies
Use Case - A regional fire authority manages multiple fire departments, each with their own FDID, using a centralized incident management system. Department A (FDID 12345) and Department B (FDID 67890) both use the incident numbering format "2024-001" at the start of each year. When the administrator imports incident files for both departments, Department A's incident "2024-001" occurred on January 1, 2024 at 10:30 AM local time, while Department B's incident "2024-001" occurred on January 1, 2024 at 2:45 PM local time. Previously, these incidents might have been incorrectly flagged as duplicates due to time zone conversion issues or because the FDID wasn't considered in validation. With this enhancement, the system correctly identifies these as two unique incidents because they have different FDIDs, preventing false duplication errors and allowing both incidents to import successfully without requiring manual intervention or renumbering.
Bulk Command Trigger for NERIS Incidents
What - The system now includes a Bulk Command Trigger for NERIS incidents, providing System Administrators with the ability to efficiently resubmit multiple authorized NERIS reports to the state API in a single operation. This feature allows administrators to select incidents by time range or specific month, automatically filters the selection to include only authorized reports marked for NERIS submission, and queues them for background processing to retrigger submission to the NERIS API. The system automatically excludes unauthorized incidents and reports not designated for NERIS to maintain data integrity, processes all valid incidents asynchronously to prevent interface delays, and logs all processing activities for audit and troubleshooting purposes. This bulk operation eliminates the manual effort previously required to individually deactivate and reauthorize each incident when resubmission is necessary.
Why - This enhancement was implemented due to customer request to address situations where NERIS API connection issues or temporary service disruptions prevent successful incident submission, requiring administrators to resend previously authorized reports. Previously, administrators had to manually deactivate and reauthorize each affected incident individually, which was time-consuming and inefficient when dealing with multiple reports from the same time period. This bulk command capability streamlines the resubmission process by allowing administrators to select and retrigger multiple incidents simultaneously, significantly reducing administrative workload and enabling faster recovery from API connectivity problems. The feature mirrors the existing bulk command pattern already used for NFIRS incident processing, providing consistency across reporting systems.
How - To use the Bulk Command Trigger for NERIS incidents:
Access the superadmin interface (System Administrator access required)
Navigate to the new Bulk Command Trigger for NERIS incidents
Select incidents using either a time frame or specific month filter
Optionally, narrow the selection by department
Review the summary displaying total incidents selected, number valid for processing, and number skipped with reasons
Confirm the bulk operation when prompted
The system will automatically queue valid incidents for background processing and retrigger submission to the NERIS API
Monitor the processing logs for job-level actions and completion status
Note: Only incidents that are both authorized and marked for NERIS will be processed; unauthorized or non-NERIS incidents are automatically excluded
Important: If an incident is already registered in NERIS but does not have a NERIS ID stored within the system, that specific operation will fail
Use Case - A fire department experiences a 3-hour NERIS API outage during which 47 authorized incidents fail to transmit to the state reporting system. Rather than manually deactivating and reauthorizing each of the 47 incidents individually, the System Administrator accesses the bulk command trigger and selects all incidents from that day's time range. The system automatically identifies that 45 of the incidents are authorized and marked for NERIS (the other 2 are skipped because they were unauthorized), displays a summary showing "47 selected, 45 valid for processing, 2 skipped (unauthorized)," and prompts for confirmation. After the administrator confirms, the system queues all 45 valid incidents for background processing and begins retriggering their submission to the NERIS API without impacting system performance. The administrator monitors the processing logs to verify successful resubmission and can confirm that all affected reports have been properly transmitted to the state without spending hours on manual reauthorization work.
Conditional Attestation for Seattle Public Disclosure Reports
What - The system now supports a legally compliant conditional attestation mechanism for Public Disclosure Reports (PDRs) submitted by Seattle Fire Department. This Seattle-specific feature adds an optional declaration toggle at the end of the Wrap-Up section labeled "Declaration from member completing report," which allows the report completer to opt into including Washington State's legally required attestation language on the printed PDF output. The attestation reads "I declare under penalty of perjury under the laws of the State of Washington that the foregoing information is true and correct" and appears in the Acknowledgement section only when the completer actively sets the toggle to YES and signs the "Member Completing Report" section. The feature applies exclusively to Seattle FD reports submitted on or after May 1, 2025, defaults to NO to prevent accidental attestation, and has no visibility or impact on any other customers' incident reporting workflows.
Why - This enhancement was implemented due to customer request to comply with Washington State legal requirements for written testimony submissions. State law mandates a sworn attestation for courts to accept written testimony without requiring the physical presence of the report completer, and Seattle Fire Department needed a mechanism to provide this legally valid attestation within their incident reports. Previously, Seattle FD lacked a standardized method for including this required declaration, which created potential legal complications when reports were submitted as written testimony in court proceedings. This conditional attestation feature ensures legal compliance while protecting report completers from unintentionally signing a sworn statement by requiring deliberate opt-in through an explicit toggle action, and the date-based activation ensures the attestation only applies to reports where this legal requirement is in effect.
How - To include the legal attestation on Seattle FD Public Disclosure Reports:
Complete the incident report as normal through all sections
Navigate to the Wrap-Up section and scroll to the end
Locate the new field "Declaration from member completing report" which displays the legally required attestation text with a toggle control (YES/NO)
The toggle defaults to NO; actively set it to YES to opt into including the attestation on the printed PDF
Complete the "Member Completing Report" signature section
Submit the report (must be dated on or after May 1, 2025)
When both conditions are met (toggle = YES and member signature completed), the attestation text will automatically appear in the Acknowledgement section of the generated PDF
Note: This feature is only visible to Seattle Fire Department users and has no effect on other customers' incident reports
Important: If the toggle remains at NO or the "Member Completing Report" section is not signed, the attestation will not appear on the PDF output
Use Case - A Seattle Fire Department company officer responds to a commercial structure fire and completes the incident report documenting the response activities, conditions found, and actions taken. Several weeks later, the department receives a subpoena requesting written testimony about this incident for an insurance litigation case. The officer needs to resubmit the report with the legally required attestation to make it admissible as written testimony in Washington State court without appearing in person. The officer opens the incident report dated after May 1, 2025, navigates to the end of the Wrap-Up section, and reviews the declaration text stating "I declare under penalty of perjury under the laws of the State of Washington that the foregoing information is true and correct." Understanding the legal implications, the officer deliberately toggles the "Declaration from member completing report" field to YES, ensures the "Member Completing Report" section contains their signature, and resubmits the report. The generated PDF now includes the sworn attestation in the Acknowledgement section, making the written testimony legally valid for court submission without requiring the officer's physical presence, while other routine reports submitted by the same officer without the toggle activated remain unaffected and do not include the attestation language.
Validation for Aiding Department FDID/NERIS Entity ID Configuration
What - The system now includes enhanced validation and visibility for missing FDID (NFIRS) or Entity ID (NERIS) values in Aiding Department configurations. When an Aiding Department is saved without the required identifier, the system displays real-time error indicators directly on the ID field using red outline styling with an exclamation icon and a hover/click message stating "Department is missing an associated ID." The Aiding Department section includes an error count indicator to help administrators quickly identify how many departments have incomplete configurations, and saved rows missing IDs are automatically flagged similar to the visual marking used for partially saved Vitals rows in the PCR. The system allows non-blocking saves to prevent workflow disruption, but ensures administrators are clearly notified of missing identifiers through multiple visual cues. This validation applies when departments are initially configured and when transitioning between NFIRS and NERIS reporting systems, ensuring that all aiding departments maintain the appropriate identifiers for accurate data transmission.
Why - This enhancement was implemented due to customer request to prevent incomplete data transmission to NFIRS and NERIS that negatively impacts reporting accuracy, departmental metrics, and potential grant funding eligibility. Previously, administrators could save Aiding Department configurations without entering the required FDID or Entity ID values, resulting in these departments being excluded from state reporting submissions or appearing with incomplete identification information. This issue was particularly problematic when customers transitioned from NFIRS to NERIS reporting, as existing aiding departments configured with FDID values would lack the newly required NERIS Entity IDs, and these gaps went unnoticed without system-level validation. The lack of visibility into missing identifiers meant that mutual aid responses could be under-reported or incorrectly attributed, potentially affecting grant applications that rely on accurate mutual aid activity documentation and compromising the completeness of regional response data shared with state reporting systems.
How - To identify and correct missing Aiding Department identifiers:
Navigate to Fire Incident Setup → Aiding Departments (or equivalent setup location for department configuration)
Review the Aiding Department section for any error count indicator showing how many departments have missing IDs
Identify departments with validation errors by looking for
red outline styling with an exclamation icon on the FDID/Entity ID field
Hover over or click the
exclamation icon to view the error message: "Department is missing an associated ID"
Edit each flagged department and enter the appropriate FDID (for NFIRS reporting) or Entity ID (for NERIS reporting) in the designated field
Save the department configuration; the error indicator will clear once a valid ID is entered
Note: The system allows saving departments without IDs to prevent workflow blocking, but flagged rows will remain marked until the identifier is added
Important: When transitioning from NFIRS to NERIS, review all existing aiding departments to ensure Entity IDs are added, as departments previously configured with only FDID values will trigger error indicators
Use Case - A fire department using NFIRS reporting has configured five neighboring departments as Aiding Departments in their system, but the administrator who set up the configurations inadvertently left the FDID field blank for two of these departments. When incidents involving mutual aid from these two departments are submitted to NFIRS, the state reporting system receives incomplete identification data, causing these responses to be excluded from regional mutual aid statistics and potentially affecting the department's grant application that demonstrates collaborative regional response capabilities. After this enhancement is deployed, the administrator navigates to the Aiding Departments setup section and immediately sees an error count indicator showing "2 errors." The two departments with missing FDIDs display red outlines with exclamation icons on their ID fields. The administrator hovers over the icon to see "Department is missing an associated ID," then edits each department to add the correct FDID values and saves the configurations. The error indicators clear, and subsequent mutual aid incidents now transmit complete department identification to NFIRS. Additionally, when the department later transitions to NERIS reporting, the system automatically flags all five aiding departments because they lack NERIS Entity IDs, prompting the administrator to add the new identifiers before any NERIS submissions occur, ensuring continuous reporting accuracy across the transition.
What - The system now includes enhanced duplicate incident detection logic within the importing tool that ensures more accurate validation by aligning date/time comparisons to a single time zone and incorporating FDID into the validation criteria. The improved duplicate check now normalizes both database-stored alarm date/time values and imported .txt file alarm date/time values to the client's configured time zone before comparison, preventing incidents that occurred on different dates or times from being incorrectly flagged as duplicates due to time zone inconsistencies. The validation logic now considers four parameters when determining duplicates: incident number, exposure, normalized alarm date/time, and FDID. This means that incidents sharing the same incident number and exposure but associated with different FDIDs are correctly treated as unique records rather than duplicates, eliminating false "Incident already exists" errors that previously occurred when multiple departments under the same client account used overlapping incident numbering systems.
Why - This enhancement was implemented due to customer request to resolve inaccurate duplicate detection that was blocking legitimate incident imports and creating unnecessary validation errors. Previously, the duplicate check compared incident number, exposure, and alarm date, but time zone handling inconsistencies caused the system to incorrectly flag distinct incidents as duplicates when the imported .txt file's alarm date/time was converted to UTC while the database stored dates in the client's local time zone, making incidents from different calendar days appear identical. Additionally, clients operating multiple departments with different FDIDs but sharing similar internal incident numbering schemes experienced false positive duplicate flags because the FDID was not included in the validation logic, preventing legitimate imports of incidents that only coincidentally shared the same incident number and exposure values. These validation failures disrupted import workflows, required manual intervention to resolve false duplicates, and delayed the availability of incident data for reporting and analysis purposes.
How - The improved duplicate detection operates automatically during the import process:
Prepare your incident data in .txt file format following standard import specifications
Navigate to the incident import tool and select your .txt file for upload
The system automatically reads the alarm_date_time value from the imported file
During validation, the system converts the database-stored alarm_date_time to the client's configured time zone
The system normalizes the imported alarm_date_time to the same client time zone for comparison
The duplicate check now evaluates four matching parameters: incident number, exposure, normalized alarm date/time, and FDID
If all four parameters match an existing incident, the system flags the record as a duplicate and prevents import
If the FDID differs, the incident is treated as unique even when other fields match, allowing the import to proceed
Review any validation messages; incidents will only be flagged as duplicates when all four criteria genuinely match
Note: This improvement applies automatically to all incident imports and requires no configuration changes
Use Case - A county fire protection district operates three separate fire departments (Department A, Department B, and Department C) under a single software account, with each department assigned a unique FDID. Department A and Department B both use calendar-year incident numbering that resets to "2025-0001" on January 1st, and both departments respond to incidents on January 5, 2025. Department A's incident 2025-0001 occurs at 14:30 local time, while Department B's incident 2025-0001 occurs at 18:45 local time. When the administrator imports the incidents from a .txt file, the previous validation logic would have incorrectly flagged Department B's incident as a duplicate of Department A's incident because both shared the same incident number (2025-0001), exposure number, and date, despite representing completely different responses by different departments at different times. With the improved duplicate detection, the system normalizes both alarm date/time values to the county's configured time zone for accurate comparison and includes each department's unique FDID in the validation check. The system correctly identifies that Department A's incident (FDID-AAA, 2025-0001, 2025-01-05 14:30) and Department B's incident (FDID-BBB, 2025-0001, 2025-01-05 18:45) are distinct records because their FDIDs differ, allowing both incidents to import successfully without false duplicate errors. Additionally, if Department A had previously imported incident 2025-0001 from January 5th and later attempts to import the same incident file again, the system would correctly flag it as a true duplicate because all four parameters (incident number, exposure, normalized alarm date/time, and FDID) match the existing database record, preventing actual duplicate data entry.
Related Articles
Fire Documentation Release Notes : October 2025
New Features 1. AI for NFIRS Canada What - Artificial intelligence capabilities have been introduced specifically for Canadian clients following the NFIRS (National Fire Incident Reporting System) standard, leveraging Deepgram and Bedrock endpoints ...
Fire Investigations Release Notes - October 2025
Video New Features CAD Integration for Fire Investigation Module What - The Fire Investigation (FI) module now supports automatic creation and population of investigation records from CAD data using the existing NFIRS notification structure. When a ...
Fire Investigations Release Notes - November 2025
NEW FEATURES Create a new setting for Custom Status What - A new Custom Status configuration has been added under Field Management, allowing agencies to create their own investigation statuses in addition to the platform's standard lifecycle statuses ...
ePCR Release Notes - Novemeber 2025
New Features OneDose - Integration and consumption of data for OneDose What - This feature introduces integration with OneDose, a medication dosing calculator platform that enables ePCR to import patient-specific medication dosing calculations and ...
Health & Wellness Release Notes - November 2025
New Features Update Import Data Tool to Pull in Training Data What - The Import Data tool has been expanded to include Training data alongside Fire Incident data, with the tool renamed from "Import Fire Report Data" to "Import Internal Data." Users ...