ePCR Release Notes - Novemeber 2025
New Features
OneDose - Integration and consumption of data for OneDose
What - This feature introduces integration with OneDose, a medication dosing calculator platform that enables ePCR to import patient-specific medication dosing calculations and recommendations directly from the OneDose system. The integration adds a dedicated "Import OneDose" button in the ePCR form that opens a modal interface for selecting specific OneDose cases/patients, retrieves comprehensive medication dosing information from the OneDose platform, and automatically populates appropriate medication and dosing fields in the ePCR, providing the same level of data consumption capabilities as existing medication dosing integrations while supporting agencies that utilize OneDose for their dosing calculation needs.
Why - This integration was implemented due to customer request to provide agencies with flexible medication dosing calculator options and ensure comprehensive data import capabilities regardless of which platform agencies choose to utilize for their dosing calculations.
How -
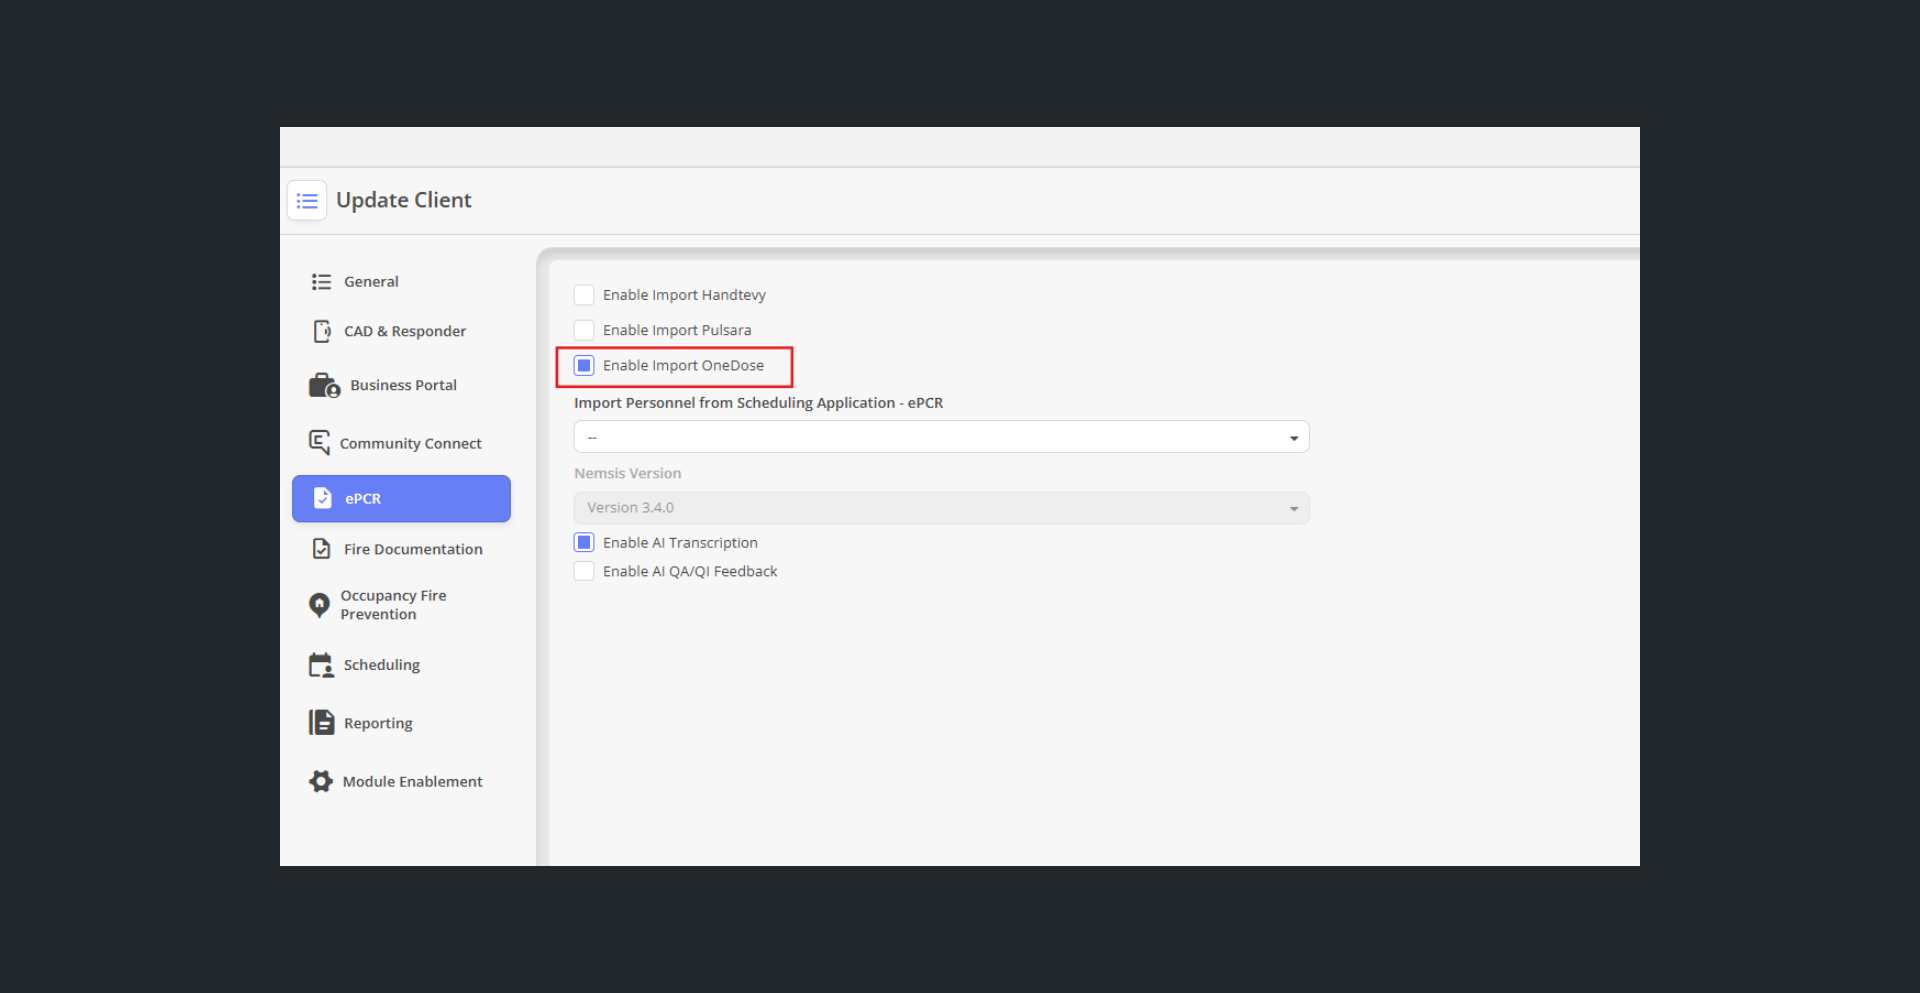
Navigate to
EMS Setup > Client Settings and enable the OneDose integration setting at the client level
(This has to be completed by CS or Implementation)
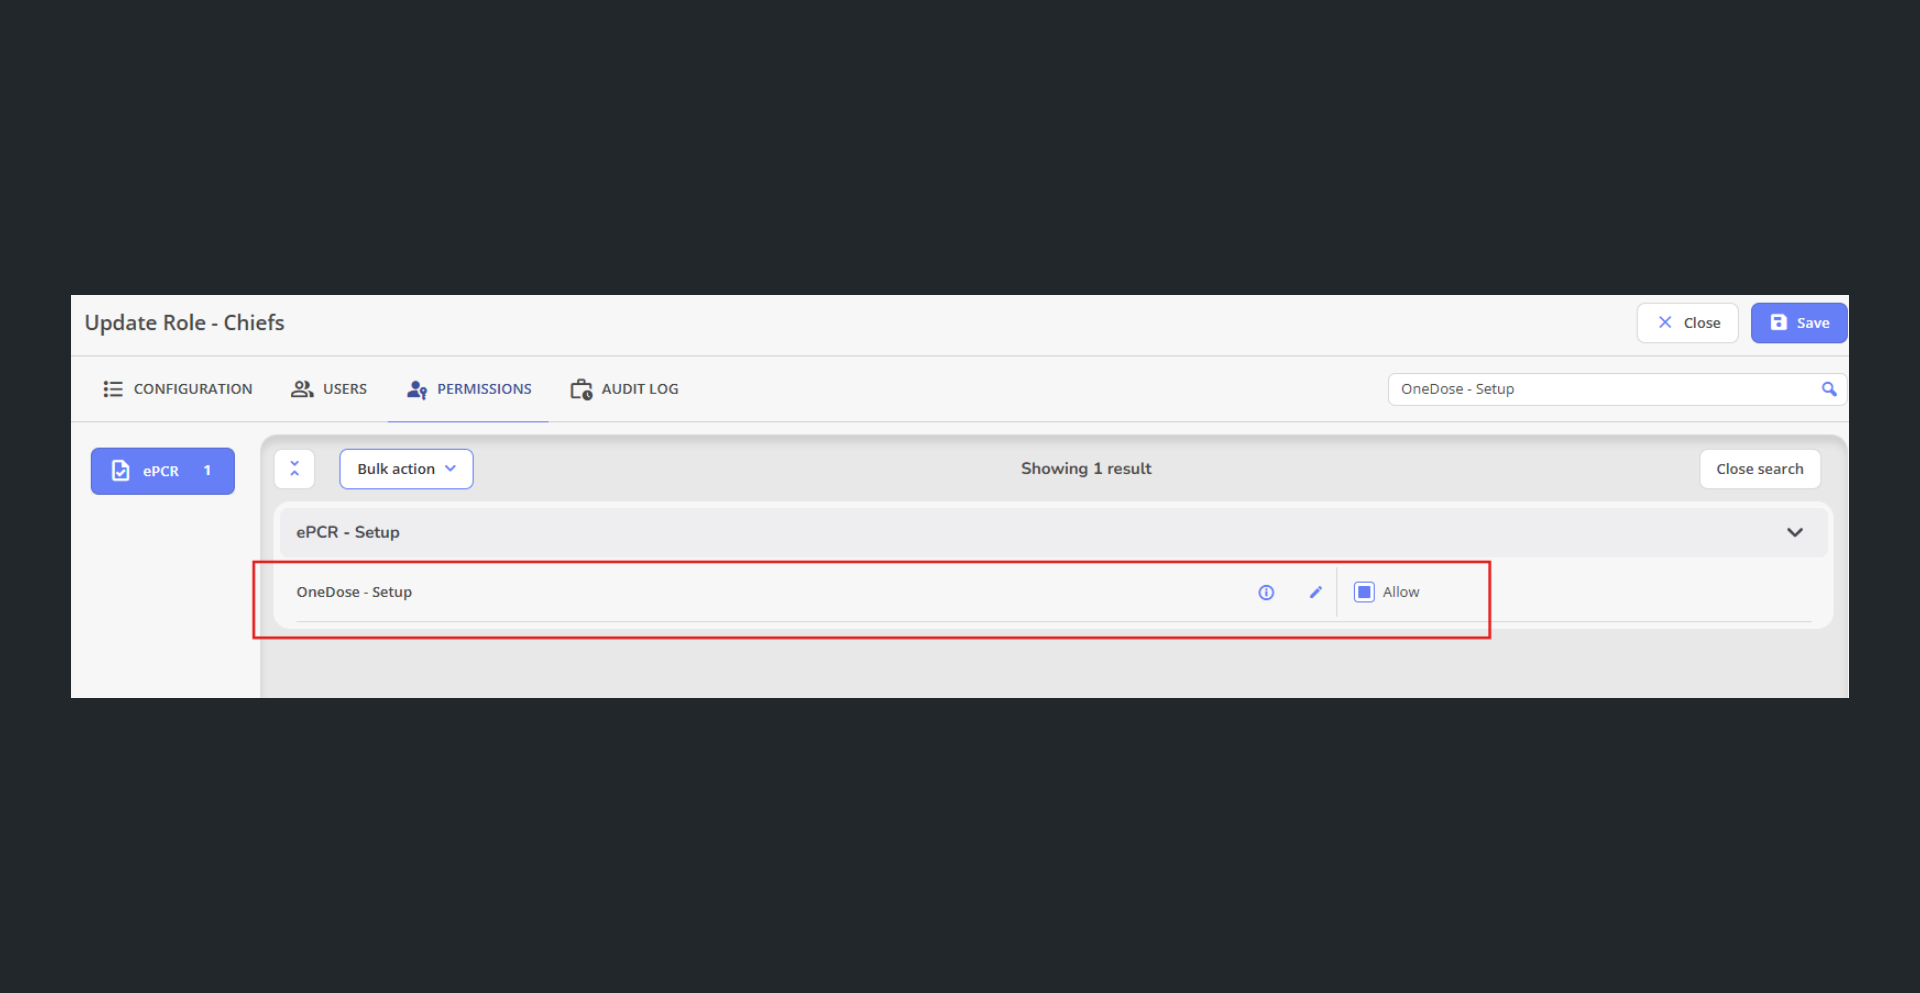
Configure role-based permissions under
EMS Setup > Roles & Permissions to control which users can access the Import OneDose functionality
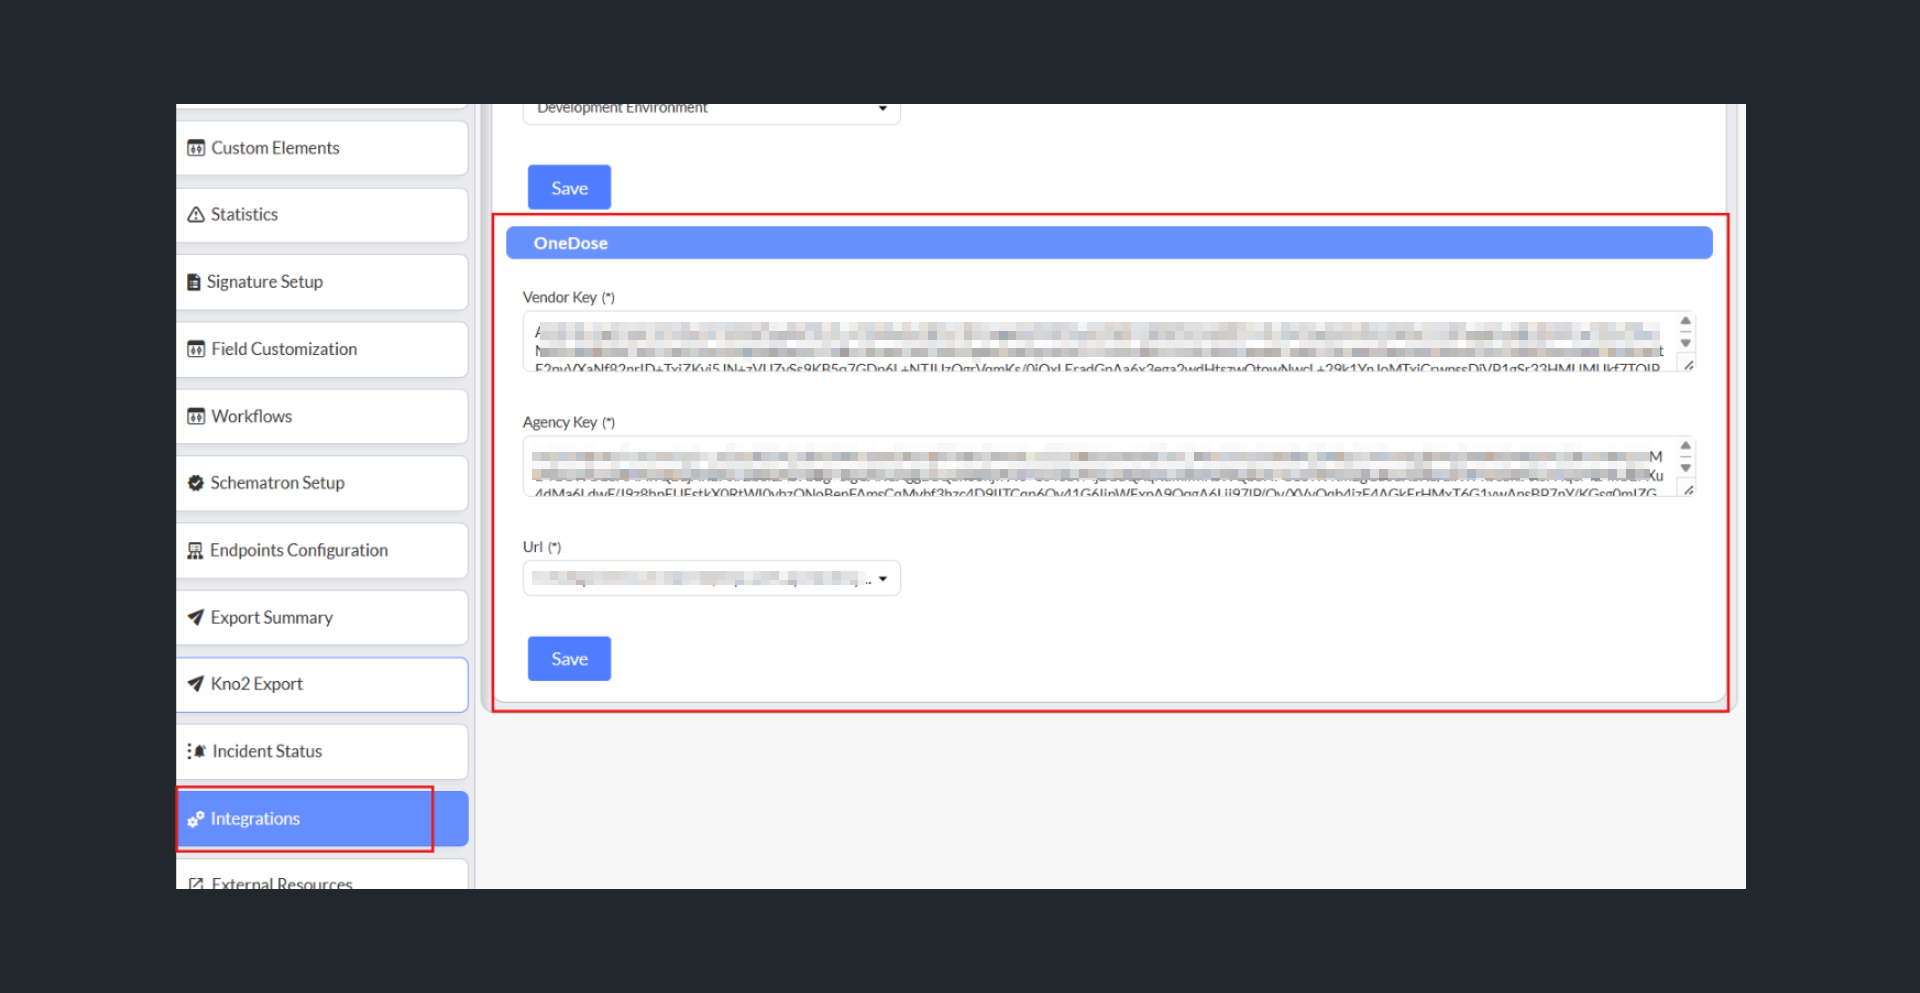
Complete the OneDose integration parameters through the administrative setup interface (automatically added during implementation)
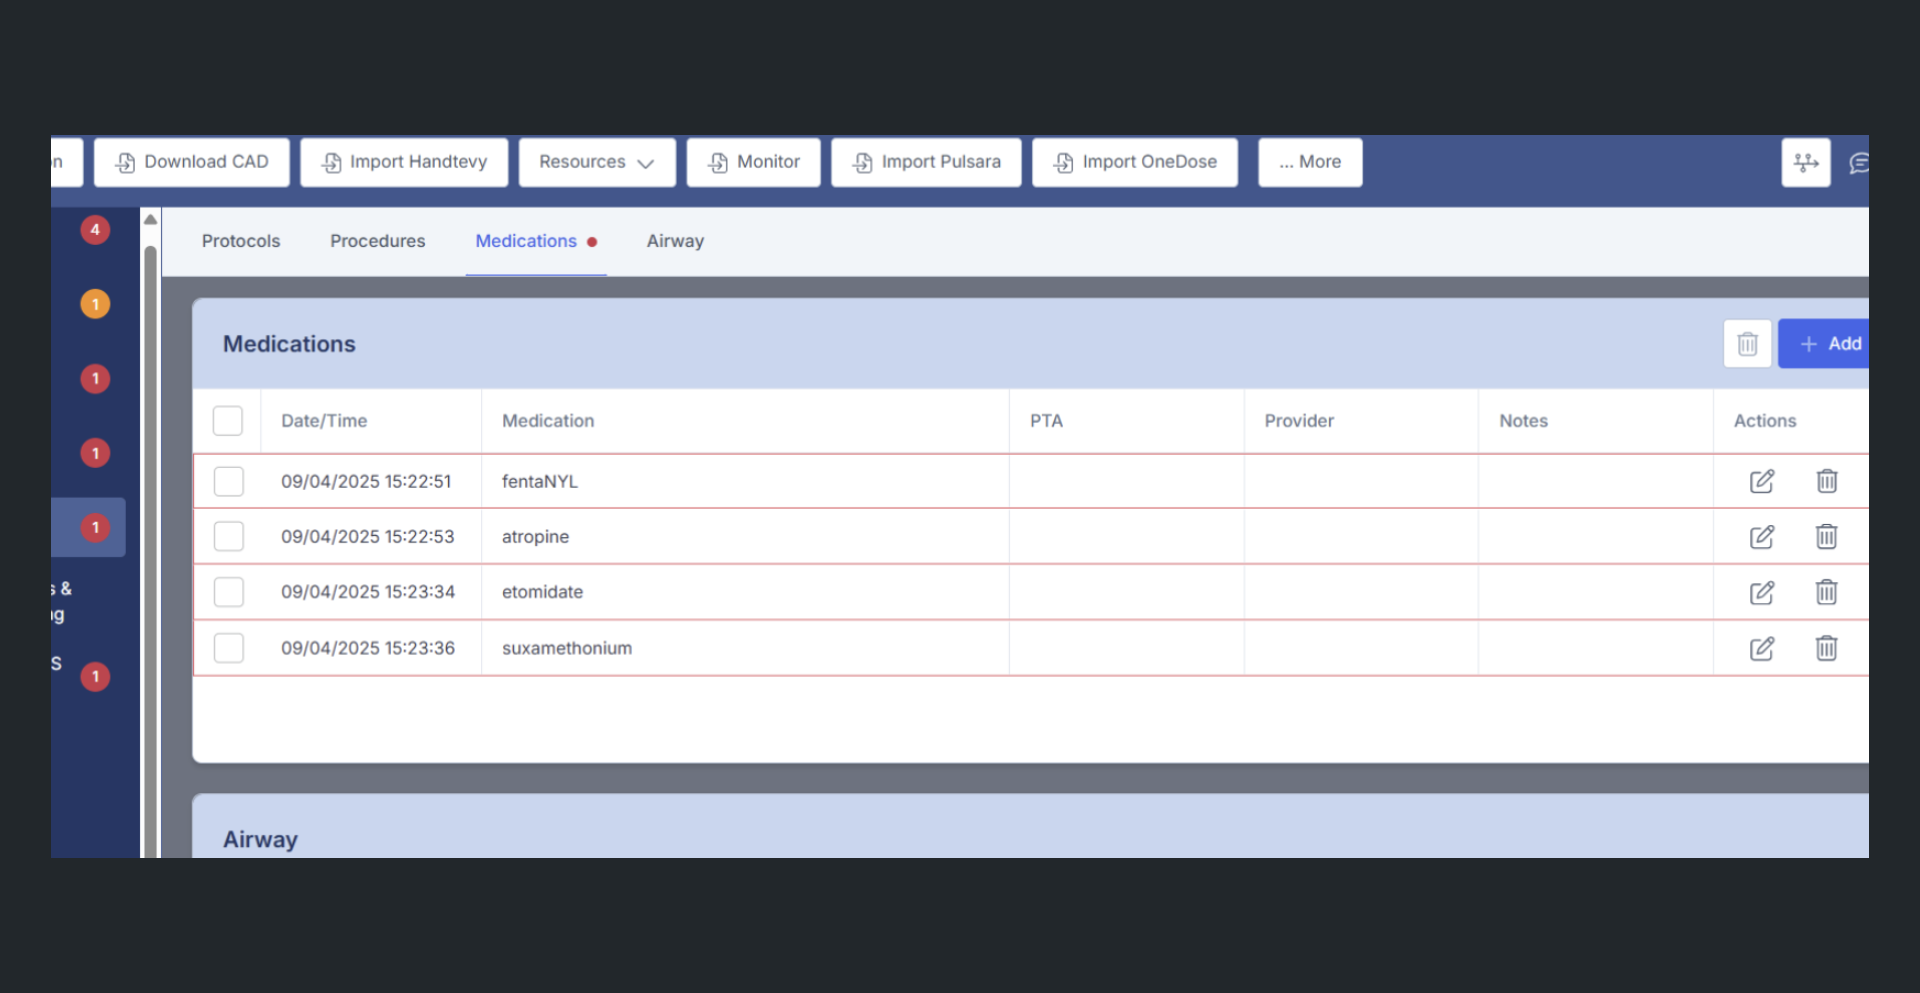
Users with appropriate permissions will see the Import OneDose button displayed in the ePCR form
Click the Import OneDose button to open the modal interface for case/patient selection
Select the specific OneDose case/patient from the available options in the modal

The system retrieves and imports comprehensive medication dosing calculations and recommendations from the OneDose platform
Imported data automatically populates the appropriate medication and dosing fields in the ePCR
Complete the medication administration documentation using the imported dosing information
Use Case - A paramedic responds to a pediatric call and needs to administer medication based on the patient's weight. After opening the ePCR and documenting initial patient information, the paramedic clicks the Import OneDose button, selects the appropriate patient case from the OneDose modal, and the system automatically populates the correct medication dosages based on OneDose calculations. This eliminates manual calculation errors and ensures accurate pediatric medication administration while maintaining complete documentation of the dosing recommendations used during patient care.
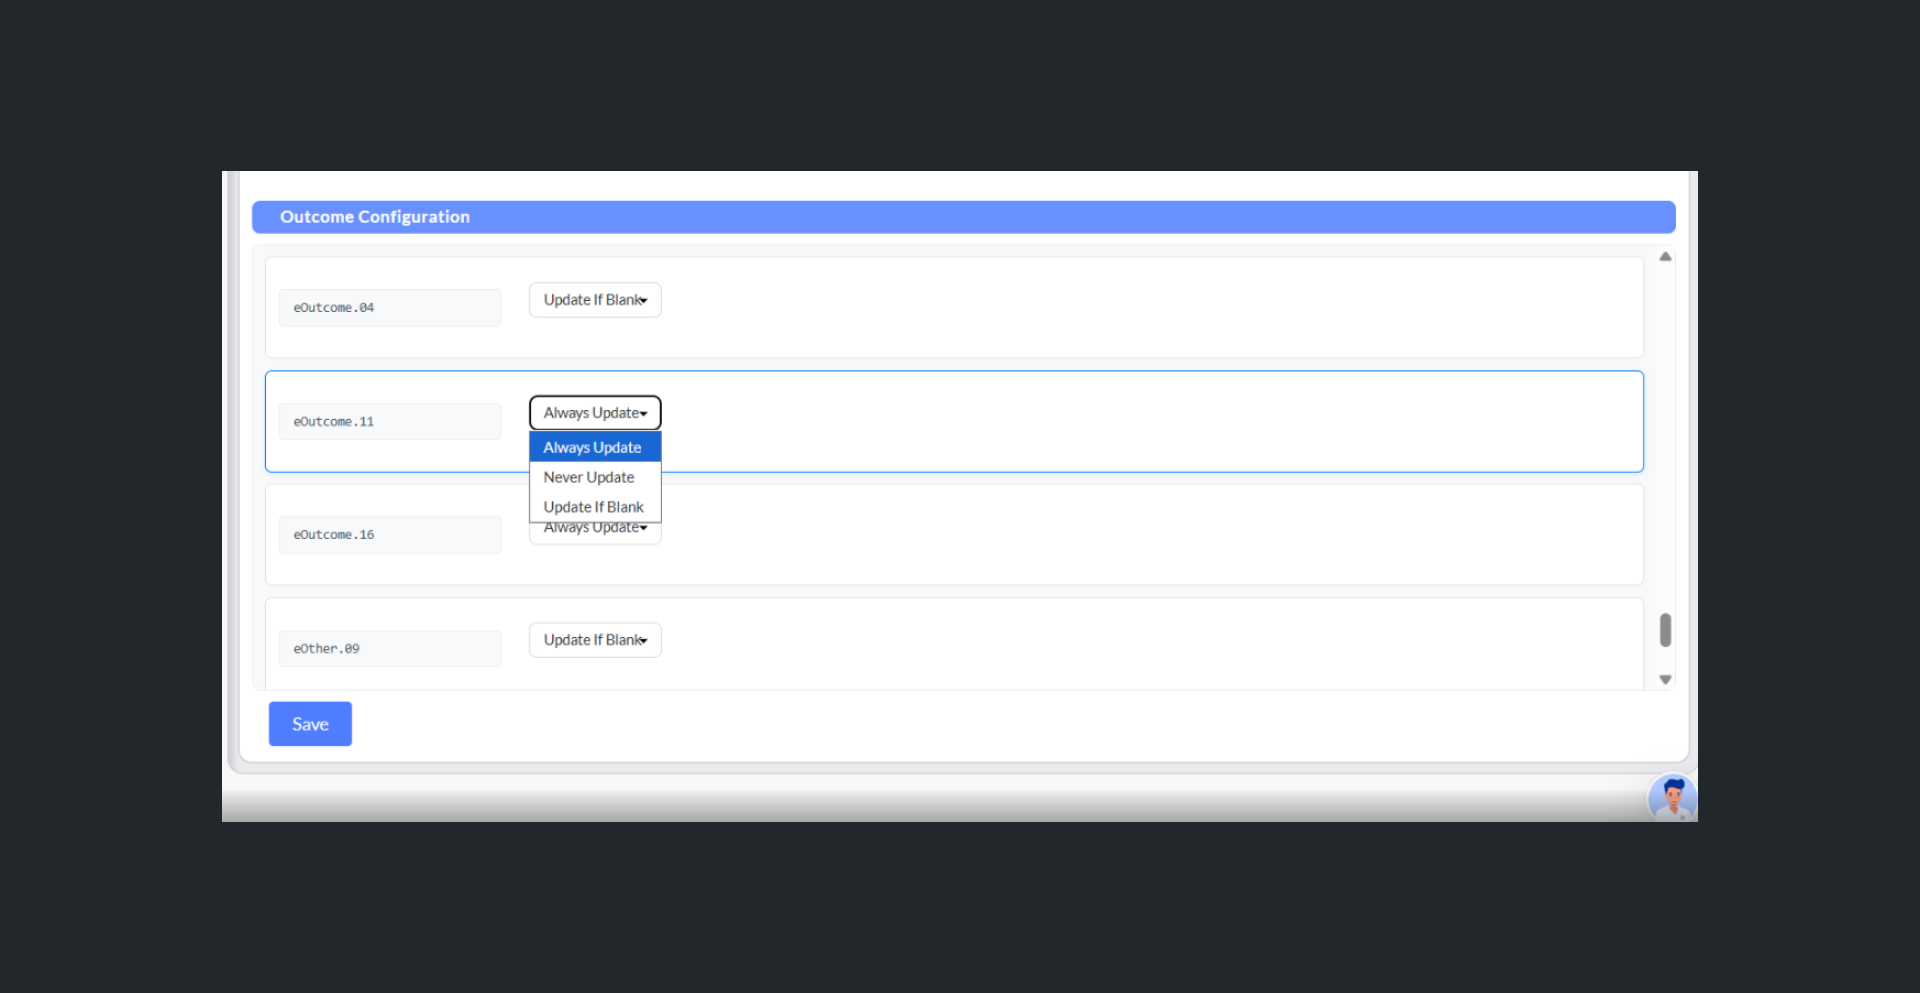
Outcome Data Import - HDE Import into PCR
What - This feature implements configurable ESO HDE (Hospital Data Exchange) data import capabilities that allow return data from ESO to update existing PCR records based on customer-specific, node-level configuration rules. The system receives abbreviated NEMSIS files via SFTP, matches records using the PCR Record ID (eRecord.01), and applies granular update controls for specific NEMSIS nodes including DemographicGroup, eRecord, eResponse, ePatient, ePayment, eDisposition, eOutcome, and eOther groups. The enhancement provides four configurable update options ("Always Update", "Never Update", "Update if Blank", and "Conditional Update") with comprehensive audit logging that records all update attempts, results, configuration conflicts, and field modifications in the History log, while defaulting all customer configurations to "Never Update" to prevent unintended data overwrites and ensure patient safety.
Why - This feature was implemented due to customer request to enable agencies to receive updated patient care information from hospital systems through ESO HDE and selectively incorporate that data back into their PCR records while maintaining granular control over which fields can be updated and under what circumstances, ensuring data integrity and preventing unwanted overwrites of critical patient information.
How -
Configure the required permission for client users under
EMS Setup > Roles & Permissions

Configure the ESO HDE endpoint settings in the common-local configuration file with host, port, user credentials, and file path parameters
Navigate to EMS Setup > HDE Import Configuration to configure node-level update rules
For each NEMSIS node, select the desired update behavior: Always Update, Never Update, Update if Blank, or Conditional Update
All configurations default to
Never Update for patient safety; explicitly change settings only for fields that should accept updates
Note: The PCR Record ID (eRecord.01) matching cannot be disabled as it serves as the mandatory identifier for record matching
When the system receives abbreviated NEMSIS files from ESO HDE via SFTP, it automatically processes them according to the configured rules
Review the import reports to see processed records, successful matches, updated fields, and any configuration conflicts
Check the History log for detailed field modification records showing Field name, Old Data, and New Data values for all applied updates
Use Case - An EMS agency transports a patient to the hospital and submits their PCR to ESO. The hospital later updates the patient's final diagnosis and treatment outcome information in their system, which ESO sends back as an abbreviated NEMSIS file. The agency has configured their HDE import settings to "Update if Blank" for outcome fields but "Never Update" for patient demographic information. When the file is processed, the system matches it to the original PCR using the PCR Record ID, updates the previously empty outcome fields with the hospital's data, preserves all existing demographic information, and creates History log entries documenting exactly what changed. The agency can now review complete patient outcome data without manually re-entering information while maintaining control over their original patient documentation.
FireHouse - Integrate Firehouse Scheduler with ePCR
What - This feature integrates FireHouse 24/7 scheduler with ePCR to enable automatic crew import based on unit assignment and date/time, leveraging the existing FireHouse integration built for Fire documentation and extending it to ePCR with behavior matching current scheduling integrations. The integration adds FireHouse to the available third-party scheduler integrations list, uses the unit call sign from dispatch and the report date/time to perform crew lookup in the FireHouse system, associates Personnel API ID fields with agency_id codes for accurate record matching, and supports manual import, CAD download, CAD refresh, and multi-unit scenarios. The system triggers crew import when changing the Primary Unit or Unit Notified by Dispatch Date/Time, prevents overwriting or duplicating existing personnel records, and remains compatible with the "Allow Download for Multiple CAD Units" feature for comprehensive apparatus and crew management.
Why - This integration was implemented due to customer request to provide automatic crew import capabilities from FireHouse scheduling systems, reducing manual data entry time, preventing crew entry errors, and ensuring consistency between scheduling assignments and ePCR documentation.
How -
Have your CS or Implementation Manager enable the ability to import personnel from scheduling application - ePCR to Firehouse.
When creating or editing an ePCR report, the system automatically uses the unit call sign and report date/time to query FireHouse for assigned crew members
To manually trigger crew import, access the import functionality and specify the unit and report date/time
When performing a CAD download, the system automatically imports the crew from FireHouse if the integration is enabled
When performing a CAD refresh, the system updates crew information from FireHouse while preserving existing personnel data
If you dismiss the FireHouse import prompt, manual import will not occur for that operation
When changing the Primary Unit field, the system triggers crew import to reflect the new unit's assigned personnel
When modifying the Unit Notified by Dispatch Date/Time field, the system updates crew import based on the new time
Note: The import process will not overwrite or duplicate existing personnel records in the report
For agencies using Allow Download for Multiple CAD Units, the system correctly imports apparatus and crew for all selected units
Use Case - A paramedic arrives at their shift and opens their CAD system, which shows they are assigned to Medic 5 for a medical call dispatched at 14:30. When they download the CAD incident into ePCR, the system automatically queries the FireHouse scheduler using "Medic 5" and "14:30" to retrieve the crew roster. The integration identifies the paramedic and their EMT partner who were scheduled on Medic 5 at that time and automatically populates their names and credentials in the ePCR personnel section. Later, if the call requires a unit transfer and the paramedic changes the Primary Unit to Medic 7, the system automatically imports the Medic 7 crew members who were on duty at that time, ensuring accurate crew documentation throughout the incident without requiring any manual personnel entry.
Enhancements
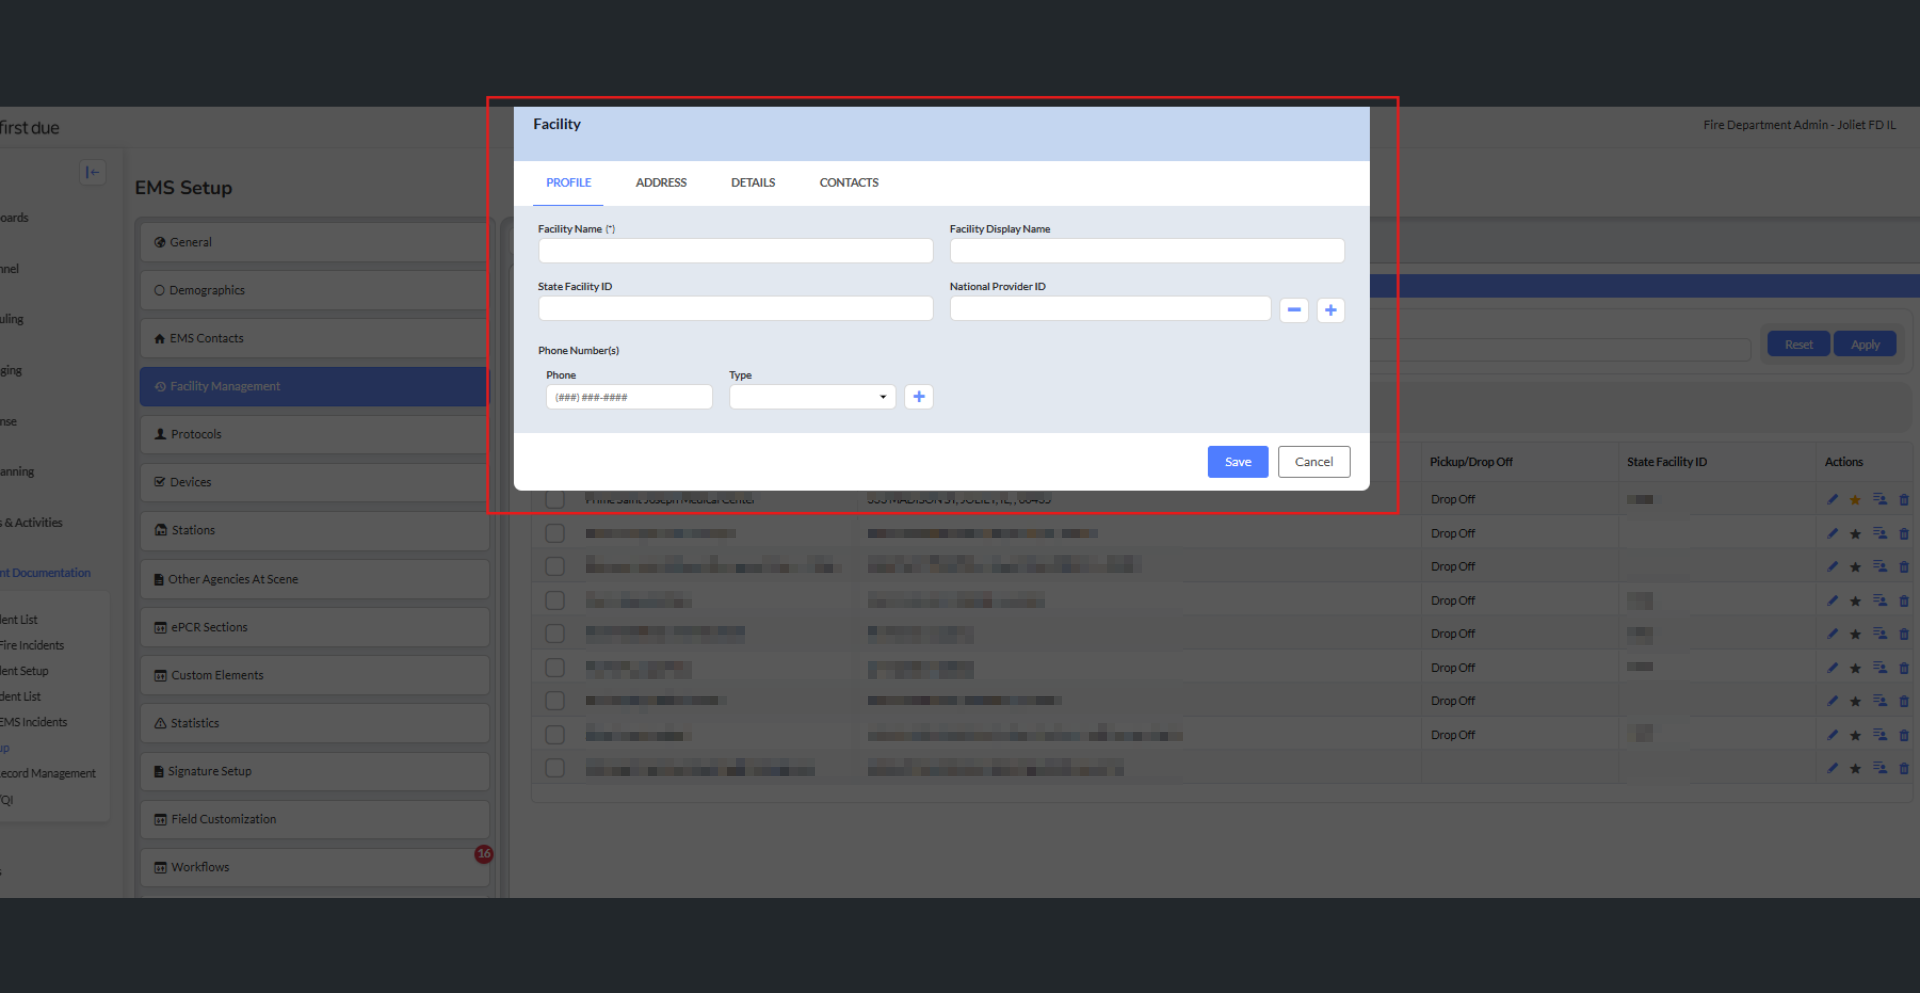
Vendor Directory - Move complete setup of Vendor Directory to the new "Facility Management"
What - This feature migrates the complete Vendor Directory functionality to EMS Setup under the new "Facility Management" label, consolidating all facility-related information management including pickup/destination locations within EMS Setup and eliminating redundancy. The enhancement implements comprehensive data migration from vendor, vendor_contact, and ems_facility tables to new facility and facility_contact tables, updates XML generation logic for DEM exports to read from the new Facility Management tables, and introduces separate Display Name functionality that allows user-friendly names in the interface while maintaining NEMSIS-compliant Facility Names for export. The Facility Management section provides enhanced facility profiles including Facility Name, Display Name, State Facility ID, National Provider ID, phone numbers, flexible address management with a Custom Address toggle, facility details configuration with Patient Pickup/Drop Off toggles, Facility Type, Designations, Fax ePCR settings, and Kno2 integration fields, along with automatic population of Scene Address and Destination Address fields when facilities are selected in forms.
Why - This enhancement was implemented due to customer request to streamline facility configuration workflows and clarify facility ownership by consolidating facility management within EMS Setup, eliminating the previous third-party catch-all structure that no longer aligned with workflow needs while maintaining full feature parity with existing Vendor Directory capabilities.
How -
Navigate to EMS Setup > Facility Management (the previous main navigation for Vendor Directory for ePCR is now deprecated)
Review the facility list displaying columns:
Facility Name,
Address,
Pickup/Drop Off,
State Facility ID, and
Actions

To create or edit facilities, click the appropriate action button to open the facility modal with organized sections:
Facility Profile: Configure Facility Name, Display Name, State Facility ID, National Provider ID, and Phone Numbers
Address Information: Enable the Custom Address toggle when only the facility name is required (disables address field requirements), or complete full address fields including GPS coordinates
Facility Details: Set Patient Pickup/Drop Off toggles, select Facility Type, configure Designations, adjust Fax ePCR settings, and set up Kno2 integration configuration
Contacts: Manage contact information for the facility
Configure user-friendly Display Names for clearer facility identification in the form interface while maintaining NEMSIS-compliant Facility Names for export purposes
Use facility actions to add, edit, delete, mark as favorite, or assign access permissions for facilities
When selecting facilities in Incident Facility Name or Transported To fields, the system automatically populates corresponding address fields
The user interface displays the Display Name when configured for clearer identification
XML exports (eScene.13, eDisposition.01) always use the Facility Name regardless of Display Name configuration
Note: The system displays Designations only for Hospital/Freestanding ED facility types; all elements appear for other facility types
Note: Data migration preserves all existing vendor information without creating duplicates, maintaining integrity in legacy reports
Note: This is a breaking change; data will not sync between the deprecated Vendor Directory and the new Facility Management
Use Case - An EMS agency needs to document a patient transport to "Memorial Hospital - Emergency Department" but their CAD system and forms previously showed the lengthy official name "Memorial Regional Medical Center Emergency Services Department" which caused confusion and display issues. The administrator navigates to EMS Setup > Facility Management, edits the facility record, and sets the Display Name to "Memorial Hospital - ED" while keeping the Facility Name as "Memorial Regional Medical Center Emergency Services Department" for NEMSIS compliance. Now when paramedics select this facility in the Transported To field, they see the clear, concise "Memorial Hospital - ED" name in their ePCR interface and the destination address automatically populates, but when the agency submits their NEMSIS data file, it exports with the complete, compliant "Memorial Regional Medical Center Emergency Services Department" name that meets state reporting requirements.
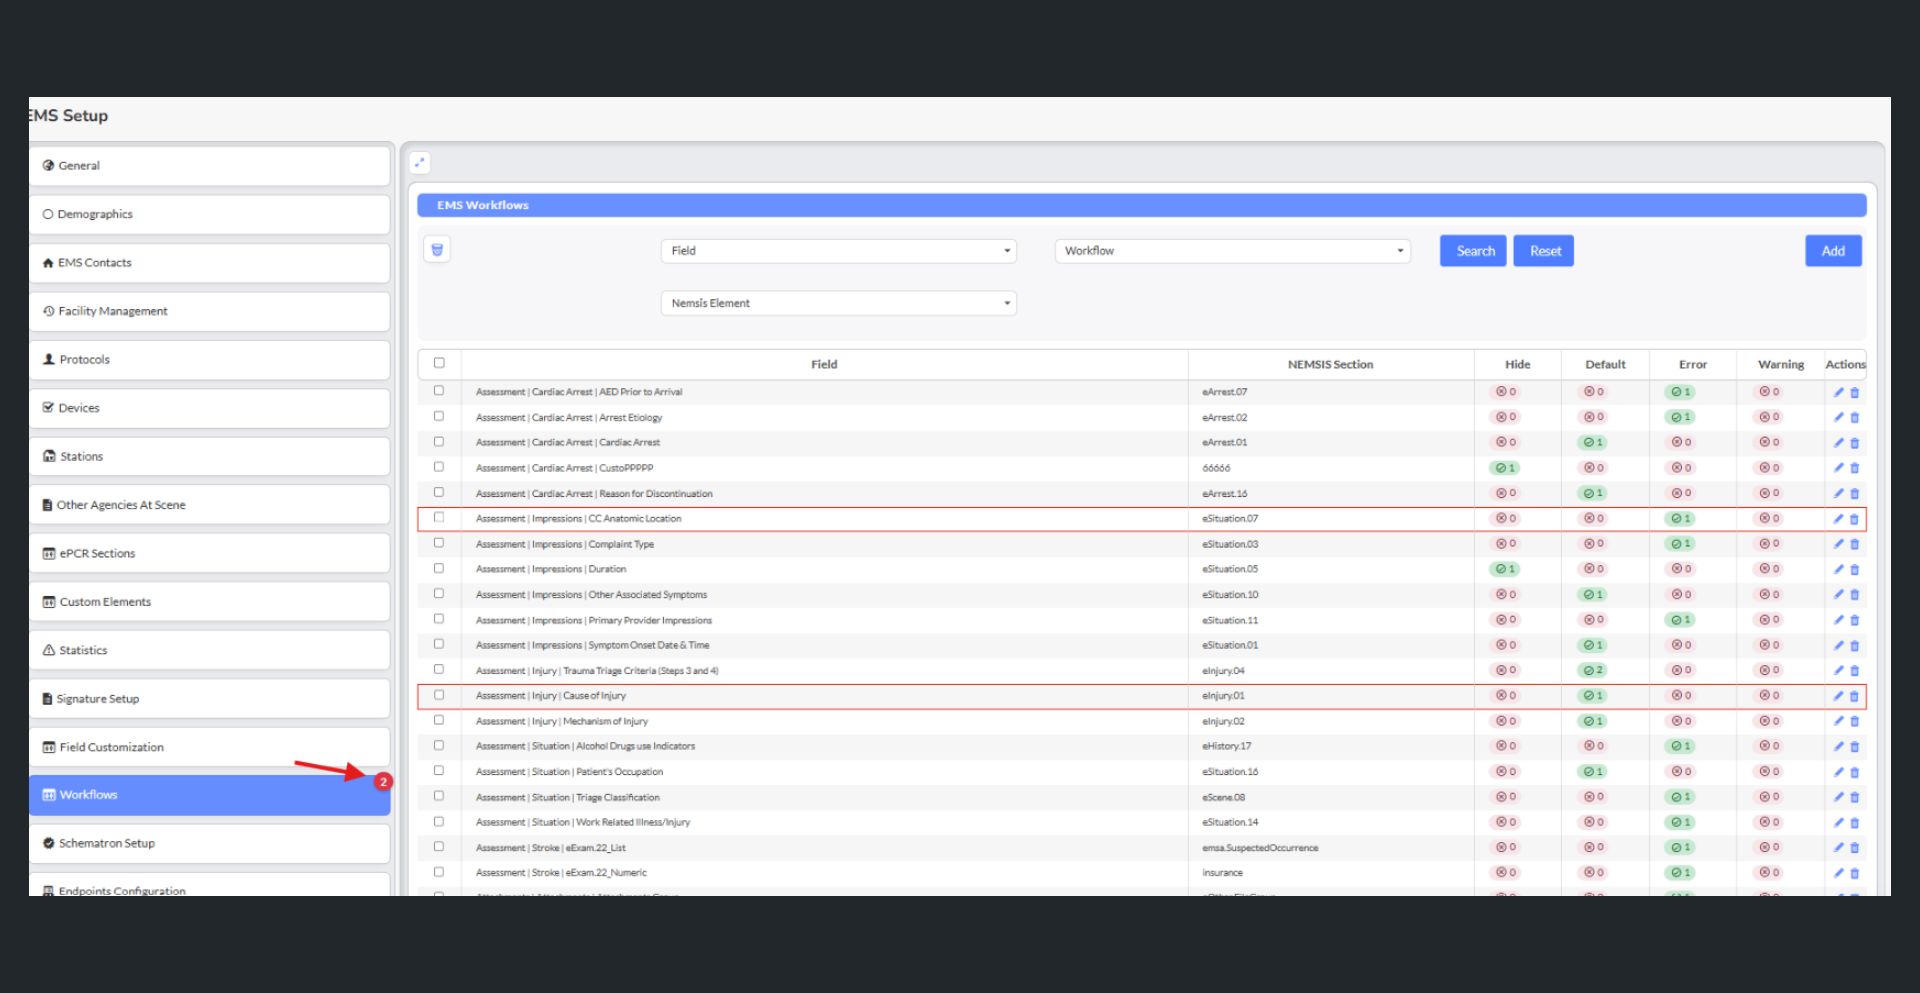
EMS Setup Workflow - Add Validation to Workflow setup
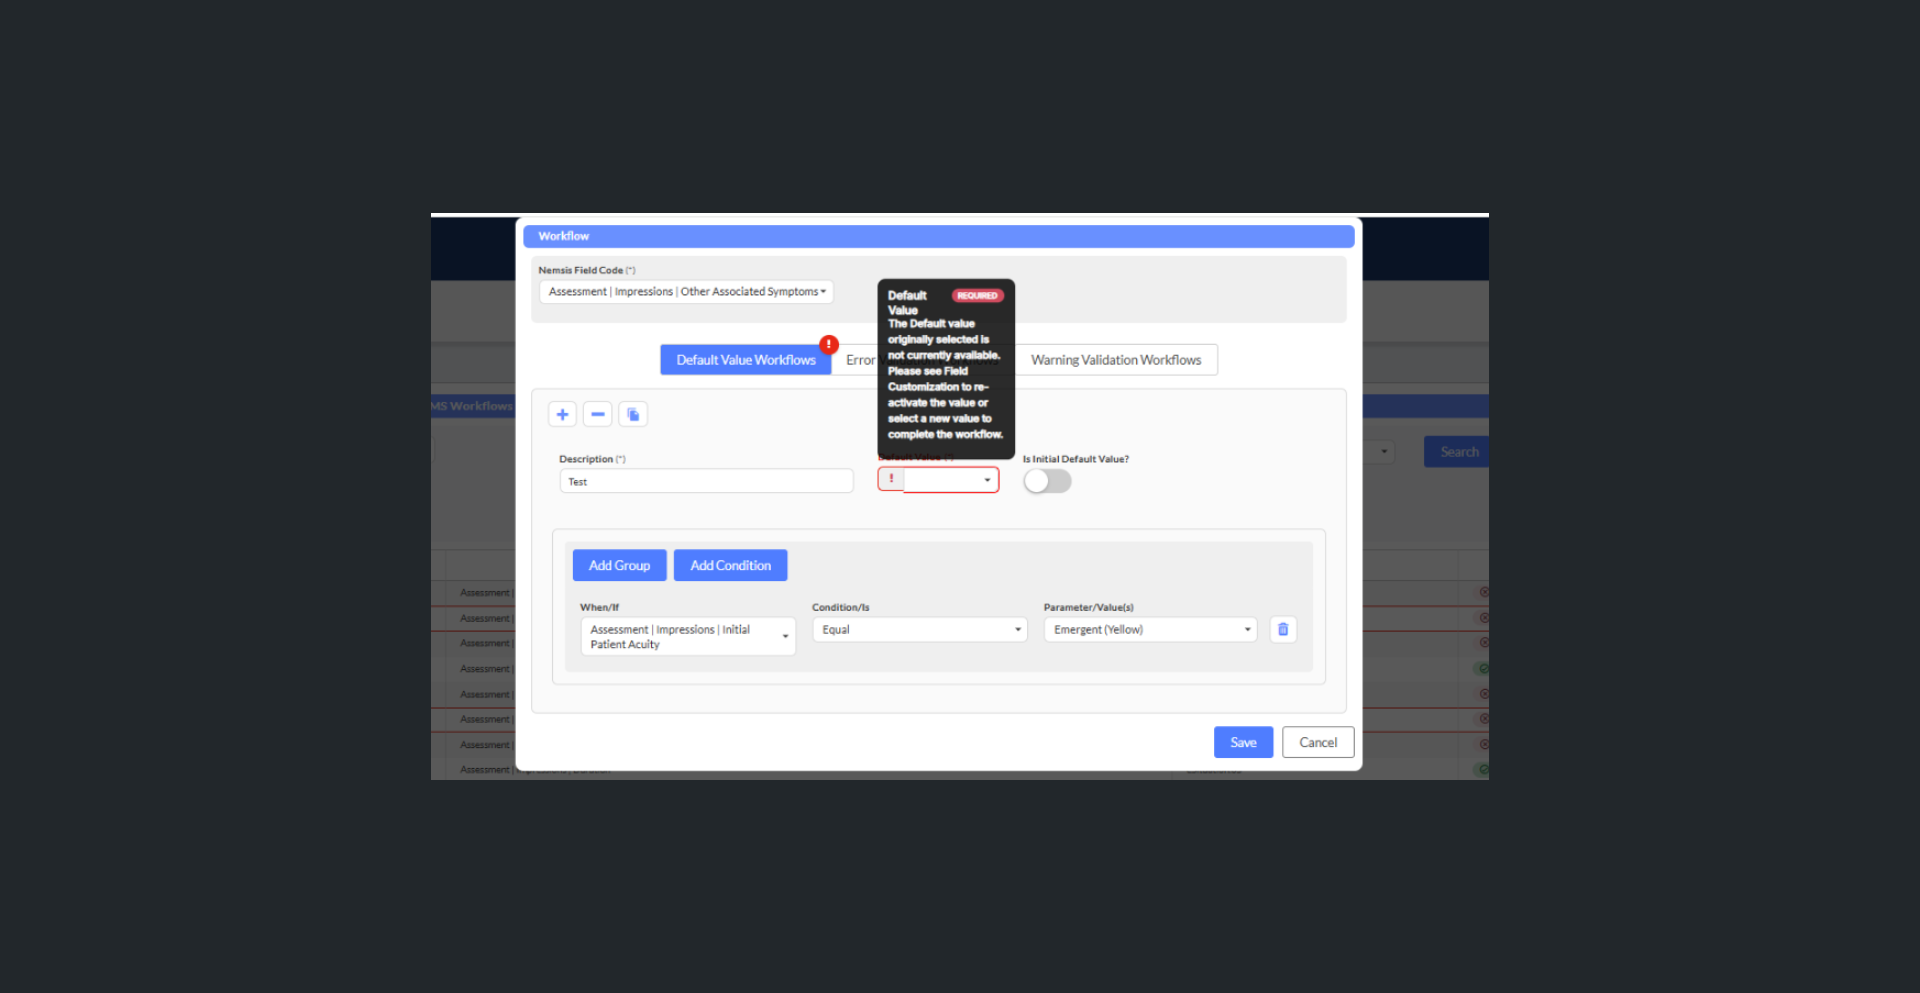
What - This feature implements comprehensive error validation for workflow configurations to help administrators identify and resolve broken workflows caused by client account copying or field customization changes. The enhancement adds visual indicators including a red circle count badge in the Workflows section header displaying the total number of broken workflows, red outlined rows in the workflow list view for immediate identification of problematic workflows, red outlined workflow type tabs (Default, Error, Warning, Hide) when containing broken workflows, and red outlines around specific broken areas within workflow configurations such as Parameter fields. The system displays contextual error messages providing field-specific explanations and resolution steps, automatically clears validation and updates counters when new values are selected and workflows are saved, synchronizes validation when corresponding values are reactivated in Field Customization, and dynamically updates the counter as workflows are fixed or new breaks are detected.
Why - This enhancement was implemented due to customer request to provide maximum guidance for administrators to understand workflow functionality and identify broken workflows that may have resulted from account copying operations or field customization value deactivation, ensuring workflows remain functional and administrators have clear paths to resolution.
How -
Navigate to EMS Setup > Workflows where the system automatically detects workflows with deactivated field customization values or broken configurations
View the red circle count indicator in the Workflows section header showing the total number of broken workflows requiring attention
Identify workflow rows with
red outlines in the list view indicating broken configurations
Click on workflow type tabs (Default, Error, Warning, Hide) which display red outlines when containing broken workflows
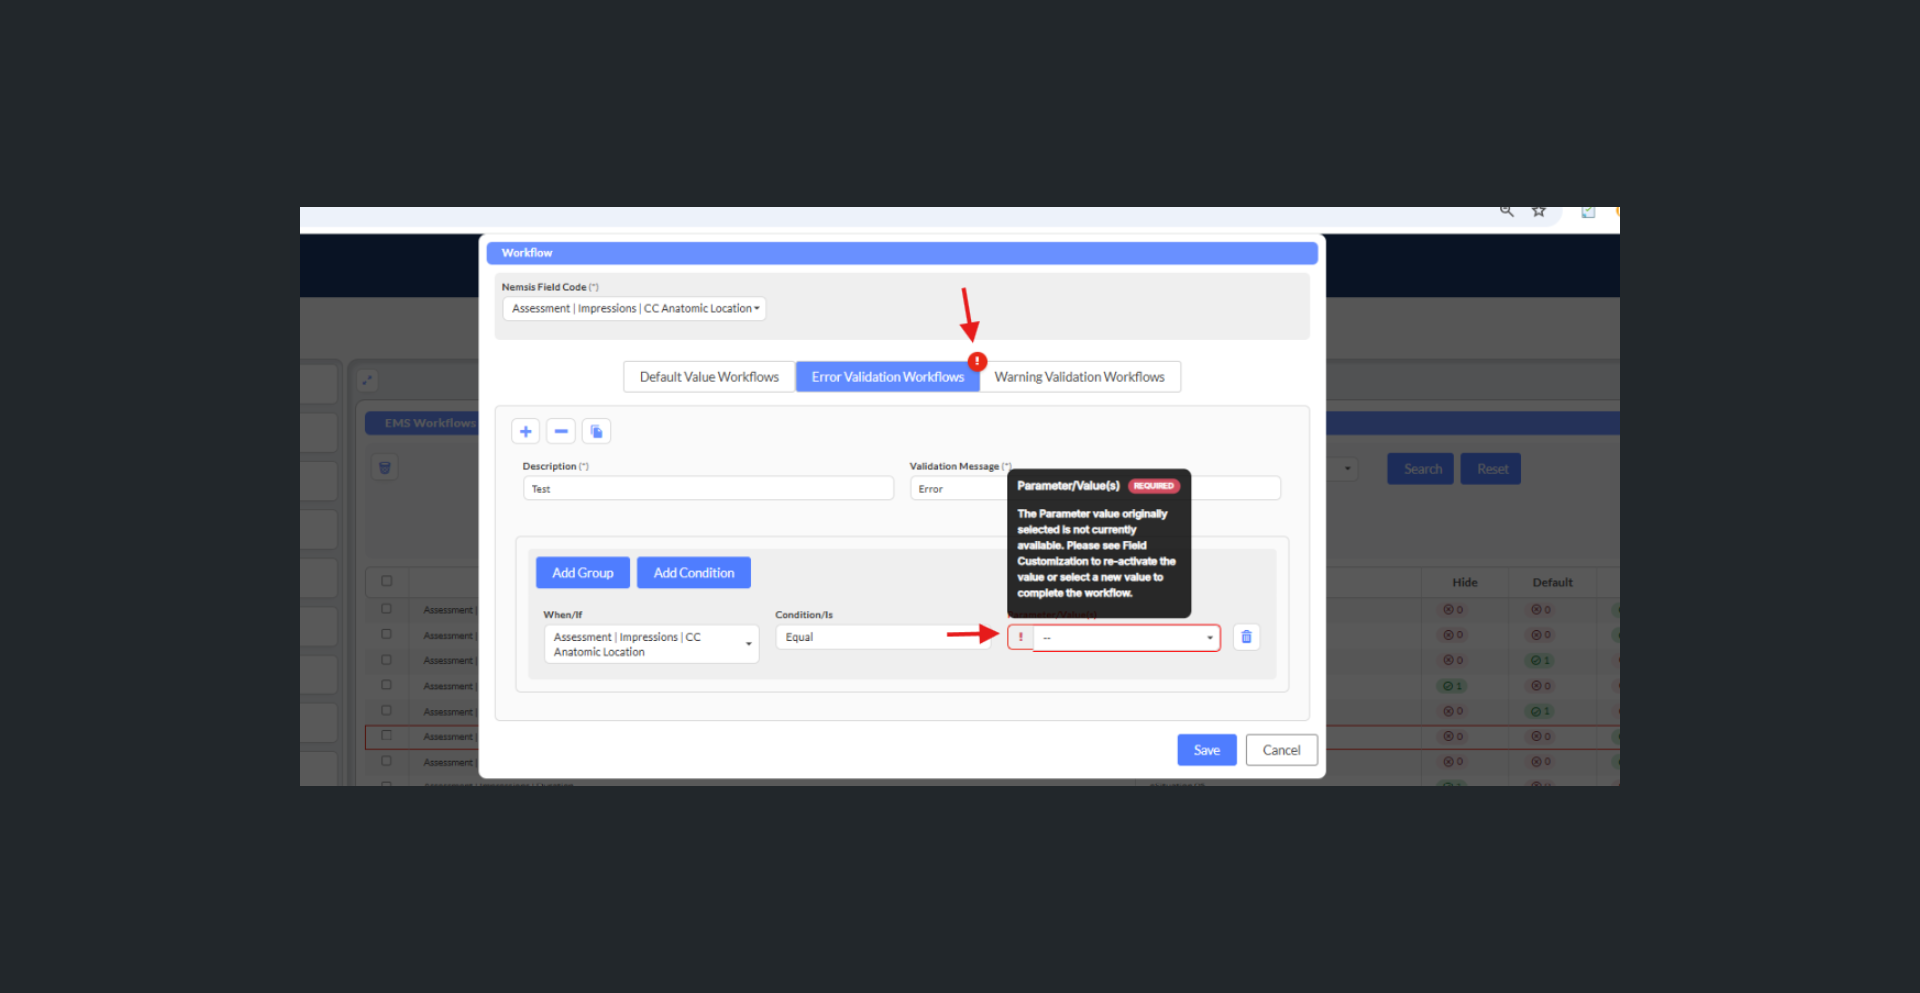
Open the affected workflow to see red outlines around specific broken areas (such as the Parameter field)
Read the contextual error messages displayed in broken areas:
For Error/Warning/Hide workflows: "The Parameter value originally selected is not currently available. Please see Field Customization to re-activate the value or select a new value to complete the workflow."
For Default workflows: "The Default value originally selected is not currently available. Please see Field Customization to re-activate the value or select a new value to complete the workflow."
To resolve by selecting a new value: Select a new available value in the broken field and save the workflow; the system automatically removes the broken state, clears red indicators, and decrements the counter
To resolve by reactivation: Navigate to Field Customization, reactivate the deactivated value; the system automatically detects reactivation, validates the workflow, removes it from the broken state, and updates the counter
Note: The counter and visual indicators update in real-time as workflows are fixed or break, providing immediate feedback on workflow integrity
Use Case - An EMS agency administrator copies a client account configuration to set up a new department and notices a red circle with the number "5" appearing in the Workflows section header. Upon investigation, they see five workflow rows outlined in red and click on one to examine it. Inside the workflow configuration, they notice the Parameter field has a red outline and displays an error message indicating "The Parameter value originally selected is not currently available." The administrator realizes that when the account was copied, certain field customization values weren't transferred. They navigate to Field Customization, locate the missing value for "Cardiac Arrest Protocol," and reactivate it. Immediately, the system detects the reactivation, removes the red indicators from that workflow, and the counter decreases from "5" to "4." The administrator continues this process for the remaining broken workflows, and once all are resolved, the red circle indicator disappears, confirming that all workflows are now functional and ready for use.
What - This feature introduces collapsible and expandable subsections within ePCR forms to reduce excessive scrolling and improve workflow organization on screen. The enhancement enables individual subsection collapse/expand operations where each subsection can be controlled independently without affecting other subsections, provides touch-friendly collapse/expand controls optimized for mobile and tablet use in field environments, maintains collapsed/expanded state preferences during form navigation within the active session, displays all subsections in default expanded state on page reload for consistent starting points, shows red number indicators on parent sections when collapsed subsections contain required fields, displays red/yellow dots next to subsection names in headers when containing error/warning validations, and protects data integrity with no data loss during collapse/expand operations.
Why - This enhancement was implemented due to customer request to address the significant usability challenge where providers needed to "scroll and scroll and scroll" through lengthy ePCR forms, creating a poor user experience that hindered efficient documentation workflows in field operations.
How -
Open an ePCR form where all subsections display in the default expanded state
Click or tap the collapse control on a specific subsection header to collapse that subsection independently
Click or tap the expand control on a collapsed subsection header to restore visibility
Organize your workflow by collapsing subsections not currently needed to reduce scrolling and focus on relevant documentation areas
Collapsed/expanded state preferences persist when navigating between form sections during your active session
When collapsed subsections contain validations, observe the following indicators:
A count indicator appears on the parent section showing total validation items
Red dots appear next to subsection names with error validations
Yellow dots appear next to subsection names with warning validations
When collapsed subsections contain incomplete required fields, a red number indicator displays on the parent section
All entered data remains intact regardless of collapse/expand operations
Note: Page reload returns all subsections to the default expanded state for consistent user experience
Use touch-friendly controls optimized for mobile and tablet devices during field operations
Use Case - A paramedic responds to a multi-patient motor vehicle collision and begins documenting the first patient's care in their ePCR on a tablet. After completing the Patient Demographics and Chief Complaint sections, they collapse those subsections to reduce screen clutter and focus on the Physical Assessment section currently being documented. As they continue documentation, they collapse the completed Physical Assessment subsection and expand the Procedures section to document interventions. When they navigate to the Medications section and back to verify a procedure detail, the system maintains their collapsed/expanded preferences, keeping completed sections collapsed and current work sections expanded. Before completing the report, they notice a red dot next to a collapsed Vital Signs subsection header, alerting them to a validation error, and a red number indicator on the parent section showing they have incomplete required fields in a collapsed subsection. They quickly expand that subsection to address the issue without scrolling through the entire lengthy form.
AI Transcript - Update Narrative Options
What - This feature enhances AI Transcription functionality by converting the single "Analyze" button to a split button with three distinct narrative handling options, giving users greater control over how AI-generated content interacts with their narratives. The enhancement implements "Analyze" as the default primary action maintaining current behavior of generating both field values and AI narrative text with the existing logo, adds "Use My Narrative" option with a MONEY-CHECK-PEN icon that preserves text in the Transcription Input Box as the report narrative and concatenates it with existing narrative without overwriting, and introduces "Fields Only" option with a BAN icon that processes transcription data for field population without generating or displaying narrative output, addressing user feedback where providers were losing carefully edited transcription text or wanting to populate fields without generating narratives.
Why - This enhancement was implemented due to customer request to provide greater flexibility for providers who leverage the AI Transcription box to write and clean up their narratives before analysis, preventing the loss of carefully edited transcription text when using AI processing and enabling workflows where users only want field population without narrative generation.
How -
Open the AI Transcription modal with transcription input and analysis functionality
Type or dictate transcription text in the Input Box, optionally editing and formatting for desired narrative presentation
Locate the Analyze split button with a primary action button and dropdown arrow for secondary options
To use Analyze (Default): Click the primary Analyze button to generate field values from transcription, create AI-generated narrative text, and populate both fields and narrative in the report (maintains existing behavior as default action)
To use "Use My Narrative": Click the dropdown and choose Use My Narrative option (MONEY-CHECK-PEN icon) to process transcription for field value generation, preserve the exact text from Transcription Input Box as narrative, concatenate with existing narrative without overwriting, and maintain your edited and formatted transcription text
To use "Fields Only": Click the dropdown and choose Fields Only option (BAN icon) to process transcription data for field population, extract and populate field values throughout the report, but NOT generate or display narrative in the AI panel
Review the results to verify your chosen option applied correctly:
Analyze: Both fields and AI narrative populated
Use My Narrative: Fields populated with your preserved narrative text
Fields Only: Fields populated without narrative output
Select the appropriate option based on your specific needs:
Complete AI assistance (Analyze)
Narrative preservation (Use My Narrative)
Field-only population (Fields Only)
Note: "Use My Narrative" concatenates new narrative content with existing text, preventing loss of previous documentation
Use Case - A paramedic responds to a cardiac arrest call and uses voice dictation during the incident to capture all critical details in the AI Transcription box. After the call, while reviewing the transcription, the paramedic carefully edits the narrative to correct medical terminology, adjust sentence structure for clarity, and ensure the documentation accurately reflects the sequence of events and interventions. Rather than clicking the standard Analyze button which would replace this carefully edited narrative with AI-generated text, the paramedic clicks the split button dropdown and selects "Use My Narrative." The system processes the transcription to populate time fields, medication dosages, and procedure checkboxes throughout the ePCR, but preserves the paramedic's exact edited narrative text without modification. The paramedic's refined documentation remains intact while still benefiting from automatic field population, saving time while maintaining narrative quality and accuracy.
Signature Setup - Allow sort order of Signature blocks
What - This feature enables signature block reordering through drag-and-drop functionality to help clients organize their ePCR systems more efficiently, implementing the same sort order functionality used in Field Customization > Values interface. The enhancement adds a visual drag handle column with three-line icons for signature block reordering, displays a position column showing numerical position indicators for each signature block's order within the group, enables click-and-drag reordering using the familiar Field Customization pattern, automatically floats default signature blocks to the top of the list when the toggle is activated while maintaining drag capability among default blocks, and ensures sort order reflects consistently in both EMS Setup and ePCR Report views with preservation of user-defined order during editing, adding, and deleting operations.
Why - This enhancement was implemented due to customer request to help clients maintain organized and efficient ePCR systems by providing control over signature block presentation order, aligning signature setup with other configurable list interfaces in the system.
How -
Navigate to Signature Setup where signature blocks are displayed with new Drag & Drop and Position columns
Review the existing signature block order with position numbers indicating the current sequence
Locate the three-line drag handle icons in the Drag & Drop column for each signature block
When the Default toggle is enabled on signature blocks, those blocks automatically float to the top of the list
To reorder default signature blocks among themselves at the top of the list, click and drag the drag handle to the desired position
To reorder non-default signature blocks, click and drag the drag handle to arrange them in the desired sequence below default blocks
Release the signature block in the desired location to establish the new position in the sort order
View the Position column numbers update dynamically, reflecting the new sort order
Verify signature blocks display in the configured order within the Signature Setup interface
Navigate to an ePCR Report and verify signature blocks appear in the same order as configured in setup
Note: The system preserves established sort order when editing signature block details
Note: New signature blocks integrate into the existing sort order structure when added
Note: When deleting signature blocks, remaining blocks maintain their relative positions in the sort order
Use Case - An EMS agency administrator reviews their Signature Setup and realizes that the most commonly used signature blocks appear at the bottom of the list, requiring providers to scroll excessively when completing reports. The administrator decides to reorganize the signature blocks by priority and frequency of use. They navigate to Signature Setup, locate the "Crew Chief Signature" block which appears seventh in the list, click and drag the three-line handle icon upward, and drop it in the second position. The position numbers immediately update to reflect the new order. They continue reordering, placing "Paramedic Signature" first, "EMT Signature" third, and moving less frequently used signatures like "Medical Director Review" toward the bottom. After saving the changes, the administrator opens a test ePCR report and confirms that the signature blocks now appear in the new priority order, with the most commonly used signatures appearing first, reducing the time providers spend locating and completing required signature blocks during report finalization.
City/County GNIS - Address and City-County Combination Updates
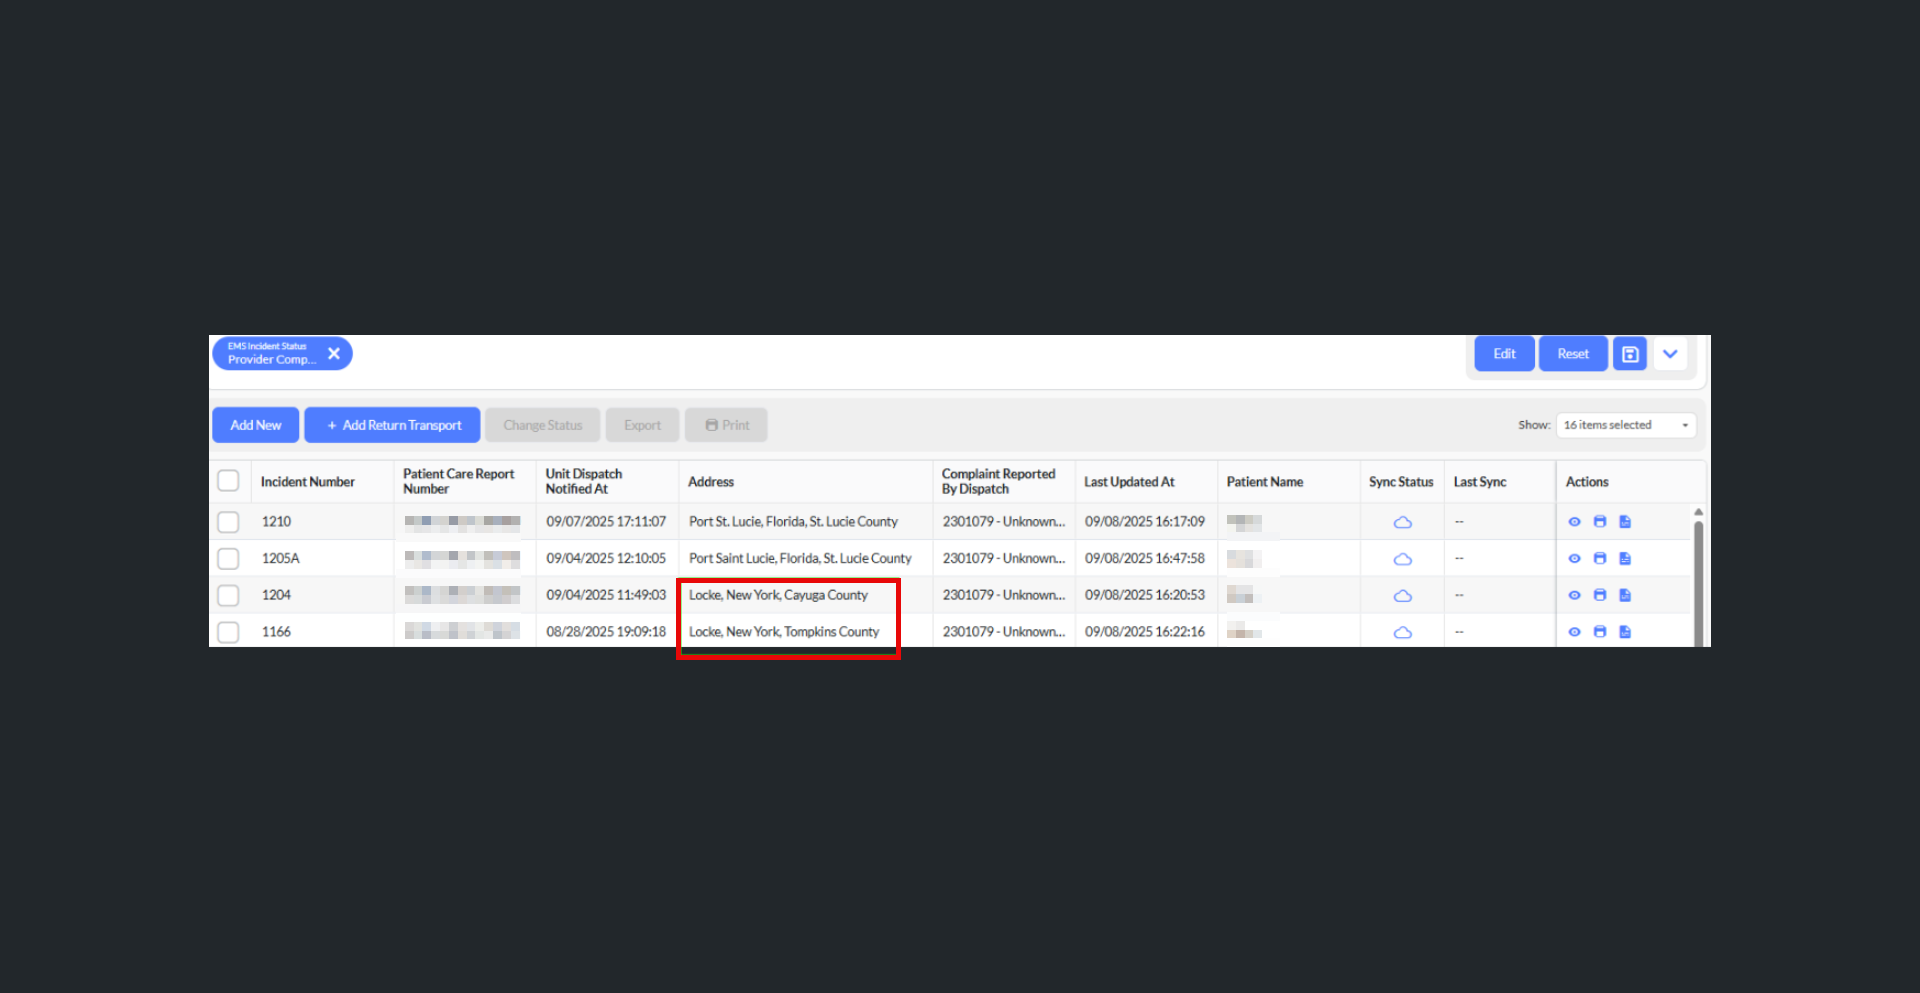
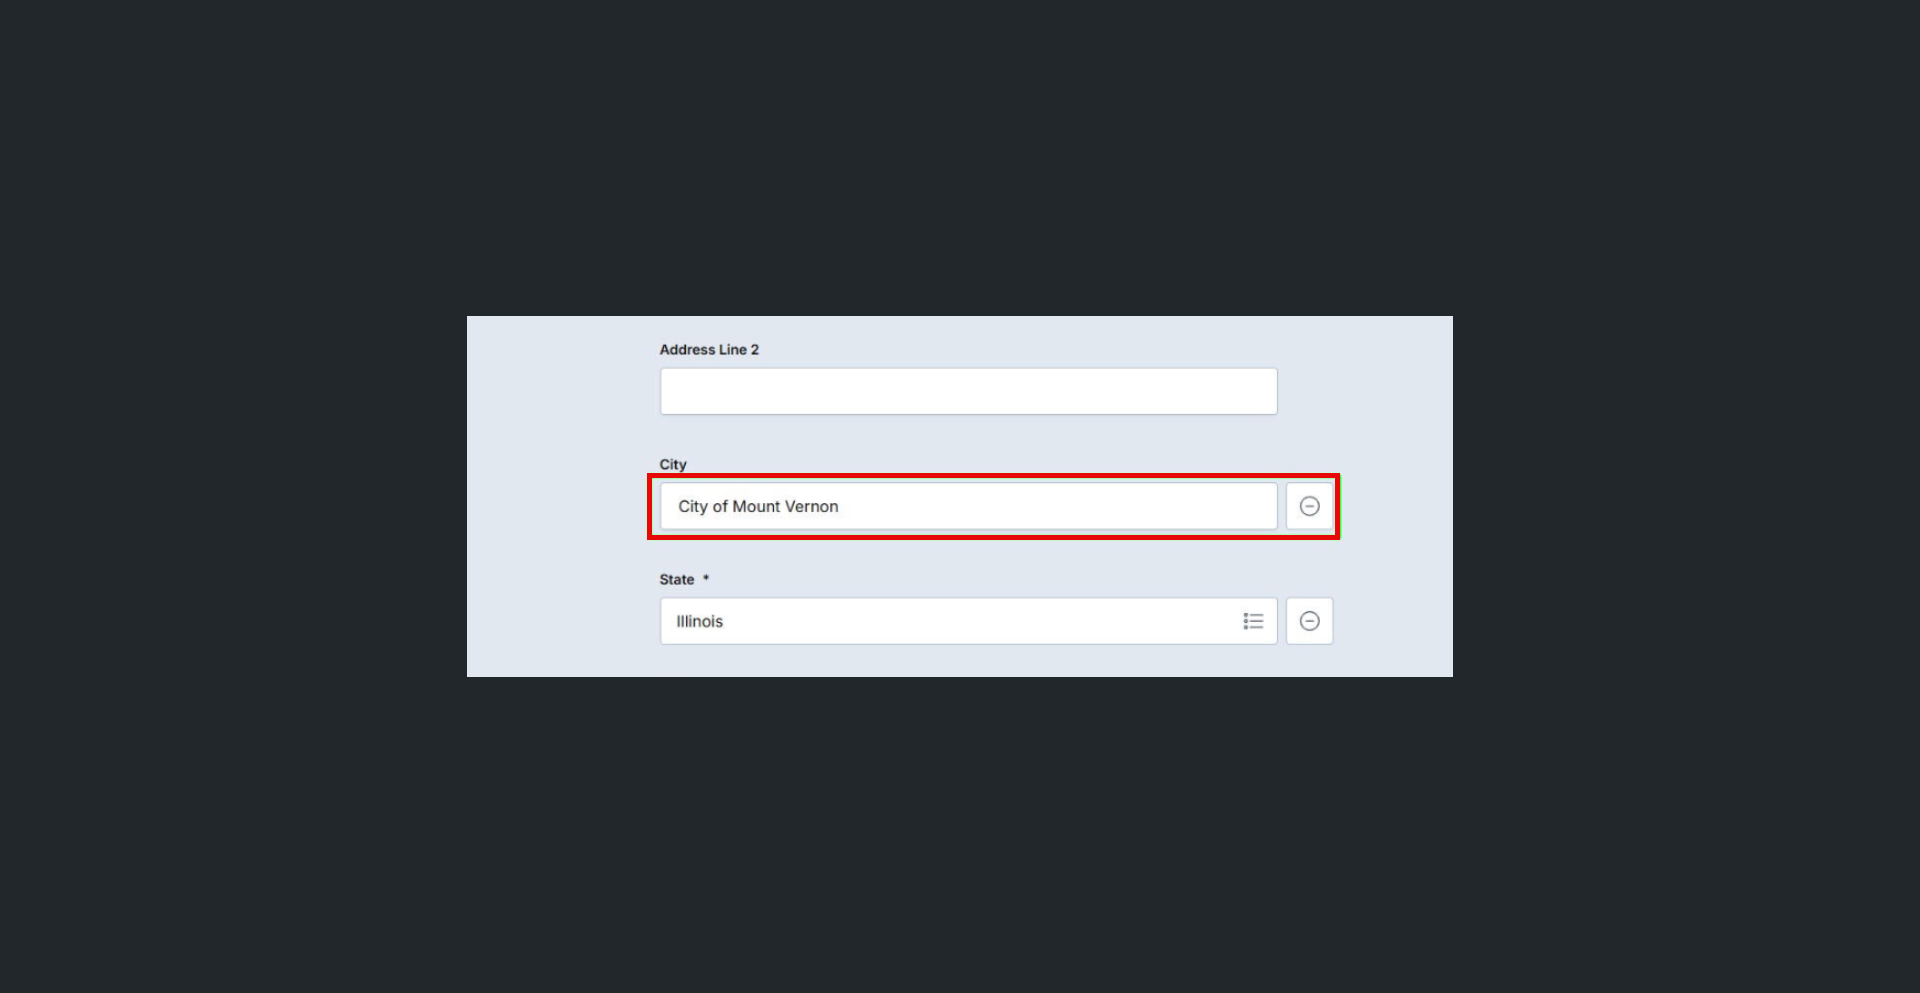
What - This feature implements multiple GNIS (Geographic Names Information System) database updates to resolve city-county combination issues affecting address documentation accuracy in several jurisdictions. The enhancement adds support for Plainwell, Michigan to be documented with both Allegan County and Barry County (zip code 49080), enables the city name "Locke" in New York to be paired with both Tompkins County and Cayuga County, adds "Port St. Lucie" as an alternative spelling variation for existing GNIS Feature ID 308089 alongside "Port Saint Lucie" in Florida, and maps the CAD value "MOUNT VERNON" to City of Mount Vernon GNIS Feature ID 2395129 in Illinois with case-insensitive matching. These updates prevent city fields from being erased when users switch to valid counties within multi-county city boundaries, ensure proper address validation for cities spanning multiple counties, and enable CAD data integration with spelling variations and case-insensitive matching for improved address documentation accuracy.
Why - These enhancements were implemented due to customer request to resolve data validation issues where the original GNIS upload did not contain information for cities spanning multiple counties, causing city field clearing when switching to valid but unmapped county combinations, and to support alternative spellings and case variations that appear in CAD data but did not match GNIS library entries.
How -
For Plainwell, Michigan:
When documenting an incident in the Plainwell area (zip code 49080), enter "Plainwell" as the city
Select either Barry County or Allegan County as the county
The system now maintains "Plainwell" in the city field instead of clearing it when either county is selected
Both Plainwell + Barry County and Plainwell + Allegan County are recognized as valid combinations
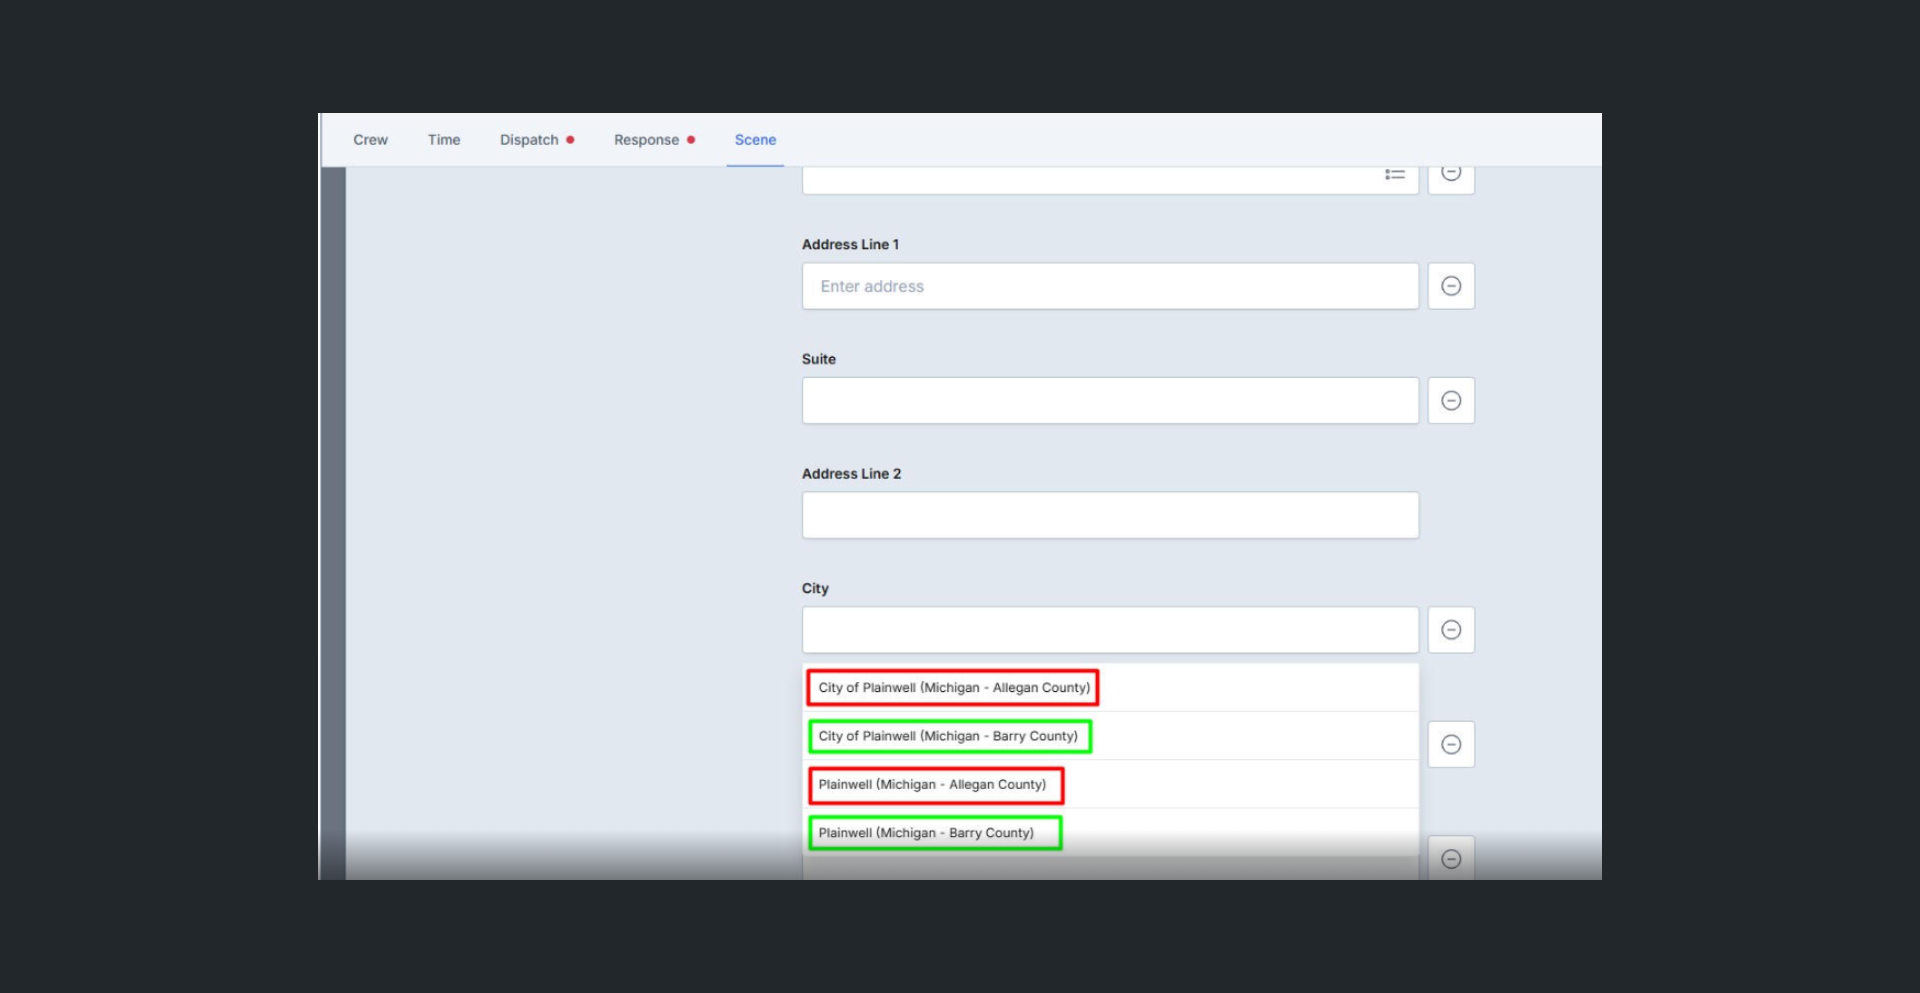
For Locke, New York:
When documenting an incident with city name "Locke" in New York, enter "Locke" as the city
The system validates both Locke + Tompkins County and Locke + Cayuga County as valid combinations
Switching between Tompkins and Cayuga counties maintains "Locke" in the city field without clearing
For Port St. Lucie, Florida:
For Mount Vernon, Illinois:
When CAD system sends city value "MOUNT VERNON" for Illinois incidents, the system maps it to City of Mount Vernon GNIS Feature ID 2395129
The matching logic ignores case differences between the CAD value and GNIS entry
Mount Vernon, IL addresses are properly validated regardless of CAD capitalization
Note: These updates ensure users can document addresses accurately when incidents occur in multi-county cities without experiencing field clearing issues
Use Case - An EMS crew responds to a medical call in Plainwell, Michigan, which is located in an area where the city spans both Allegan County and Barry County. The agency's response area falls primarily within the Barry County portion of Plainwell. When the paramedic documents the incident address in their ePCR, they enter "Plainwell" as the city and initially select Allegan County from the dropdown. Upon realizing their specific location is in the Barry County section, they change the county selection to Barry County. Previously, this county change would have cleared the "Plainwell" city field, requiring re-entry and causing confusion. With this enhancement, when the paramedic switches to Barry County, the system now maintains "Plainwell" in the city field, recognizing that Plainwell + Barry County is a valid combination. The address documentation remains accurate and complete without requiring the paramedic to re-enter the city name, improving documentation efficiency and preventing address validation errors for incidents in multi-county cities.
Related Articles
ePCR Release Notes - October 2025
New Features 1. CAD - Option to Import All Apparatus from CAD into ePCR What - Multi-unit CAD import functionality has been enabled with configurable primary and supporting unit logic, allowing users to select multiple apparatus and crew from CAD ...
Fire Investigations Release Notes - October 2025
Video New Features CAD Integration for Fire Investigation Module What - The Fire Investigation (FI) module now supports automatic creation and population of investigation records from CAD data using the existing NFIRS notification structure. When a ...
Fire Investigations Release Notes - November 2025
NEW FEATURES Create a new setting for Custom Status What - A new Custom Status configuration has been added under Field Management, allowing agencies to create their own investigation statuses in addition to the platform's standard lifecycle statuses ...
Health & Wellness Release Notes - November 2025
New Features Update Import Data Tool to Pull in Training Data What - The Import Data tool has been expanded to include Training data alongside Fire Incident data, with the tool renamed from "Import Fire Report Data" to "Import Internal Data." Users ...
Fire Incident Documentation Release Notes: November 2025
New Features Implement Unit Actions Behavior for Aiding Apparatus in NERIS What - NERIS now properly handles Actions Taken for Aiding Apparatus, ensuring that deleting apparatus with incomplete action data no longer triggers invalid validation errors ...