ePCR Release Notes - October 2025
New Features
1. CAD - Option to Import All Apparatus from CAD into ePCR
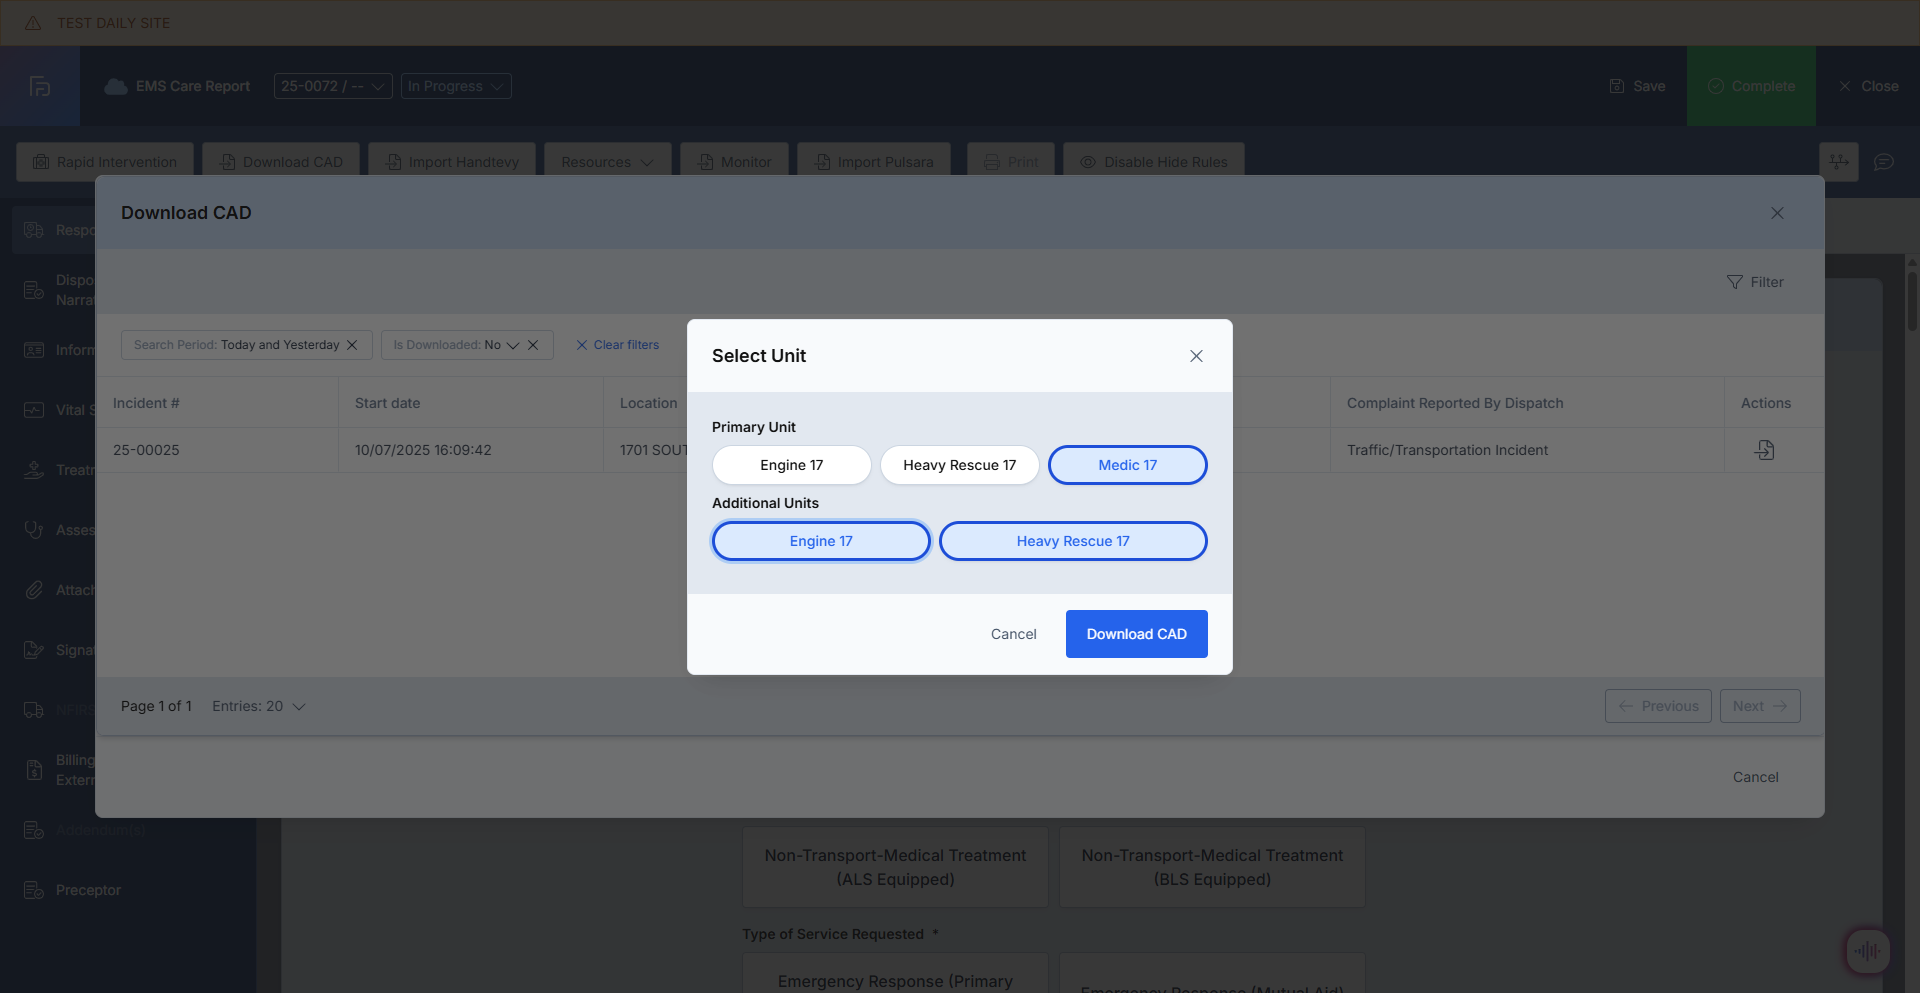
What - Multi-unit CAD import functionality has been enabled with configurable primary and supporting unit logic, allowing users to select multiple apparatus and crew from CAD data while maintaining clear distinction between primary and supporting units. The enhancement provides flexible download options for apparatus-only or combined crew and apparatus imports, incremental download capabilities that add new units without overwriting existing data, and time association logic that matches supporting unit personnel by scheduled times aligning with primary unit, supporting accurate documentation of multi-unit responses without over-populating crew data or requiring extensive manual cleanup.
Why - This enhancement was implemented due to customer request to support accurate multi-unit response documentation where multiple apparatus respond to the same incident, enabling EMS agencies to efficiently import all responding units from CAD while maintaining clear primary unit designation and avoiding crew data over-population that previously required extensive manual cleanup.
How - Multi-unit CAD import is managed through enhanced configuration settings and selective import controls:
Navigate to EMS Setup → General and enable "Allow download for multiple CAD units" setting
Select download mode: "Download Apparatus Only" or "Download Crew and Apparatus" based on documentation needs
Open CAD download modal for incidents with multiple units available
Designate primary unit (e.g., Medic 17) which floats to top and enables download button
Multi-select additional units (e.g., Engine 17, Heavy Rescue 17) from Additional Units section
Apparatus Only mode imports times and crew from primary unit with all selected apparatus listed
Crew and Apparatus mode imports times from primary unit and crew from all selected units per integration configuration
Incremental downloads add newly selected units while preserving previously imported data
Refresh CAD updates empty fields without overwriting existing information
Note: Primary unit selection automatically populates times, personnel, and apparatus with primary designation
Note: Supporting units can be selectively imported without assuming all units need full documentation
Note: Second CAD download adds new units while maintaining existing apparatus and crew entries
Use Case - When an ambulance, engine, and supervisor respond to a cardiac arrest, the paramedic can designate Medic 17 as the primary unit and select Engine 17 and Heavy Rescue 17 as supporting units in the CAD import modal. With "Download Crew and Apparatus" mode selected, the system imports the primary unit's times and all crew members from the three responding units, clearly marking Medic 17 as primary in the apparatus grid. If the paramedic later realizes Battalion 1 also responded and performs a second CAD download selecting that unit, the system adds Battalion 1 to the apparatus list without removing or overwriting the previously imported units and crew, allowing accurate multi-unit documentation without starting the import process over or manually cleaning up duplicate entries.
What - Deletion capability for AI-generated comments has been introduced in the QA/QI module with mandatory feedback collection to improve AI accuracy over time, featuring a trash can icon integrated into AI comments that triggers a confirmation modal with multi-select reason options. The system implements soft delete architecture that preserves deleted comments in the database with metadata including deletion timestamp, user identity, incident ID, comment content, and selected reasons, while providing real-time synchronization across EMS QA/QI and EMS Care Report interfaces to ensure immediate deletion updates and support continuous AI model improvement through captured feedback data.
Why - This enhancement was implemented due to customer request to address the reality that AI feedback is not always accurate or applicable, allowing users to remove incorrect or irrelevant comments containing inaccurate protocol interpretations, missing context, or inapplicable references while capturing valuable deletion reason data to inform AI model improvements and ensure the system learns from user corrections over time.
How - AI comment deletion is managed through user-friendly interface with comprehensive feedback collection:
Open QA/QI review from EMS QA/QI list where AI Comments section displays generated feedback
Locate trash can icon next to AI comment text for comments requiring removal
Click delete icon to trigger confirmation modal with multi-select feedback options
Select deletion reasons from six categories: Inaccurate Interpretation of Protocol, Information is already present, Protocol not applicable to this patient scenario, Missing Contextual details, Incorrect identification of data element, and Other
Choose multiple reasons, single reason, all options, or skip reason selection entirely for flexible feedback
Use red Delete button to confirm removal or Cancel button to preserve comment
System marks comment as deleted (is_deleted = true) in epcr_ai_review_field table while preserving original content
Deletion metadata captured including timestamp, user identity, incident ID, comment content, and selected reasons
Changes synchronize immediately across both EMS QA/QI and EMS Care Report interfaces
Note: Deleted comments retained in database for AI training and model refinement purposes
Note: Deletion feedback data supports continuous AI improvement and accuracy enhancement
Note: Feature acknowledges current AI limitations while providing path for system learning
Use Case - A QA supervisor reviewing an AI-generated comment that states "Epinephrine dose of 1mg exceeds protocol maximum of 0.3mg for anaphylaxis" recognizes this is inaccurate because the patient received epinephrine for cardiac arrest, not anaphylaxis, where 1mg is the correct dose. The supervisor clicks the trash can icon, selects "Inaccurate Interpretation of Protocol" and "Protocol not applicable to this patient scenario" from the deletion reasons, and confirms deletion. The system immediately removes the comment from both the QA/QI interface and the crew's ePCR view while preserving the original comment text and deletion feedback in the database, allowing AI developers to use this real-world correction to improve future protocol interpretation accuracy and reduce similar errors in cardiac arrest case analysis.
What - Scene address information has been integrated with the Address Point Management functionality to automatically create occupancies from scene locations when they don't already exist in the system, leveraging the existing Address Point Management endpoint developed by the Preplan team. The system implements intelligent address matching with place_id storage, automatic occupancy creation upon report completion for addresses within the client's operational state, and proper handling of out-of-state addresses with null values to prevent duplicate occupancy creation while enabling improved pre-planning and response coordination capabilities.
Why - This enhancement was implemented due to customer request to automatically capture and maintain occupancy data from actual incident scene locations, enabling improved pre-planning, hazard identification, and response coordination for future incidents at the same addresses while leveraging robust Address Point Management functionality developed by the Preplan team for consistency across the platform.
How - Address Point integration is automatically managed through scene address processing with intelligent validation:
Check with your CSM to activate "Enable Address Point Management" setting in system configuration
User enters scene address information during ePCR documentation
System validates if scene address belongs to client's operational state
In-state addresses call Address Point Management endpoint that checks for existing occupancy and creates new record if none found, saving place_id and address_id in epcr_scene table
Out-of-state addresses save null value in address_id field with no occupancy creation attempted
Upon report completion, system ensures valid address_id values remain stored with created or matched occupancies available in Occupancy table
place_id storage and existing occupancy checking prevent duplicate records for same location
Note: Scope limited to Scene addresses only to maintain focus on incident locations within service area
Note: Feature requires "Enable Address Point Management" setting activation for functionality
Note: Integration utilizes Address Point Management logic for consistency across platform
Use Case - When an ambulance responds to a residential address at 789 Maple Drive that doesn't exist in the occupancy database, the system automatically validates the address is within their operational state, checks for existing occupancies at that location using place_id matching, and creates a new occupancy record when none is found. Upon ePCR completion, the address_id is stored in the scene table, making the occupancy available for future pre-planning activities. If the same address generates another call six months later, the system recognizes the existing occupancy through place_id matching and links the new incident without creating a duplicate record, while out-of-state transfers to neighboring jurisdictions are properly handled with null address_id values since those locations fall outside the department's service area and don't require occupancy tracking.
Enhancements
1. Remove Attachment Option from External Resource Section and Migrate Data to Primary Attachment Section
What - The attachment functionality has been removed from the External Reports section and all historical attachment data has been migrated to the primary Attachments section to ensure NEMSIS export compliance and proper billing documentation. The enhancement eliminates the attachment dropzone and attach/add options from External Reports Grid interface while automatically migrating all historical attachments through database reassignment from epcr_external_reporting_id to epcr_other_attachment_id, consolidating all attachment functionality in the appropriate location where files are properly exported and documented.
Why - This enhancement was implemented due to customer request to address compliance and billing issues where attachments added to External Reports were not included in NEMSIS XML exports, requiring consolidation of all attachment functionality in the primary Attachments section to ensure proper export and documentation for regulatory compliance and billing requirements.
How - Attachment migration is automatically processed with complete data preservation and export compliance:
Attachment UI removed from External Reports Grid including dropzone and attach/add options
Database migration automatically reassigns all historical attachments from External Reports to primary Attachments section
Historical data remains accessible through primary Attachments section without data loss
External Reports can be saved, completed, printed, and exported successfully without attachment features
NEMSIS XML exports now properly include all attachments for billing and regulatory compliance
Data integrity preserved through complete linkage maintenance between migrated photos, epcr_other_attachment records, and epcr records
Reports process successfully without validation errors or export issues after migration
Note: Post-migration validation confirms all photos properly linked to correct record types
Note: Clean interface focuses External Reports Grid on core reporting functionality
Note: All previously attached files remain fully accessible and functional in primary location
Use Case - An EMS agency that previously attached patient care photos to External Reports entries will find all historical images automatically migrated to the primary Attachments section, where they can access the same photos alongside other incident attachments. When generating NEMSIS XML exports for billing submission, all attachments including the previously External Reports-linked photos are now properly included in the export file, ensuring compliance with state reporting requirements and complete billing documentation. The External Reports interface remains fully functional for its core purpose of documenting external reporting activities, while all attachment management is consolidated in the appropriate Attachments section where proper export functionality ensures regulatory compliance and billing accuracy.

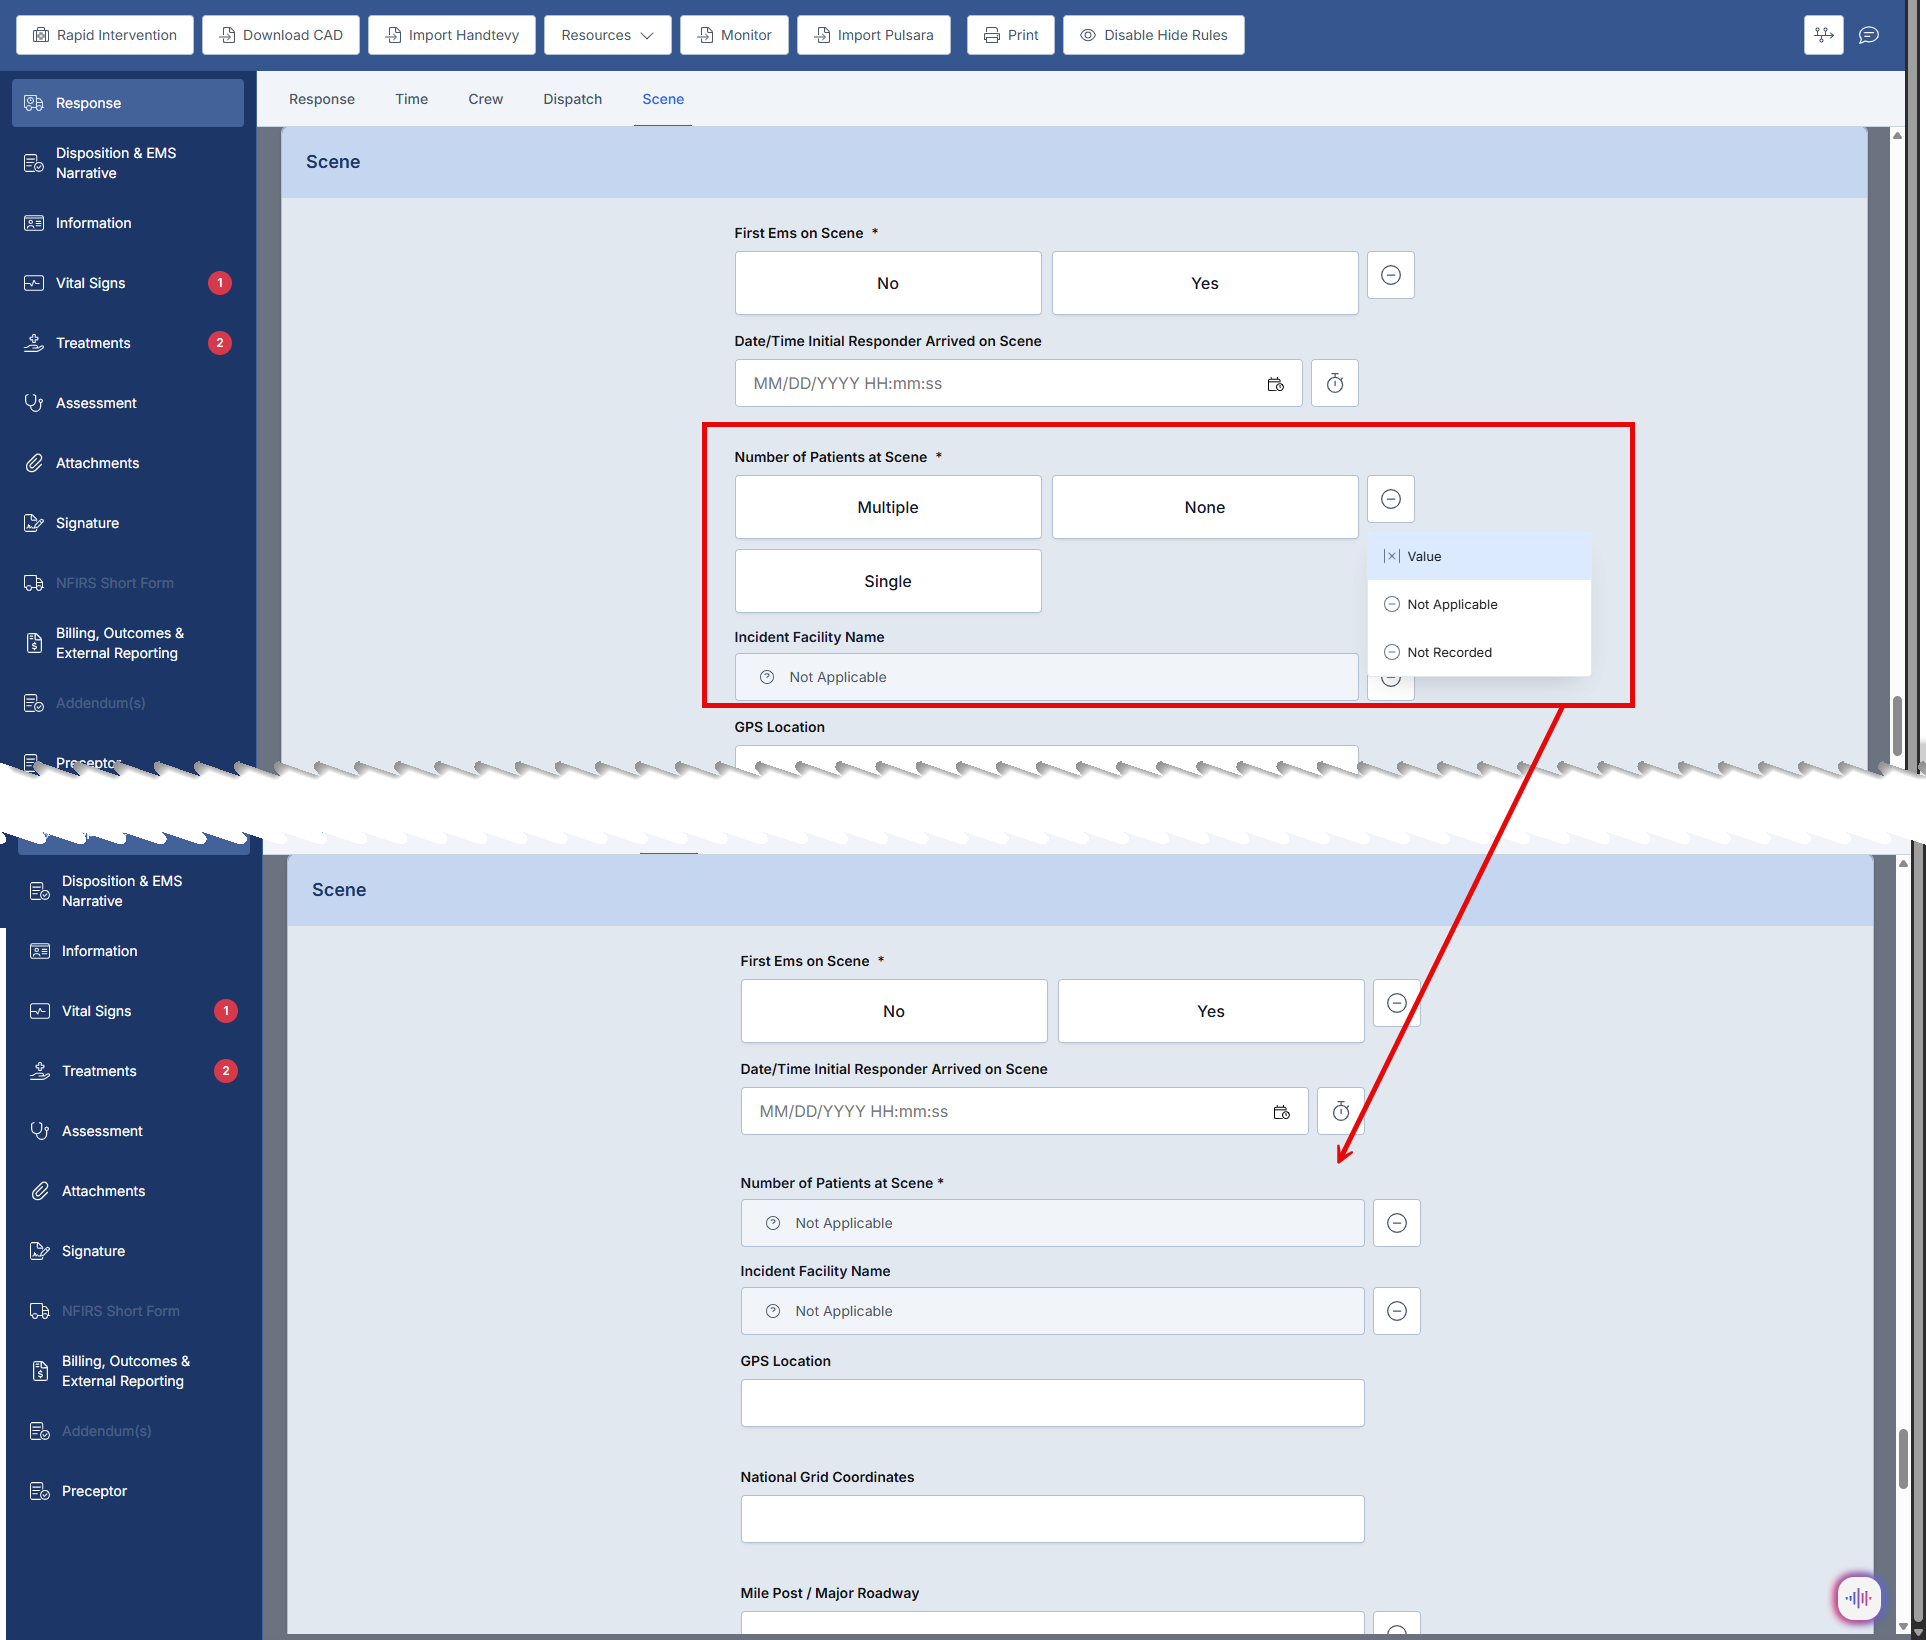
2. Not Value Implementation Correction/Consistency with Screen Maximization
What - The display and behavior of Not Values across the ePCR form has been standardized to improve consistency and maximize screen real estate through uniform visual treatment with bordered containers and dynamic field hiding functionality. The system automatically collapses button packs and dropdown selectors when Not Values (Not Recorded, Not Applicable, Unknown, etc.) are selected, reducing scrolling requirements and improving form efficiency while maintaining exceptions for specific fields like eProcedures.03, eMedications.03, and Symptom Onset Date/Time that allow simultaneous Not Values and regular values, with consistent enforcement of Custom Value and Not Value mutual exclusivity.
Why - This enhancement was implemented due to customer request to address inconsistent Not Value display styles causing confusion and to improve form efficiency by reducing vertical space requirements, enabling users to complete documentation with less scrolling while maintaining clear visual treatment and proper data integrity enforcement for fields where Not Values and regular values cannot coexist.
How - Not Value behavior is standardized through uniform visual treatment and dynamic field management:
Not Value options (Not Recorded, Not Applicable, Unknown) display in standardized bordered containers
Container layout aligns inline with field indicators on same row for space optimization
Select Not Value triggers system to automatically hide 6-pack buttons or dropdown selectors for selected field
Fields below dynamically shift upward, reducing vertical space and scrolling requirements
Custom Value fields disable when Not Value selected and re-enable when deselected
Exception fields (eProcedures.03, eMedications.03, Symptom Onset Date/Time) maintain visible normal options alongside Not Value
Deselect Not Value automatically redisplays 6-pack buttons or dropdown selectors
Workflow fields apply same uniform visualization, hide/show controls, and dynamic space adjustment
Note: Majority of fields cannot have both real value and Not Value documented simultaneously
Note: System enforces mutual exclusivity between Custom Values and Not Values for data integrity
Note: Uniform bordered container treatment improves visual consistency across entire form
Use Case - A paramedic documenting a patient encounter who did not receive any medications can select "Not Applicable" in the Medications section, causing the system to automatically hide the medication dropdown selector and shift all subsequent form fields upward, reducing the need to scroll through empty medication fields. If the paramedic later realizes the patient did receive aspirin and deselects "Not Applicable," the medication dropdown immediately reappears allowing proper documentation. For procedure fields that permit both Not Values and regular selections, such as eProcedures.03, the normal procedure options remain visible even when "Not Recorded" is selected, supporting complex documentation scenarios while maintaining the space-saving benefits for standard fields throughout the form.
3. EKG Procedure Auto-Documentation Enhancement
What - The system now automatically documents 3-lead electrocardiographic monitoring procedures when EKG leads are placed on patients during care. When the EKG device captures a "Leads On" event indicating that cardiac monitoring has begun, the software automatically adds procedure code 428803005 (3-lead electrocardiographic monitoring procedure) to the patient care report with the exact timestamp of when the leads were applied. This enhancement uses actual captured event data from the EKG device rather than relying on configuration settings, ensuring that only events where leads were genuinely placed trigger the procedure documentation. The system intelligently processes only the first "Leads On" event to prevent duplicate entries that could occur from lead repositioning or monitoring artifacts, and it adds the procedure regardless of whether it's active in your agency's field customization settings, displaying appropriate notifications when inactive codes are used.
Why - This enhancement was implemented due to customer requests for improved billing accuracy and more complete clinical documentation. Agencies reported that cardiac monitoring procedures were being under-documented, resulting in lost revenue and incomplete patient care records. By automating the procedure documentation based on actual device data rather than manual entry or configuration settings, the system ensures that every instance of EKG monitoring is properly captured for billing and compliance purposes, reducing the administrative burden on field personnel while improving documentation completeness and revenue capture for agencies providing cardiac monitoring services.
How - This feature works automatically with no configuration required
Import EKG case data as you normally would through your integrated EKG device
The system will automatically detect "Leads On" events from the EKG data
When detected, procedure code 428803005 (3-lead electrocardiographic monitoring procedure) will be added to the Procedures section of the patient care report
The procedure timestamp will match the exact time the EKG leads were placed according to device data
Note: If procedure code 428803005 is not in your agency's active custom procedure list, it will still appear in the report with a notification stating "This procedure cannot be used in the report, to use it you must first add it to your custom list"
Note: To enable the procedure for reporting, navigate to Agency Settings > Field Customization > Procedures and add code 428803005 to your active list
Note: Only the first "Leads On" event will trigger procedure documentation; subsequent events from lead repositioning will not create duplicate entries
Use Case - A paramedic crew responds to a 62-year-old patient complaining of chest pain and applies 3-lead EKG monitoring at 14:23 to assess cardiac rhythm during transport. The EKG device captures this "Leads On" event and transmits it with the case data. When the crew imports the EKG data into their patient care report, the system automatically adds the 3-lead electrocardiographic monitoring procedure with a timestamp of 14:23, matching exactly when the leads were applied. This ensures the monitoring procedure is properly documented for billing purposes without requiring the paramedic to manually enter it, reducing documentation time while improving billing accuracy. If the patient's condition requires the crew to reposition the leads during transport, these subsequent "Leads On" events are ignored to prevent duplicate procedure entries, maintaining clean and accurate clinical documentation that supports proper reimbursement for the cardiac monitoring services provided.
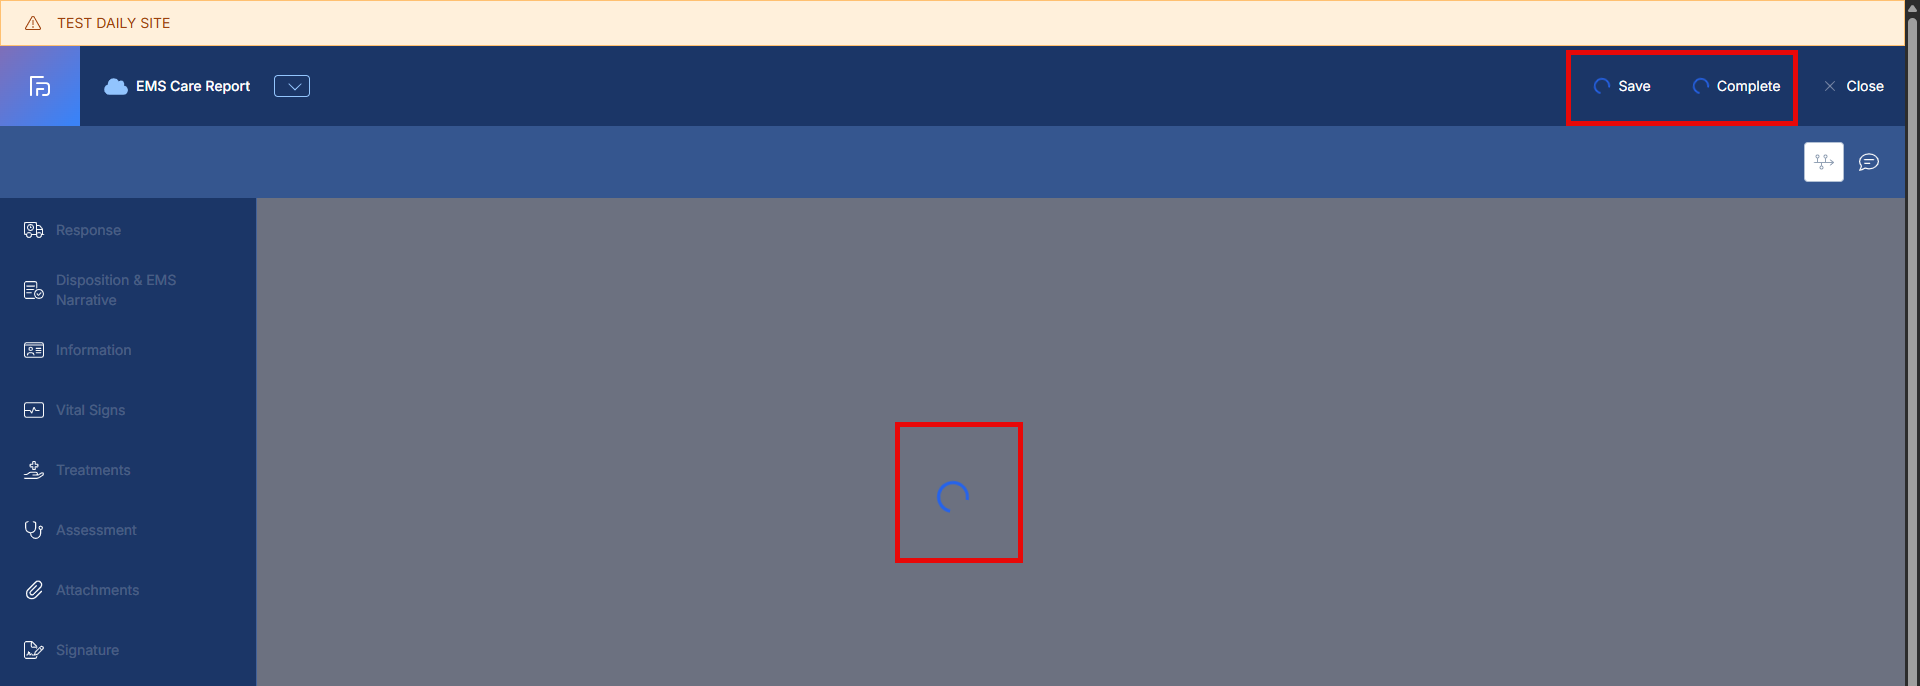
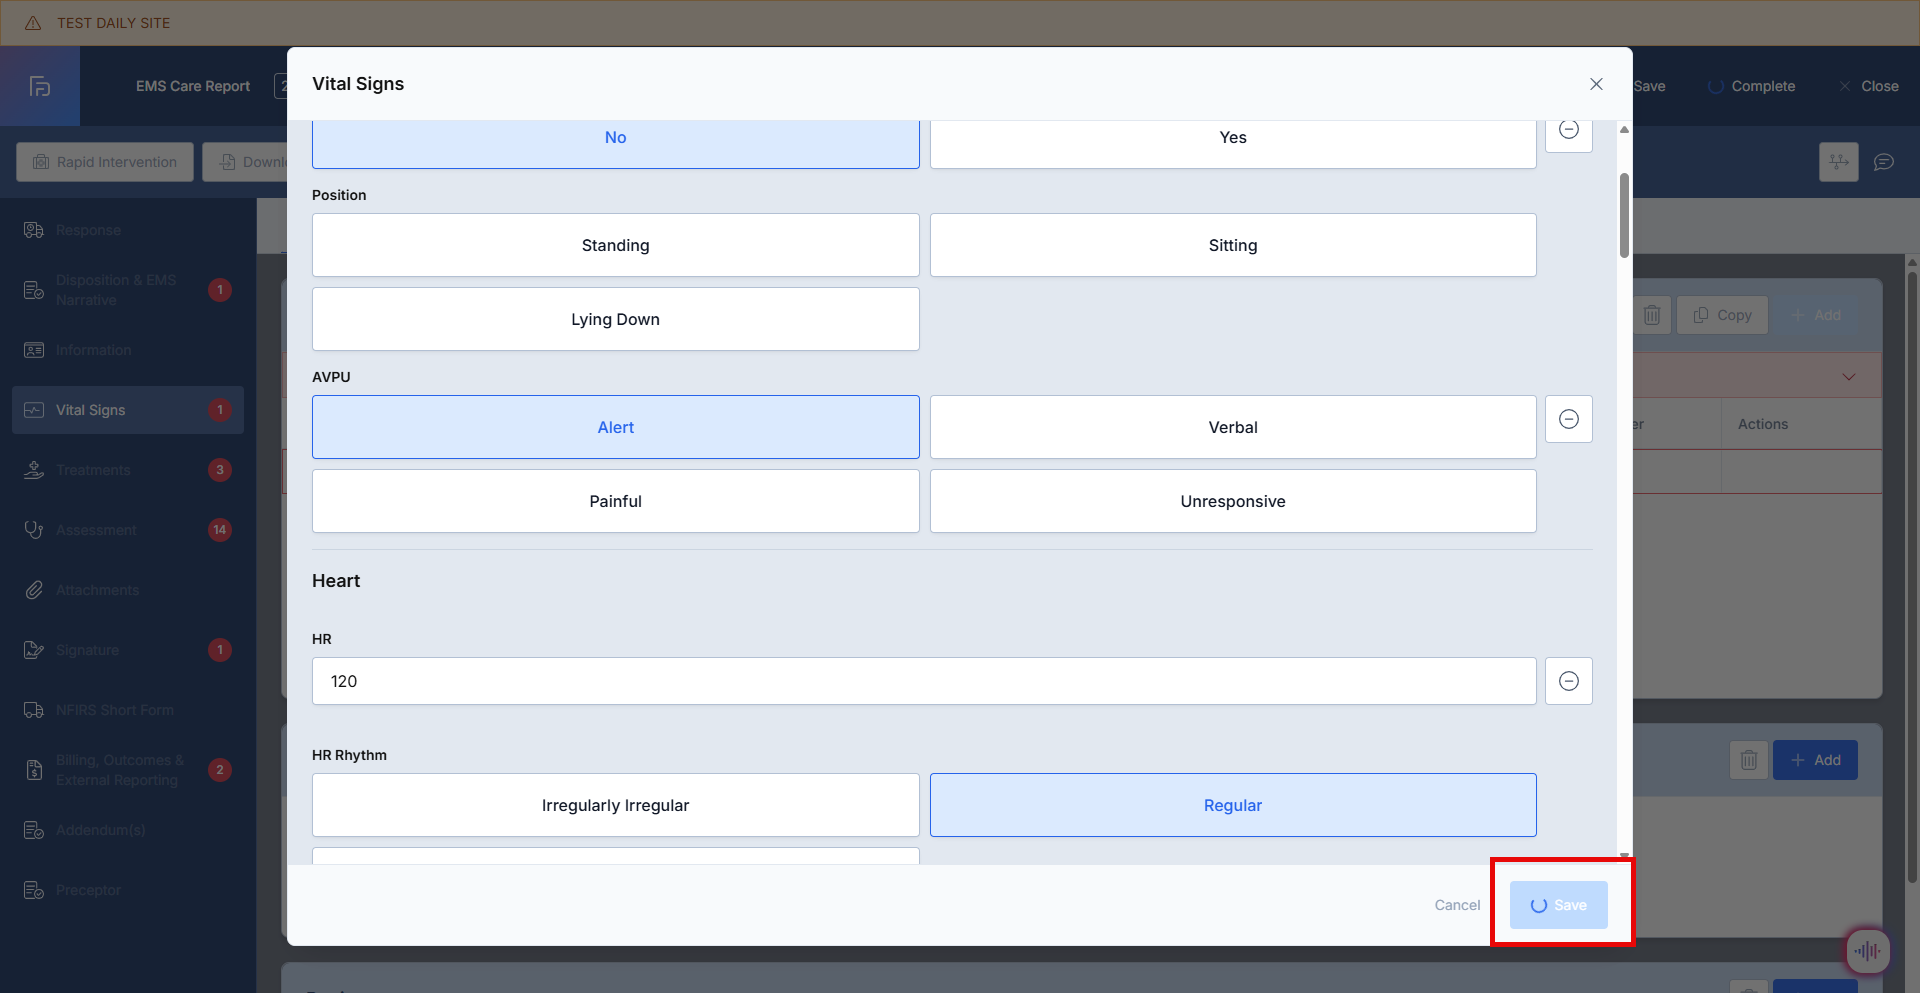
4. Visual Loading Indicators for Data Operations
What - The application now displays comprehensive visual loading indicators throughout the ePCR system to provide clear feedback during all data loading operations. When users initiate actions such as CAD downloads, monitor imports, form submissions, or opening modals, the system immediately displays a spinning wheel loading cursor that matches the familiar pattern used when loading new incidents. During these operations, buttons are automatically disabled and visually distinguished to prevent multiple clicks, and form fields are greyed out while maintaining the overall layout integrity. The loading indicators appear on Save and Complete buttons, in the center of reports during initial loads, and on modal Save buttons when opening forms with many custom elements such as Vitals, Signatures, and Procedures. This enhancement functions consistently across both web and iPad platforms, ensuring users always understand when the application is actively processing their requests.
Why - This enhancement was implemented due to customer requests reporting that field crews were repeatedly clicking buttons during data loading operations because they perceived the application as frozen or unresponsive. This "button smashing" behavior created poor user experience, user frustration, and potential system performance issues as multiple identical requests were submitted. Agencies identified this problem as particularly noticeable in modals with numerous custom elements and during critical operations like CAD downloads and monitor imports, where the lack of visual feedback led crews to question whether their actions were being processed. By providing clear visual communication through loading indicators and disabled button states, the system eliminates user uncertainty, prevents duplicate requests, and improves overall confidence in the application's responsiveness.
How - This feature works automatically across all data loading operations with no configuration required
Loading indicators will automatically appear when you access an ePCR report, displaying in the center of the report and on Save/Complete buttons
When you click Download CAD Data, a spinning wheel loading cursor will appear during the data retrieval process
When you initiate monitor imports, the system will display loading indicators during the import operation
When you click the Complete button to submit a report, the button will show a loading state and become disabled until processing finishes
When opening modals such as Vitals, Signatures, or Procedures, a loading cursor will appear on the Save button while the form populates
Form fields will appear greyed out during validation and data loading operations while maintaining their layout
All interactive buttons will be visually disabled during loading to prevent multiple clicks
Note: The loading indicators use the same spinning wheel pattern as the existing new incident loading screen for visual consistency
Note: This functionality works identically on both web browsers and iPad devices
Use Case - A paramedic crew arrives on scene for a motor vehicle accident and opens their ePCR to begin documentation. They immediately click the Download CAD Data button to retrieve dispatch information, and the system displays a spinning wheel loading cursor, clearly indicating that the CAD data is being retrieved. The button becomes disabled and visually distinct, preventing the paramedic from clicking it multiple times out of uncertainty. After completing patient assessment, the crew opens the Vitals modal to document vital signs, and a loading indicator appears on the Save button while the system populates the custom fields configured for their agency. When transport is complete and the paramedic clicks the Complete button to submit the report, the button shows a loading state and remains disabled during the submission process, providing clear feedback that the report is being processed. Throughout these operations, the paramedic understands exactly when the system is working versus when it's ready for input, eliminating the frustration and "button smashing" behavior that previously occurred when no visual feedback was provided during data operations.
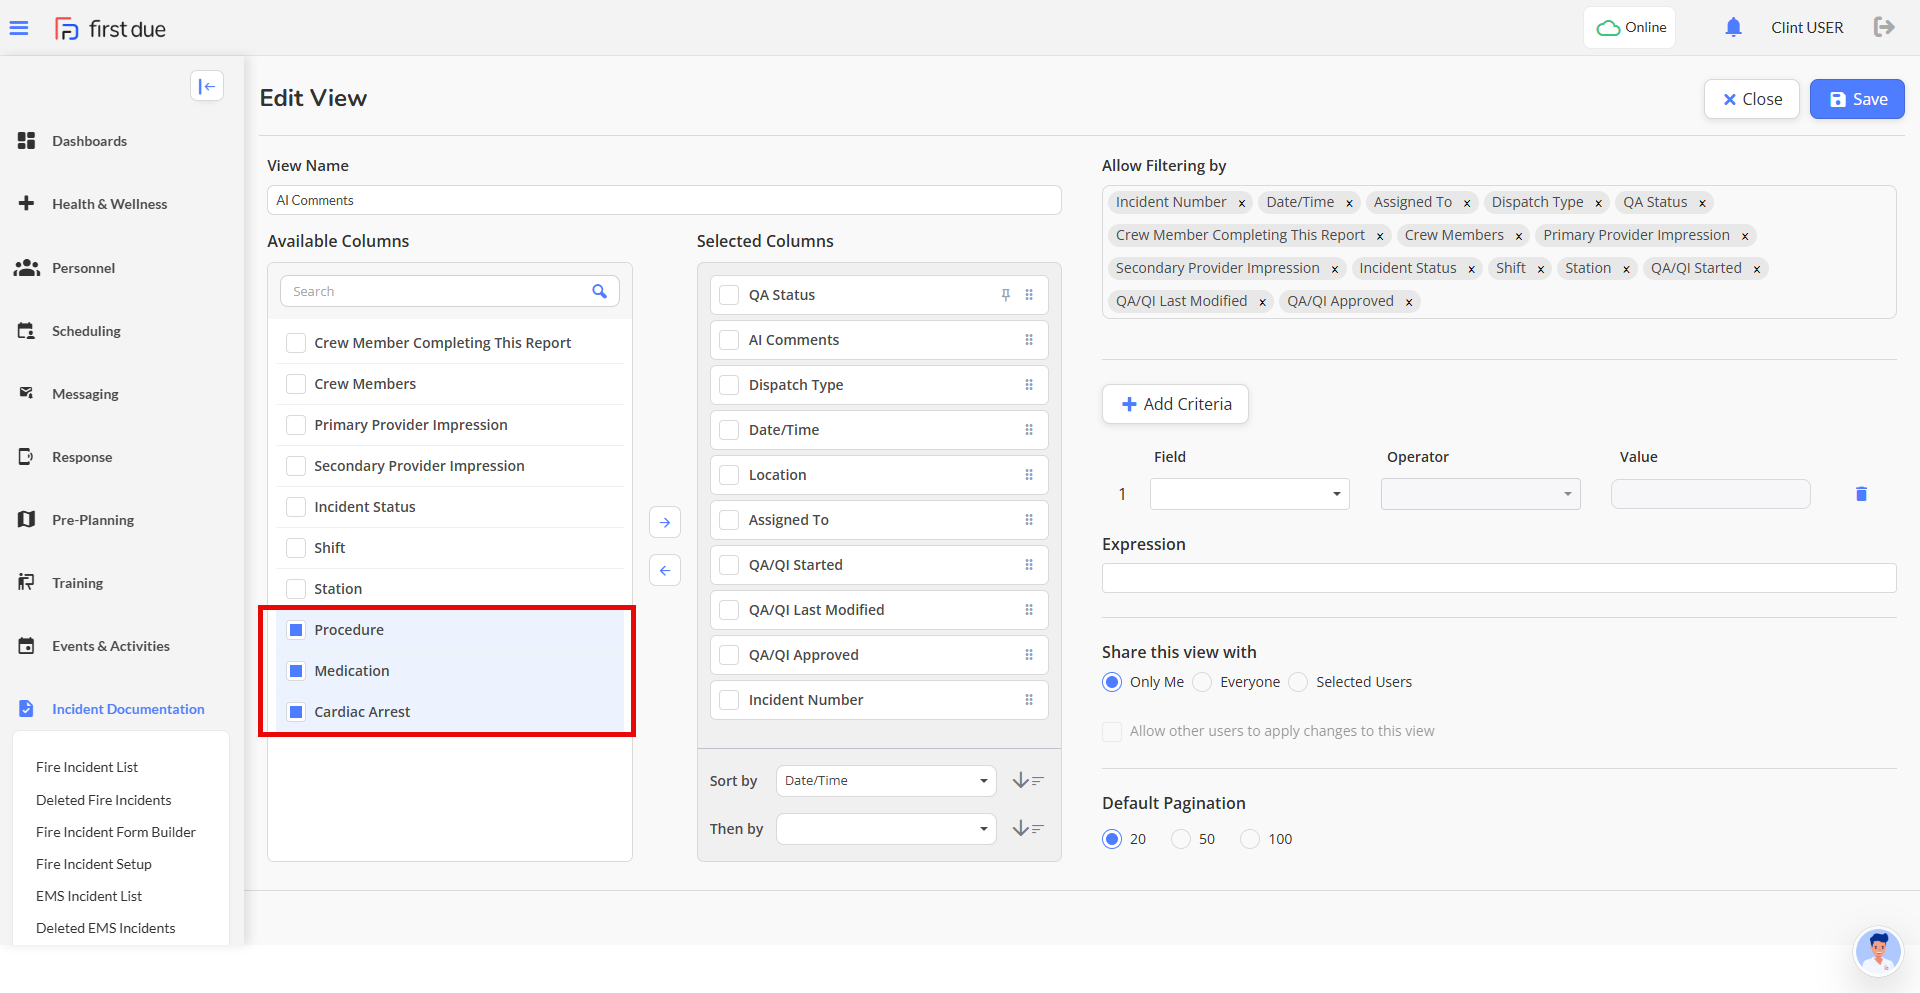
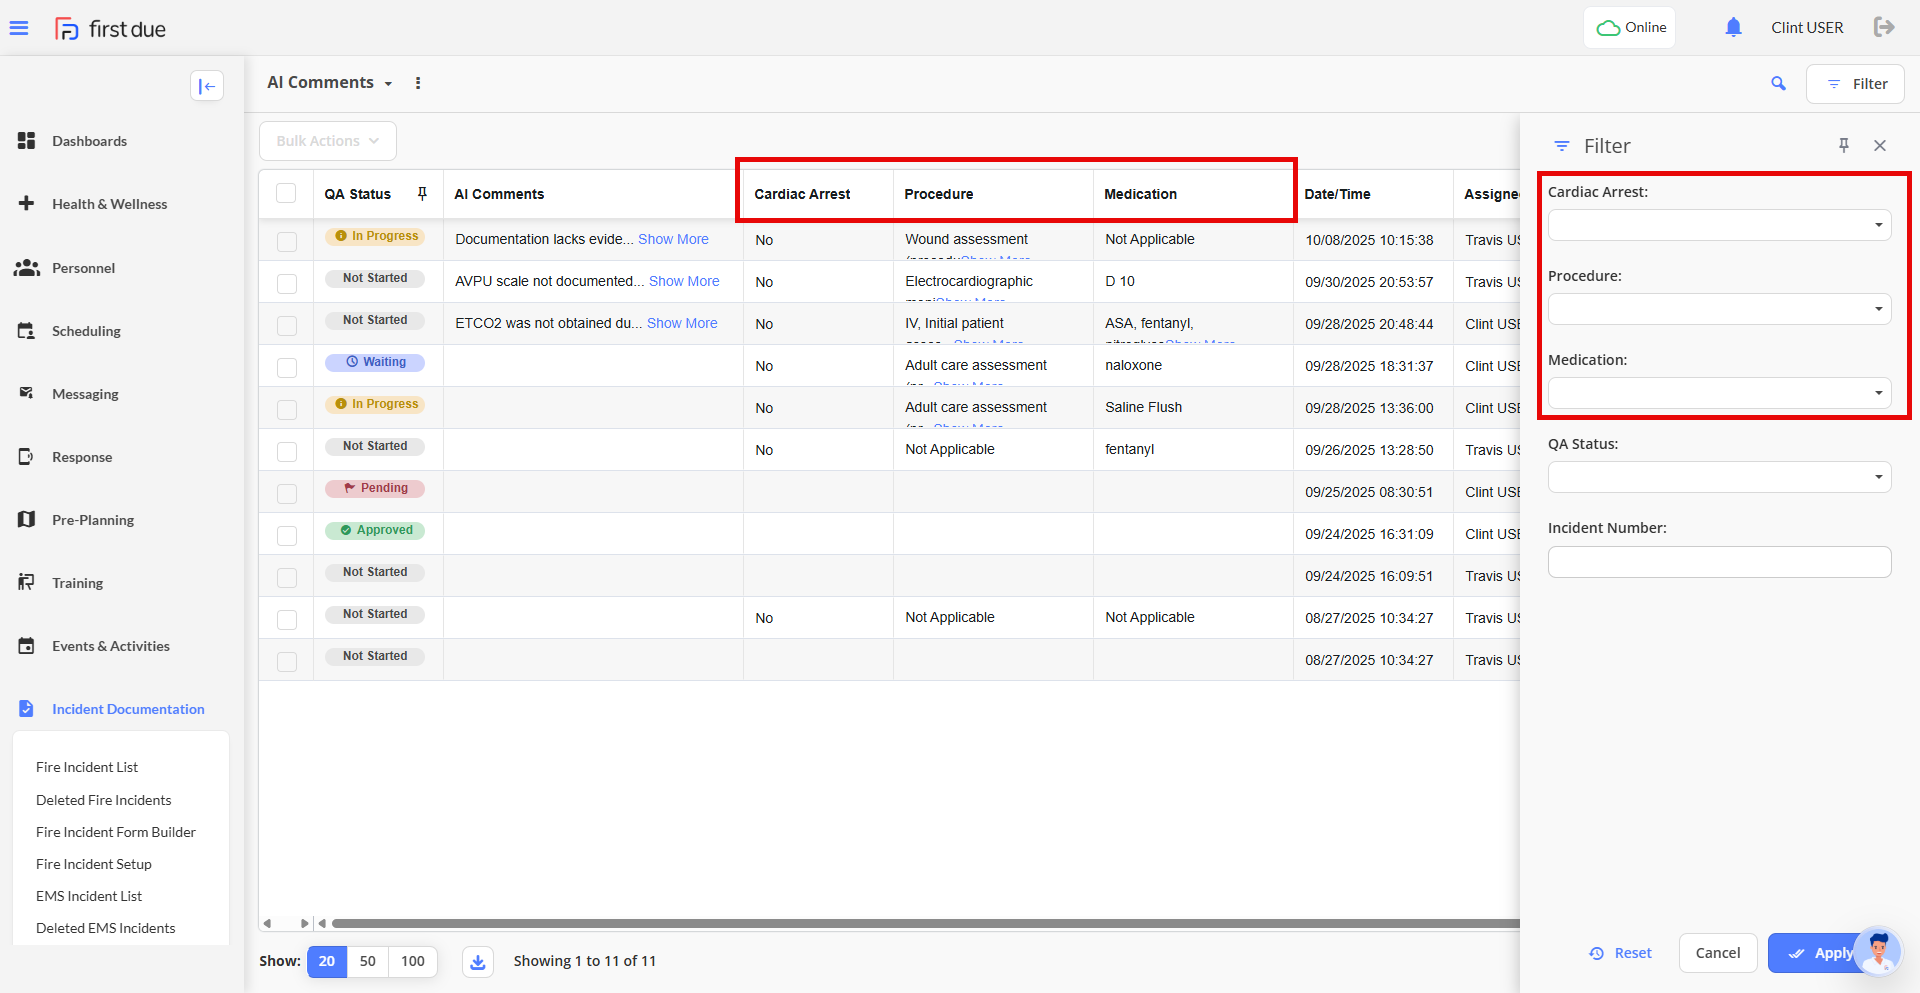
5. Enhanced QA/QI List Filtering and Columns
What - The QA/QI incident list now includes three additional clinical data fields that can be added as columns and used for filtering: Procedures (eProcedures.03), Medications (eMedications.03), and Cardiac Arrest (eArrest.01). These fields are fully integrated into the existing configurable incident list view infrastructure, allowing you to customize your list display and create filtered views based on specific clinical criteria. The filters can be applied independently to focus on a single clinical element or combined to create complex categorization scenarios, such as viewing all cardiac arrest incidents where specific procedures were performed. All custom view configurations, including the new columns and filters, persist across page refreshes and user sessions, ensuring a consistent workflow experience. The Clear Filter option works seamlessly with these new fields, restoring the full incident list view without errors or data loss.
Why - This enhancement was implemented due to customer requests for more efficient QA/QI workflow management and reviewer assignment capabilities. Agencies reported that they needed to categorize incidents into distinct review buckets based on clinical criteria such as specific procedures performed, medications administered, or cardiac arrest cases, and then assign appropriate QA reviewers based on their clinical expertise and the type of review required. Without the ability to filter by these critical clinical fields, QA coordinators were manually reviewing large numbers of incidents to identify cases requiring specialized review, creating significant workflow inefficiencies. By leveraging the existing configurable list infrastructure and adding these three most-requested clinical fields, the enhancement enables agencies to streamline their QA assignment processes without requiring extensive system restructuring.
How - Configure these new fields in your QA/QI list custom views
Navigate to QA/QI > Incident List to access the enhanced list view
Click the Custom View configuration option to modify your list display
Add any of the three new columns to your view: Procedure Name (eProcedures.03), Medication Name (eMedications.03), or Cardiac Arrest (eArrest.01)
Configure filter criteria using the new fields by selecting them from the available filter options
Apply a single filter to create focused incident buckets (e.g., filter by Cardiac Arrest = "Yes" to view only cardiac arrest cases)
Combine multiple filters for complex scenarios (e.g., filter for cardiac arrest incidents where epinephrine was administered)
Click Clear Filter to restore the full incident list view when needed
Save your configured views for repeated use in your QA workflow
Note: Your custom view configurations will persist across sessions, so you don't need to reconfigure each time you access the list
Note: All three fields work independently and can be combined in any configuration to meet your agency's specific QA categorization needs
Use Case - A QA coordinator at a busy EMS agency needs to assign weekly chart reviews to specialized reviewers based on clinical criteria. The cardiac arrest specialist reviewer needs all resuscitation cases, the airway management expert needs cases involving advanced airway procedures, and the medication safety reviewer needs cases with specific controlled substance administrations. The coordinator navigates to the QA/QI Incident List and creates a custom view filtering for Cardiac Arrest = "Yes" to generate a bucket of 12 cardiac arrest cases from the past week, which are immediately assigned to the cardiac arrest specialist. Next, they create another view filtering by Procedure Name containing "endotracheal intubation" to identify 8 advanced airway cases for the airway expert. Finally, they filter by Medication Name containing "fentanyl" or "morphine" to find 15 cases requiring medication safety review. These saved custom views can be reused each week, dramatically reducing the time spent manually sorting through hundreds of incident reports to identify cases requiring specialized review and ensuring that each incident is assigned to the most appropriate reviewer based on the clinical interventions documented.
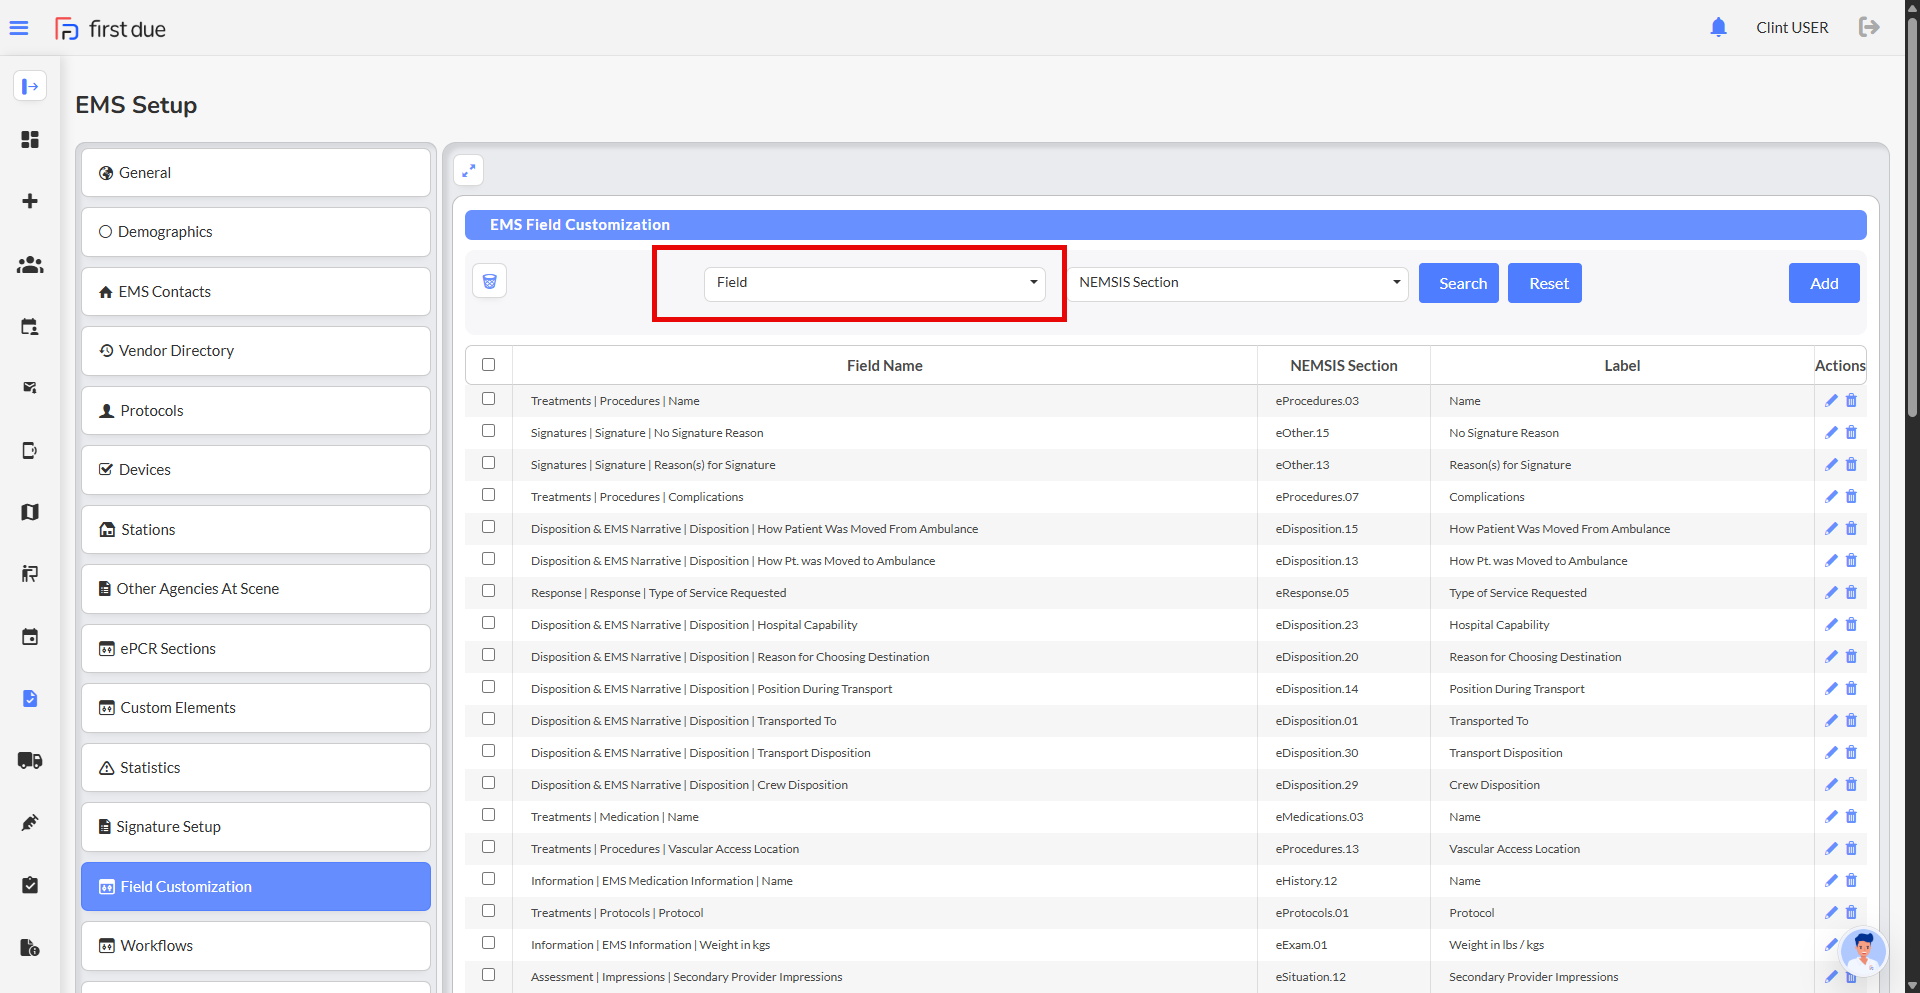
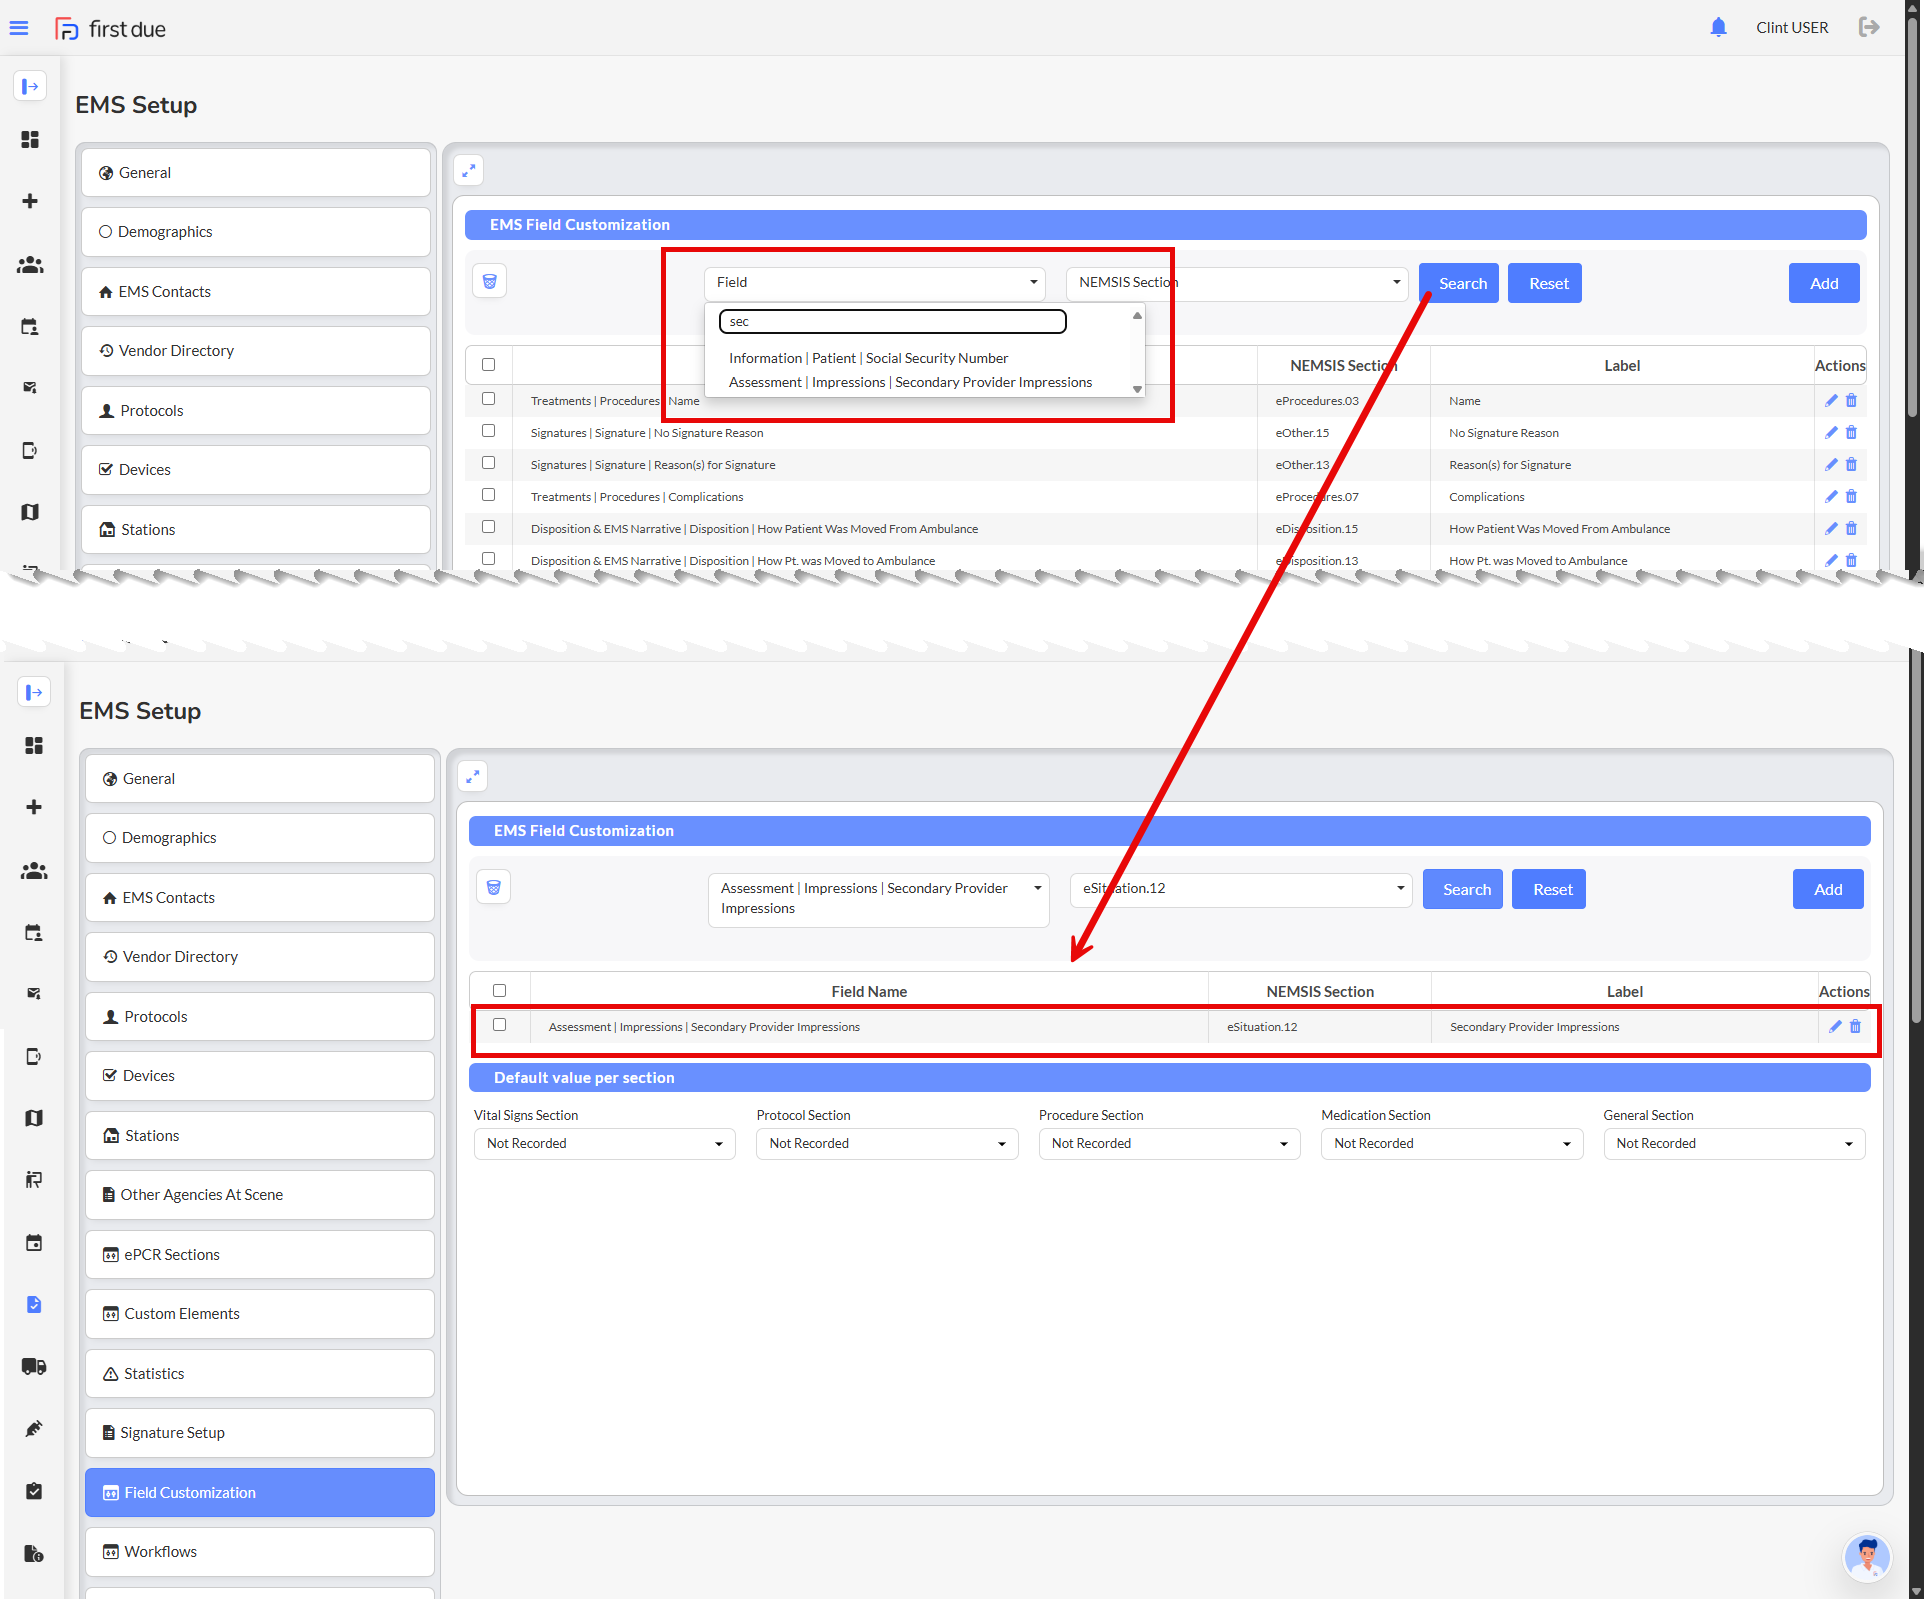
6. Field Name Search in EMS Field Customization
What - The EMS Field Customization interface now includes a dedicated field name search bar positioned in the header alongside the existing NEMSIS Section search bar. This new search functionality enables you to type field names directly and see real-time filtering of the field list as you enter characters, matching the proven search behavior already available in the Workflows section. The field name search works independently or can be combined with the NEMSIS Section search to narrow results using both criteria simultaneously. As you type in the Field search bar, the field list updates immediately to display only matching fields, and you can refine your search by continuing to type or broaden results by deleting characters. Both search bars remain available to support different search approaches, whether you prefer searching by specific field names or browsing by NEMSIS sections.
Why - This enhancement was implemented due to customer requests highlighting that the vast majority of administrators search for fields by their field names rather than by NEMSIS Section when configuring field customizations. Usage patterns indicated that most customers know the specific field they want to configure and need to locate it quickly, but the existing interface only provided NEMSIS Section filtering, requiring administrators to remember which section contained their target field or browse through multiple sections to find it. This limitation created workflow inefficiencies and frustration, particularly when configuring commonly-used fields or making quick adjustments. By adding field name search functionality that mirrors the successful implementation already proven in the Workflows section, the enhancement addresses the primary search pattern used by administrators and significantly improves efficiency when managing field configurations.
How - Use the new field search functionality in Field Customization
Navigate to Incident Documentation > EMS Setup > Field Customization > EMS Field Customization
Locate the two search bars in the header section: the existing NEMSIS Section search and the new Field search bar
Click in the Field search bar and begin typing the name of the field you want to configure
View real-time filtering results as the field list automatically updates to show only matching fields
Continue typing to narrow results further or delete characters to broaden your search
Alternatively, use the NEMSIS Section search bar to filter by section if preferred
Combine both search methods by entering criteria in both search bars to filter by section and field name simultaneously
Click the Clear option in either search bar to restore the full field list
Select and configure your filtered fields with improved efficiency
Note: The search functionality performs identically to the field search in the Workflows section for consistency
Note: Both search bars remain available so you can use whichever search method best fits your workflow
Use Case - An EMS agency administrator needs to configure several specific fields across different NEMSIS sections to support a new clinical protocol for stroke assessment. Rather than remembering that the Cincinnati Stroke Scale field is in section eExam, the Blood Glucose field is in section eVitals, and the Last Known Well field is in section eTimes, the administrator simply types "stroke" into the Field search bar and immediately sees all stroke-related fields filtered in real-time. They configure the Cincinnati Stroke Scale field, then clear the search and type "glucose" to quickly locate and configure the Blood Glucose field requirements. Next, they type "last known" to find the Last Known Well timestamp field without needing to navigate through multiple NEMSIS sections. What previously required browsing through multiple sections and scrolling through long field lists now takes seconds, as the administrator can jump directly to each needed field by typing its name. This streamlined approach is particularly valuable during time-sensitive configuration updates or when supporting field crews who need immediate clarification on how specific fields are configured in the system.
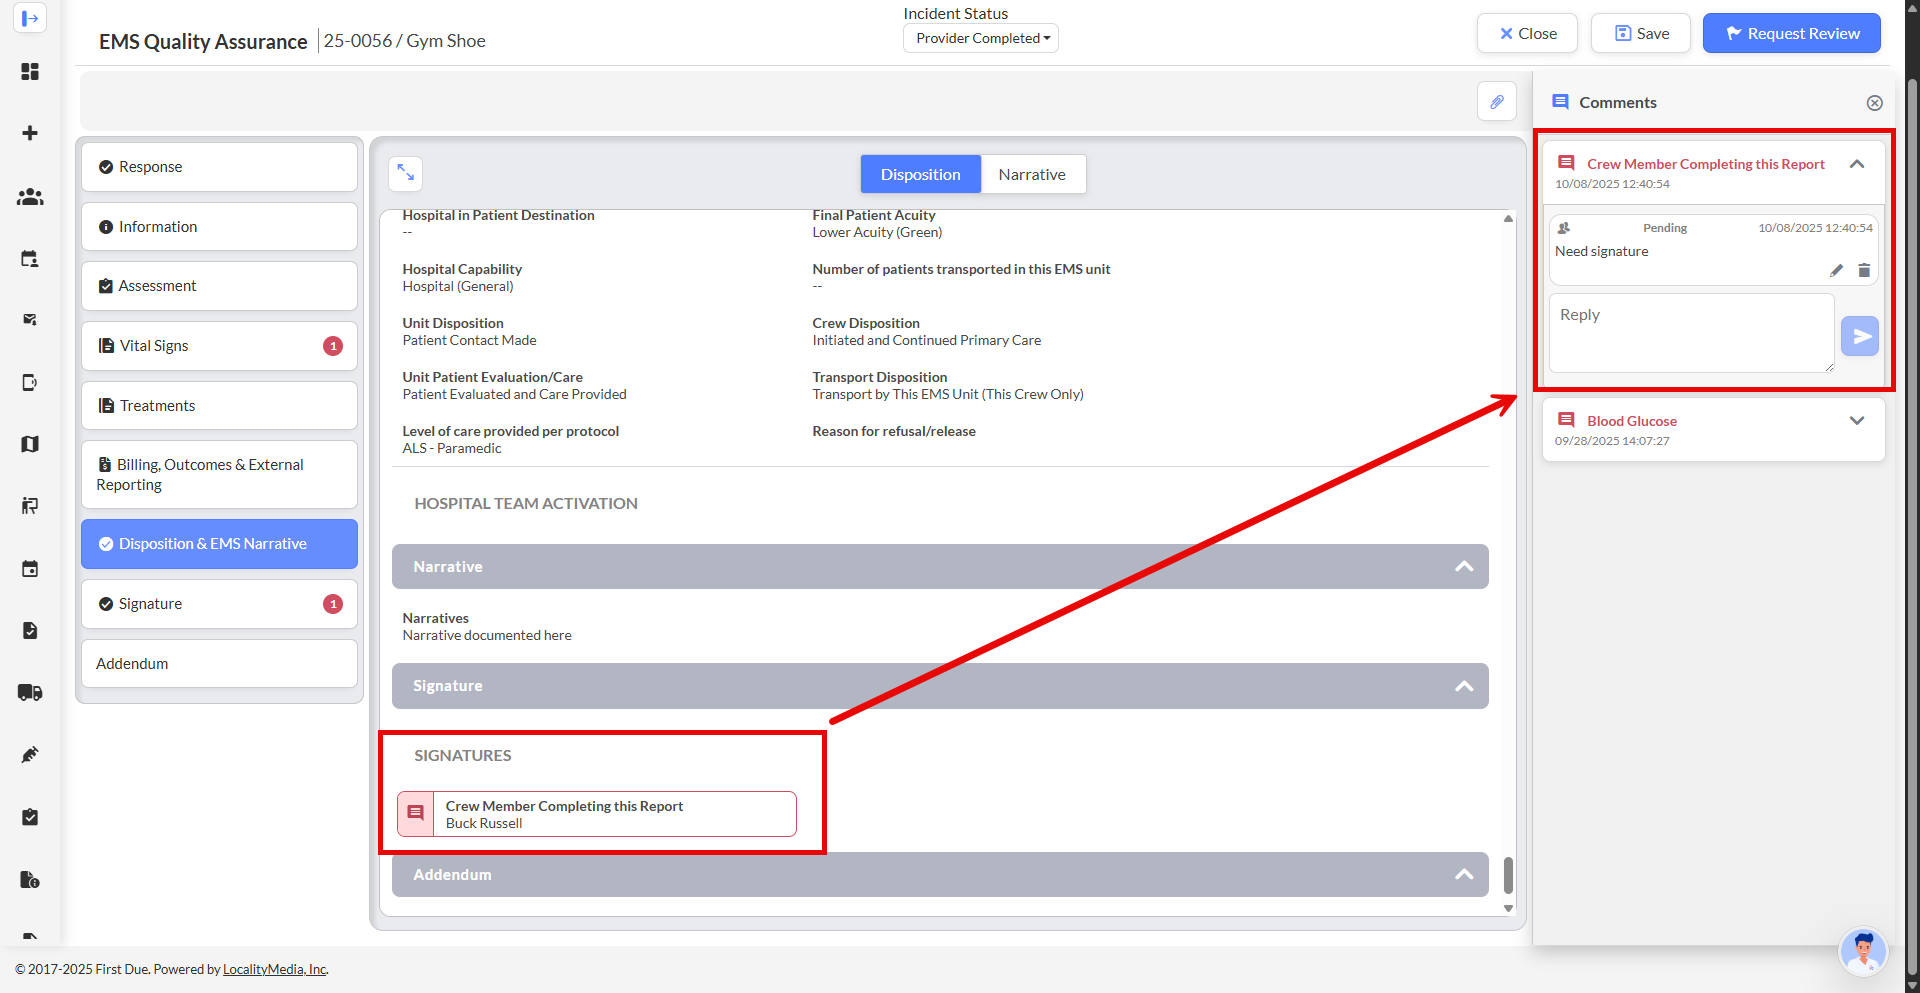
7. Crew Member Completing Report Field Added to QA Review
What - The QA review interface now displays the "Crew Member Completing this Report" field (eOther.08) as the final element in the review section, positioned immediately after the signatures. This field shows which crew member completed the report documentation and supports full review workflow functionality consistent with all other fields in the QA review process. QA reviewers can now view the crew member information, add comments specific to report completion accountability, request corrections if the information is incorrect or requires clarification, and include this field in their overall approval decision. The field displays accurately retrieved crew member data and integrates seamlessly with existing QA review patterns, enabling reviewers to perform the same actions on this field as they can on any other reviewed element throughout the interface.
Why - This enhancement was implemented due to customer requests identifying that the crew member completing the report was a critical data element missing from the QA review interface. QA reviewers need to evaluate report completion accountability as part of their comprehensive quality assurance process, including verifying that the appropriate crew member documented the incident and ensuring that report completion responsibilities are properly assigned and tracked. Without access to this field during the review process, QA coordinators could not fully assess documentation accountability or flag potential issues where incorrect crew members were listed as completing reports. By adding this field to the QA review interface with complete workflow functionality, reviewers can now perform thorough quality assurance evaluations that include accountability tracking for report completion.
How - This field appears automatically in all QA reviews with no configuration required
Navigate to QA/QI and open any incident requiring quality assurance review
Scroll to the end of the QA review section, past all other reviewed elements including signatures
Locate the Crew Member Completing this Report field displayed as the final element in the review
Review the crew member information to verify who completed the report documentation
Click the Add Comment option to add notes specific to report completion accountability if needed
Use the Request Correction functionality to flag the field if the crew member information is incorrect or requires clarification
Include this field in your overall approval decision when completing the review workflow
Note: The field supports all the same review workflow operations available for other QA review fields
Note: This information helps verify that appropriate crew members are completing report documentation and supports accountability tracking across your QA program
Use Case - A QA coordinator is reviewing a complex multi-casualty incident report involving three ambulance crews who responded to a motor vehicle accident with four patients. During the review, the coordinator needs to verify that the primary attending paramedic on the most critical patient completed the report documentation, as agency policy requires the highest-level provider on scene to complete reports for serious incidents. After reviewing all clinical documentation, medications, procedures, and signatures at the end of the QA review interface, the coordinator sees the Crew Member Completing this Report field showing that an EMT-Basic from a supporting unit completed the report rather than the lead paramedic. The coordinator adds a comment noting "Per agency policy, lead paramedic should complete MCI reports - please clarify crew assignment" and requests a correction to ensure proper documentation accountability. This visibility into report completion responsibility enables the QA coordinator to identify potential training needs around documentation policies and ensure that report completion duties are appropriately assigned based on crew qualifications and incident complexity, supporting overall quality improvement initiatives.
8. Improved Workflow Field Labels for Enhanced Clarity
What - The workflow configuration interface now displays enhanced field labels in the condition builder that include additional descriptive terminology to clarify each field's purpose. The When field label now reads When/If to better convey that it represents the trigger condition being evaluated, the Condition field label now reads Condition/Is to indicate it defines the comparison operation being performed, and the Parameter field label now reads Parameter/Value(s) to clarify that it represents the expected input values that the condition evaluates against. These improved labels apply consistently across all workflow types including Default Value Workflows, Error Validation Workflows, and Warning Validation Workflows, providing contextual hints that help users understand workflow logic construction more intuitively without affecting any underlying workflow functionality or behavior.
Why - This enhancement was implemented due to customer requests indicating that the original single-word field labels (When, Condition, Parameter) did not clearly convey their purpose and function to all users, particularly those new to the workflow system or building complex workflow rules. Administrators reported confusion when constructing workflow conditions because the labels provided minimal context about what information should be entered in each field and how the fields related to each other in the overall workflow logic. By adding alternative terminology that users naturally think of when building conditional logic—such as "if" for triggers, "is" for comparisons, and "values" for parameters—the enhanced labels reduce the learning curve and improve comprehension during workflow configuration, enabling administrators to build accurate workflow rules more efficiently and with greater confidence.
How - The improved labels appear automatically in all workflow configurations with no action required
Navigate to Incident Documentation > EMS Setup > Workflows and select any workflow type (Default Value Workflows, Error Validation Workflows, or Warning Validation Workflows)
Click Add Group or Add Condition to access the condition builder interface
Observe the enhanced field labels: When/If, Condition/Is, and Parameter/Value(s)
Use the When/If field to select the trigger condition that represents when something occurs if specific criteria are met
Use the Condition/Is field to configure the comparison operation that defines the condition being evaluated
Use the Parameter/Value(s) field to enter the values that the condition evaluates against
Build your workflow rules with improved understanding of each field's purpose and function
Note: These label enhancements apply consistently across all three workflow types for a uniform experience
Note: The improved labels do not change any workflow functionality—they only provide additional clarity about field purpose
Use Case - An EMS agency administrator is configuring a new Error Validation Workflow to ensure that crews document patient refusal signatures whenever the disposition is recorded as "Patient Refused Care." The administrator, who is relatively new to building workflows, accesses the workflow configuration interface and clicks Add Condition to begin constructing the validation rule. With the improved labels, they immediately understand that the When/If field is where they specify the trigger condition (Disposition equals "Patient Refused Care"), the Condition/Is field is where they define how to evaluate it (equals/is), and the Parameter/Value(s) field is where they enter the specific values to check against. The contextual hints provided by the enhanced labels eliminate the confusion they previously experienced when trying to determine what information belonged in each field, allowing them to successfully build the workflow rule on the first attempt without needing to reference documentation or contact support. This improved clarity is especially valuable when building complex workflows with multiple nested conditions and groups, where understanding the logical structure is critical to creating accurate validation rules.
Related Articles
ePCR Release Notes - Novemeber 2025
New Features OneDose - Integration and consumption of data for OneDose What - This feature introduces integration with OneDose, a medication dosing calculator platform that enables ePCR to import patient-specific medication dosing calculations and ...
Fire Investigations Release Notes - October 2025
Video New Features CAD Integration for Fire Investigation Module What - The Fire Investigation (FI) module now supports automatic creation and population of investigation records from CAD data using the existing NFIRS notification structure. When a ...
Fire Documentation Release Notes : October 2025
New Features 1. AI for NFIRS Canada What - Artificial intelligence capabilities have been introduced specifically for Canadian clients following the NFIRS (National Fire Incident Reporting System) standard, leveraging Deepgram and Bedrock endpoints ...
Fire Incident Documentation Release Notes: November 2025
New Features Implement Unit Actions Behavior for Aiding Apparatus in NERIS What - NERIS now properly handles Actions Taken for Aiding Apparatus, ensuring that deleting apparatus with incomplete action data no longer triggers invalid validation errors ...
Health & Wellness Release Notes - November 2025
New Features Update Import Data Tool to Pull in Training Data What - The Import Data tool has been expanded to include Training data alongside Fire Incident data, with the tool renamed from "Import Fire Report Data" to "Import Internal Data." Users ...