Inspection Type - Part 4: Email
Purpose Statement
This article demonstrates how to configure email settings for Inspection Types in the Fire/EMS software platform. The email configuration enables automated notifications to fire inspectors, customizes outgoing email addresses, and provides flexible messaging options to streamline inspection communication workflows.
Background Information
Email configuration is a critical component of the inspection workflow that automates communication between the system, inspectors, and property owners. This feature reduces manual communication overhead while ensuring all stakeholders receive timely notifications about scheduled inspections. The system supports integration with major calendar platforms and allows for custom email branding using agency-specific email addresses.
Prerequisites:
- Inspection Type must already be created
- Administrative permissions for email configuration
- Access to DNS settings if using custom agency email address
Required Permissions
To configure inspection type email settings, users must have:
- Admin or Inspection Administrator permissions
- Email Configuration access rights
- DNS management access (for custom email address setup)
Video
Step-by-Step Guide


- Toggle On/Off Email Notification when an inspection is automatically scheduled.
- Toggle On/Off Email Notification when an inspection is manually scheduled.

- If no time is set, will schedule for entire day
- If time is set-will schedule for 1 hour
- Calendars available to schedule to:
- Apple Calendar
- Google Calendar
- Microsoft Calendar
- Microsoft 365 Calendar
- Mozilla Calendar
- Yahoo Calendar
- Select correct calendar (you must be signed in to it).
- System will put the inspection on the selected calendar.
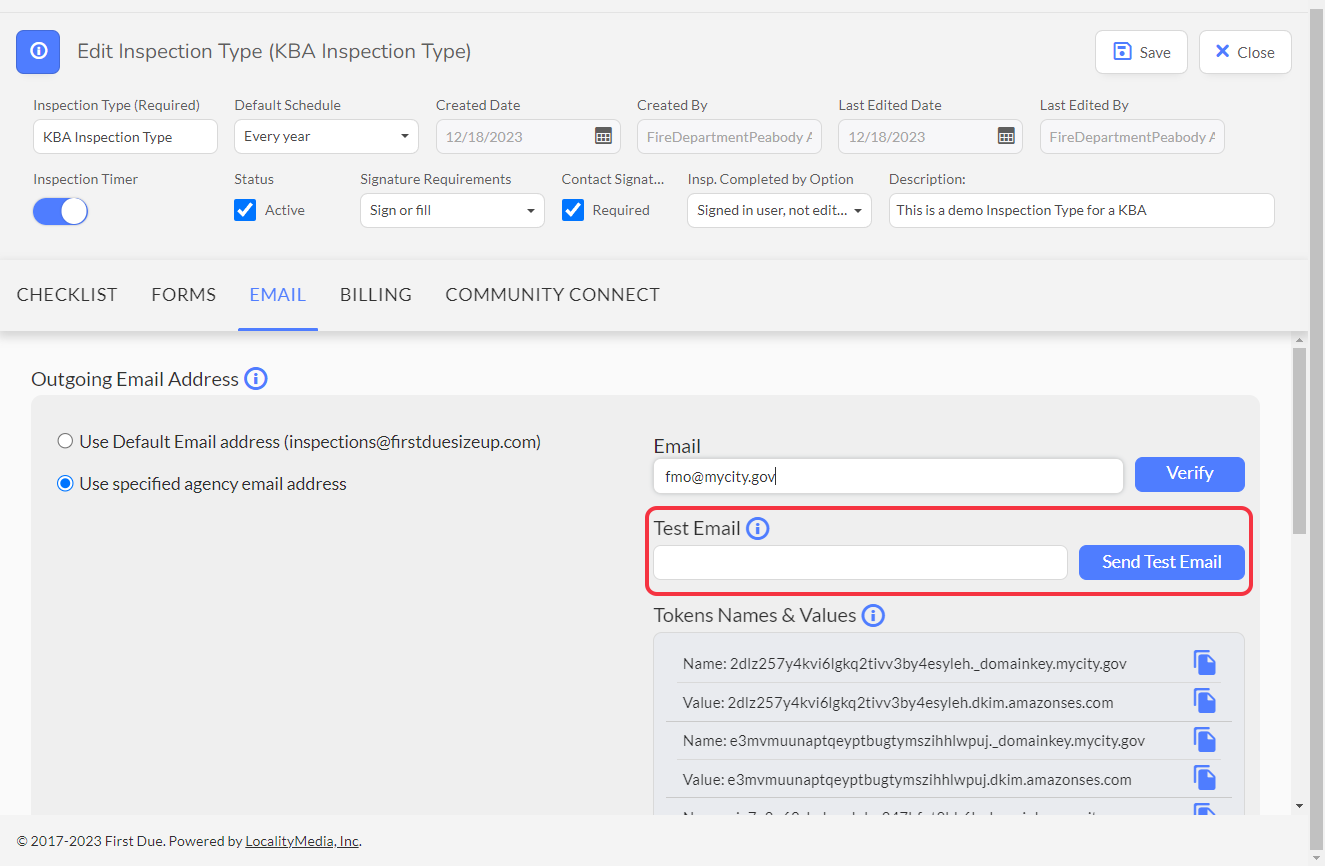
- Emails will be sent from the specified email address. Replies to inspections@firstduesizeup.com are not monitored.


- Please use this list to create CNAME records for each pair name & value on your email server. When Amazon SES detects that you've added these records to the DNS configuration for a domain, you can start sending emails from that domain.
- To create the CNAME records for DKIM authentication, use the following values:
- Name: <name provided>
- Type: CNAME
- Value: <value provided>

- The domain of the entered email address has to match the one you entered in the specified agency email address field.
- Verify that the email was received to insure the agency specified email is the email sender.
1 - No-Reply is default Custom Sender Name.2 - Edit sender name to add before the email address
1 - Provide a CC option to send the report to the Inspector.2 - Always CC the Inspector (Include CC Me option for Inspection Report has to be enabled).3 - Enter email address to always send the report to specified recipients.


- Highlight the text and select the desired text formatting option.
- B = Bold
- I = Italicized
- H2 = Increase font size and Bold
- H3 = Increase font size and Bold

- Sets all of the text to the right, similar to pressing the "tab" key.


- Enter text to display between the brackets.
- Enter the web address after (https:// and before the ).
- See example.


- Note: In the Side by Side preview mode, you can make edits to your email message body text and see the results as you work.

- Note: You cannot edit the text when in Full Screen Mode.

Best Practices
- Test email configurations thoroughly before deploying to ensure proper delivery
- Use agency-branded email addresses to maintain professional communication standards
- Keep message content concise but include all necessary inspection details
- Verify calendar integrations work correctly with inspector workflows
- Regularly review email templates to ensure accuracy and relevance
- Maintain DNS records properly to prevent email delivery issues
- Use clear, professional language in all automated communications
Troubleshooting & FAQs
Q: Why aren't my custom agency emails being delivered? A: Verify that all CNAME records have been properly configured in your DNS settings and that Amazon SES has detected the records.
Q: Calendar appointments aren't appearing for inspectors. What should I check? A: Ensure inspectors are signed in to their selected calendar platform and have granted necessary permissions for calendar access.
Q: Test emails aren't being received. What's wrong? A: Confirm the test email domain matches your specified agency email address domain and check spam/junk folders.
Q: Can I use multiple agency email addresses? A: Each inspection type can be configured with one custom agency email address. Multiple addresses require separate inspection type configurations.
Q: How do I modify DNS records for email verification? A: Contact your IT administrator or DNS provider to create the required CNAME records using the provided token names and values.
Related Articles
- Inspection Type - Part 1: Creating and Editing Inspection Type
- Inspection Type - Part 2: Creating and Editing an Inspection Checklist
- Inspection Type - Part 3: Forms
- Inspection Type - Part 5: Billing
- Inspection Type - Part 6: Community Connect
Related Articles
Inspection Type - Part 6: Community Connect
Purpose Statement This Knowledge Base Article demonstrates how to configure the Community Connect section for an Inspection Type, enabling community members to request inspections directly through the Community Connect portal. This feature ...Inspection Type - Part 2: Creating and Editing an Inspection Checklist
Purpose Statement This article demonstrates how to create and edit comprehensive inspection checklists within the Fire/EMS software platform. Inspection checklists enable departments to standardize their inspection processes, ensure regulatory ...Inspection Type - Part 1: Creating and Editing Inspection Type
Purpose Statement The Inspection Type feature allows Fire/EMS agencies to create standardized inspection processes for various property types and compliance requirements. This functionality enables departments to maintain consistent inspection ...Inspection Type - Part 5: Billing
Purpose Statement The Billing section of Inspection Types allows administrators to configure whether inspectors can issue invoices directly from inspections. This feature streamlines the billing process by enabling real-time invoice generation during ...Create and Edit Permit Type
Purpose Statement The Create and Edit Permit Types feature allows fire prevention administrators to establish and modify permit categories within the system. This functionality enables agencies to customize permit workflows, set response deadlines, ...