Cloning a Dashboard
Purpose Statement
Cloning dashboards allows users to create editable copies of existing dashboards—whether agency-built or provided by First Due. This feature ensures users can tailor dashboard content, modify widget layouts, and personalize reporting views without affecting the original shared dashboard.
Background Information
Agencies frequently clone dashboards to:
-
Customize First Due–provided dashboards for local workflows
-
Personalize dashboards for command staff, officers, or administrative roles
-
Experiment with layout or widget updates before deploying them broadly
-
Maintain clean dashboard templates while still empowering user-level customization
When a dashboard is cloned, the system creates a new version with all widgets, filters, and layout preserved. The cloned dashboard becomes fully editable—even if the original was view-only. Each cloned dashboard must be assigned a unique name.
Required Permissions
To clone and modify dashboards, users must have:
-
Dashboards → View
-
Dashboards → Create
-
Dashboards → Edit
-
Reports → View (required for updating or adding report-based widgets)
Without these permissions, users will not see the clone icon or editing tools.
Video
Step-by-Step Guide
Step 1: Open the Module Stack
Click the First Due logo in the upper-left corner of the screen. This opens the full module stack, which contains all available system modules, including Dashboards.
Step 2: Navigate to the Dashboard List
In the module list, select Dashboard List. This page displays all dashboards available to you, including agency-created dashboards and any First Due–provided templates.
Step 3: Select the Dashboard You Want to Clone
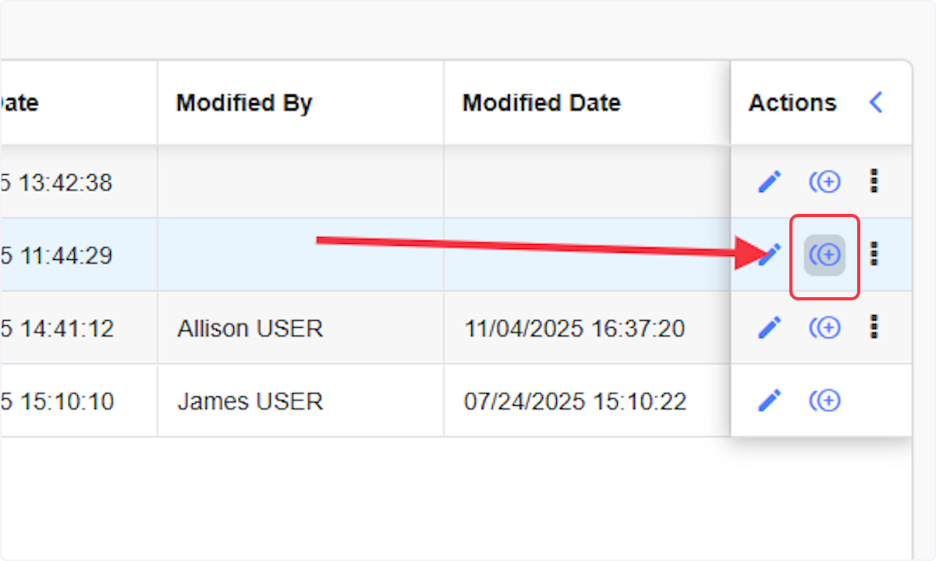
Locate the dashboard in the list and click the Clone icon in the Actions column. This tool is available only if you have the appropriate permissions and if the dashboard is eligible for cloning.

Step 4: Enter a New Dashboard Name
A pop-up window appears prompting you to update the dashboard name.
Because dashboard names must be unique, replace the default text with a clear and descriptive name—for example, referencing your role, purpose, or version.
Step 5: Confirm by Clicking Clone
Click Clone to finalize the creation of your new dashboard.
The system generates an identical copy and adds it to the dashboard list. You now have full editing permissions on this copied version.
Step 6: Open Your Newly Cloned Dashboard
From the list, select your newly created dashboard by clicking on the name. Opening the dashboard allows you to review its layout and prepare any modifications.
Step 7: Enter Layout Editing Mode
Click Edit Layout in the top right corner.
This mode unlocks editing controls, enabling you to adjust widget positioning, modify widget settings, remove unused components, and add new reports or visual elements.
Step 8: Adjust Widgets as Needed
Use the layout editor to customize the dashboard to your needs. Options include:
-
Editing a widget: Change the underlying report or update its configuration
-
Deleting a widget: Remove elements that are not relevant to your role
-
Adding widgets: Insert new reports, charts, or summaries that support your workflow
This step allows you to transform the dashboard into a version tailored specifically to your operational responsibilities.
Step 9: Save Your Customized Dashboard
Once your updates are complete, click Save in the upper-right corner.
This applies all layout changes and finalizes your cloned dashboard. Your customized version is now ready for use.
Best Practices
-
Name dashboards clearly: Include your role, purpose, or a version label to avoid confusion.
-
Clone before editing: Always clone shared or template dashboards rather than altering originals.
-
Remove irrelevant widgets: Eliminate unused content to keep dashboards focused and efficient.
-
Verify report permissions: Ensure any added or edited widgets reference reports you have access to.
-
Review dashboard layouts periodically: Remove outdated items and optimize performance.
Troubleshooting & FAQs
Why don’t I see the clone icon?
You may not have the required Create or Edit dashboard permissions. Contact an administrator if cloning options are missing.
Why didn’t my cloned dashboard appear in the list?
Refresh the Dashboard List. If it still does not appear, confirm that you clicked Clone after entering a unique name.
Can editing the cloned dashboard affect the original?
No. All changes apply only to the cloned version.
Why can’t I edit some dashboards?
Some dashboards are locked or view-only. Cloning always produces an editable version.
Related Articles
Fire Incident Setup - Narrative Template
Purpose Statement Narrative templates in First Due streamline fire incident documentation by providing pre-formatted text blocks that crews can quickly insert into incident reports. This feature reduces documentation time, ensures consistent report ...Clone and Edit Permit Types
Purpose Statement The Clone and Edit Permit Types feature allows administrators to efficiently create new permit types by duplicating existing configurations. This streamlines the setup process by copying all settings, workflows, custom fields, and ...Sharing a Dashboard
Purpose Statement To demonstrate how to configure sharing settings for a Dashboard in the Dashboards Module, enabling users to control access permissions and collaboration capabilities for their created dashboards across the organization. Background ...Work Order Boards Setup: Creating a New Work Order Board
Purpose Statement The purpose of this article is to guide users through the process of creating a new Work Order Board in First Due. Work Order Boards allow departments to manage and track asset maintenance activities, including repairs, preventative ...Assets Module Setup: Notification
Purpose Statement The Notifications Tab in the Assets Module Setup allows module managers to configure automated email alerts for critical asset management events. This feature ensures timely communication about work orders, checklist requirements, ...