Purpose Statement
The Columns tab allows users to select and customize which data fields from the selected Data Source will display in a Tabular Ad-Hoc Report.
Columns determine what information appears in the final report output. By selecting only the fields needed, users can create focused, readable reports that support operational analysis, compliance review, administrative reporting, and decision-making.
Background Information
Column configuration is an important step in the Ad-Hoc reporting process because it determines which data elements are visible in the final report.
The Columns tab is only available for Tabular Reports and is configured after the Data Source Configuration and Report Type tabs. Users can select fields from the configured data source, customize column labels, reorder columns, remove unnecessary fields, create hyperlink columns for direct record access, and configure Date/Time display formatting when applicable.
The selected columns provide the structure of the report and should align with the report’s purpose and intended audience.
Required Permissions
To configure columns in Ad-Hoc Reports, users may need the following permissions:
- Reports Module access
- Ad-Hoc Reports creation permissions
- Read access to the selected Data Source records
- Appropriate permissions for the underlying data being reported
For example, incident-related columns may require access to Fire Incident or Incident Documentation records.
Permission names may vary based on agency configuration. If expected fields are not available, contact a system administrator to verify the user’s Reports permissions, Ad-Hoc Reporting permissions, Data Set Permissions, and module-specific access.
Video
Step-by-Step Guide
1. Navigate to Column Configuration
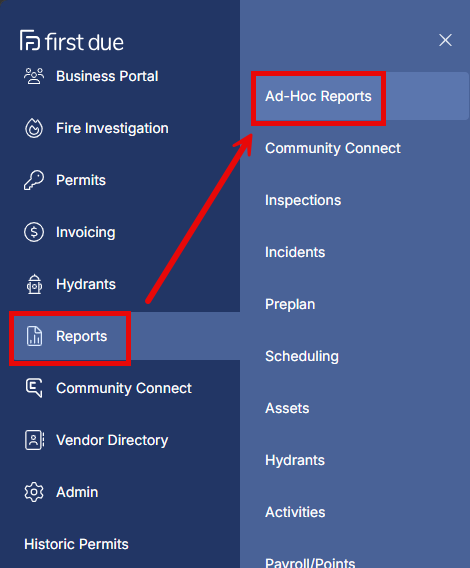
Navigate to Reports > Ad-Hoc Reports > Create Report.
Complete the Data Source Configuration and Report Type tabs first.
The Report Type must be set to Tabular Report to access the Columns tab.
2. Select Data Fields for Display
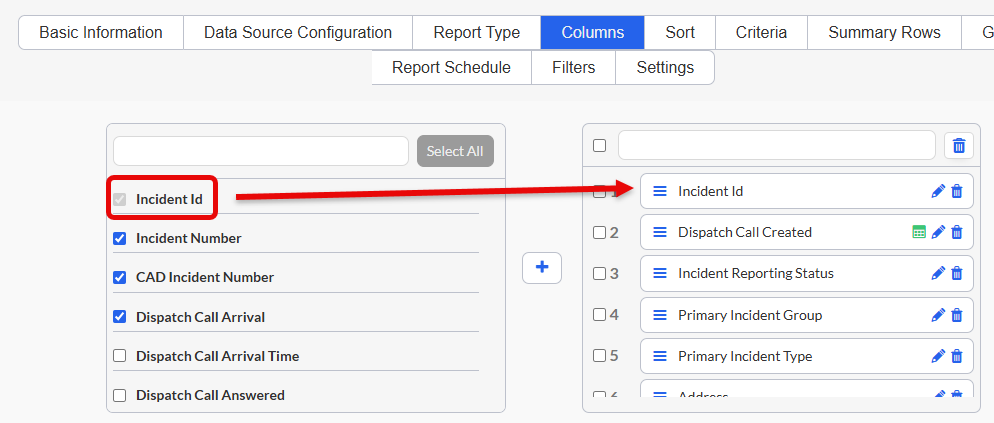
Click the checkbox next to each data field you want to include in the report.
Click the plus icon (+) to move the selected fields to the active columns list.
Select fields that provide the most relevant information for the report’s purpose.
3. Configure Hyperlink Columns
Identify columns labeled as Id columns, such as Incident Id.
These columns can create clickable hyperlinks in the report output, allowing users to open the specific record directly from the report for detailed review or editing.
4. Remove Unwanted Columns
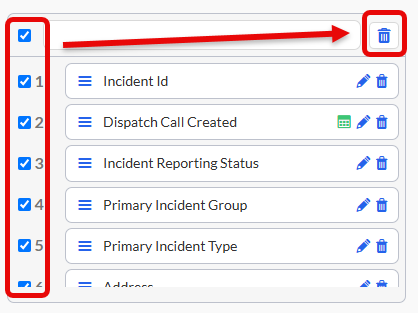
Click the trash can icon next to an individual column to remove it from the report.
To remove multiple columns at once, use the bulk select option, select the applicable rows, and delete them together.
5. Reorder Column Display
Click and drag the hamburger icon next to a column to change its display order.
Arrange columns in a logical sequence that supports easy data review.
6. Customize Column Labels
Click the pencil icon next to a column to edit its displayed name.
Custom labels allow you to create clearer, more user-friendly column headers for report readers.
7. Save Custom Labels
Enter the new label for the column.
Click the checkmark to save the change.
The original Data Source Field name remains visible in parentheses for reference during report setup, but it will not appear in the final report output.
8. Configure Date and Time Display, If Applicable
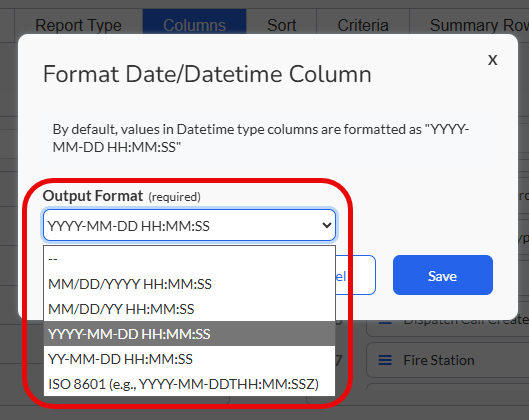
For Date/Time fields, open the column settings and select the preferred Date and Time Display Format.
Available formatting options may allow the column to display:
- Date only
- Time only
- Date and time together
The selected format applies to how the data appears on-screen and in exported reports. It does not change how the data is stored in the system.
9. Proceed to the Next Configuration Tab
Click Next to advance to the Sort tab and continue configuring the Ad-Hoc Report.
For additional column features please reference:
Ad-Hoc Reporting: Custom Columns
Ad-Hoc Reporting: Automatically Calculation Columns
Configurable Date and Time Display
Date/Time fields include additional display settings that allow users to control how date and time values appear in reports.
This setting improves readability by allowing users to format Date/Time columns based on the report’s purpose. For example, a report used for high-level trend analysis may only need the date, while a report used for event sequencing may need both the date and time.
Common examples include:
- Displaying only the incident date for monthly or annual trend review
- Displaying only the time for response interval analysis
- Displaying both date and time for incident activity timelines
- Using consistent date and time formatting across exported reports
The Date and Time Display Format affects display and export only. It does not change the original stored data.
Key Behaviors & Features
Columns Are Used for Tabular Reports
The Columns tab is only available when the report type is set to Tabular Report.
Selected Columns Control Report Output
Only fields moved into the active columns list will appear in the final report.
Custom Labels Improve Readability
Column labels can be renamed so report readers see clear, user-friendly headings.
Original Field Names Remain Available for Reference
When a custom label is added, the original field name remains visible in setup for reference.
Columns Can Be Reordered
Users can drag and drop columns into the order they should appear in the report.
Id Columns Can Create Links
Id-based columns may allow users to open the related record directly from the report.
Date/Time Fields Can Be Formatted
Date/Time columns can be configured to display date only, time only, or date and time together when available.
Best Practices
- Select only the columns necessary for the report’s purpose.
- Place identifying information, such as Incident ID or Record ID, near the beginning of the report.
- Arrange columns in a logical order, such as identifiers first, followed by dates, categories, status fields, and detail fields.
- Use clear custom labels that are easy for report readers to understand.
- Use hyperlink columns when users may need quick access to the source record.
- Configure Date/Time fields based on how the report will be reviewed or exported.
- Consider the audience when selecting and labeling columns.
- Test the column configuration with a small data set before generating large reports.
- Avoid adding excessive columns, as this may make reports difficult to read and slower to generate.
- Document column selections when creating standardized reports for recurring use.
Troubleshooting & FAQs
Why can’t I see the Columns tab?
The Columns tab is only available when the Report Type is set to Tabular Report. Summary Reports do not include a Columns tab.
Why are some data fields missing from the available columns list?
The available fields depend on the selected Data Source Configuration and the user’s permissions. Verify that the correct data source is selected and that the user has permission to access the underlying records.
Why aren’t my hyperlink columns working in the generated report?
Confirm that the correct Id column was selected and that the user has permission to access the linked records. If the issue continues, contact a system administrator.
Can I modify columns after the report is created?
Yes. Saved Ad-Hoc Reports can be edited to update column selections, labels, formatting, and ordering.
How many columns can I include in one report?
There is no strict limit provided, but reports with too many columns may be harder to read and may take longer to generate. Include only the columns needed for the report’s purpose.
Why does my custom label still show the original field name in setup?
The original Data Source Field name remains visible in parentheses for reference while configuring the report. The final report output displays the custom label.
Can I change how Date/Time fields display?
Yes. Date/Time fields can be configured using the Date and Time Display Format setting when available. This controls whether the report displays date only, time only, or both date and time.
Does changing the Date and Time Display Format change the stored data?
No. The format only changes how the value appears in the report and export. It does not change the data stored in the system.
Use Case Examples
Incident Review Report
Selected columns may include Incident ID, Incident Date, Incident Type, Station, Apparatus, and Disposition.
Use the Incident ID as a hyperlink column so users can open the incident directly from the report.
Incident Activity Timeline
Selected columns may include Incident ID, Activity Date/Time, Unit, Status, and Notes.
Configure the Date/Time field to display both date and time for detailed event sequencing.
Monthly Trend Report Export
Selected columns may include Incident Date, Station, Incident Type, and Response Zone.
Configure the Date/Time field to display date only for easier high-level trend review.
Administrative Compliance Report
Selected columns may include Record ID, Created Date, Completed Date, Assigned User, Status, and Review Notes.
Use custom labels to make the report easier for supervisors or administrators to review.